The title of this blog post is what many of us techie folks dream of - free reign to build your own home network! It might seem like a pretty geeky dream (ok, it is a pretty geeky dream), but the reality is that we're increasingly dependent on our home networks these days because of the amount of stuff we connect to them. That little consumer-grade combination modem and wireless access point your ISP gave you or the one you bought from the local PC store is going to struggle to provide fast, reliable connectivity across the house to all your devices; that very architecture predates smart phones, connected TVs and the (frankly ridiculous) array of IoT things we have spread all over the place. Think about it - one access point plugged into the most convenient location for the phone or cable line is precisely what we did 15 years ago and that just doesn't cut it today.
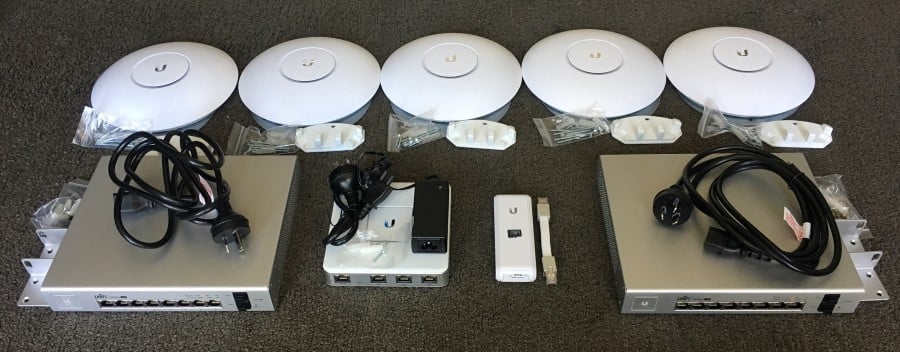
Last year, I'd finally had enough of my own dodgy wifi and decided to fix it with Ubiquiti gear (that's required reading before this post too, I'm going to refer to a lot of concepts already explained there). I went out and bought all the bits to extend wifi to every corner of the house and actually make it all reliable! I was fortunate enough that the house we're in already had ethernet wired throughout (albeit the slower Cat5e kind) and ports in every room so I bought a 5 pack of their UAP‑AC‑PRO access points and did this:
The results in terms of network behaviour were awesome: no more dead spots, no more dodgy speed, no more degradation of signal quality requiring a reboot, just rock-solid performance in a way that frankly, I've never needed to really even think about. The only downside to this whole model is the 5 dish-like access points sitting in view. I could mount them permanently in less obtrusive positions (they're presently just sitting next to ethernet jacks), but we're looking at a combination of wiring to be done and semi-permanent decisions to be made about where holes get drilled. Oh - the other downside is what the cupboard in my garage looks like. I'm going to show you a picture and I don't want you to flip out, ok? Alright, brace yourself:
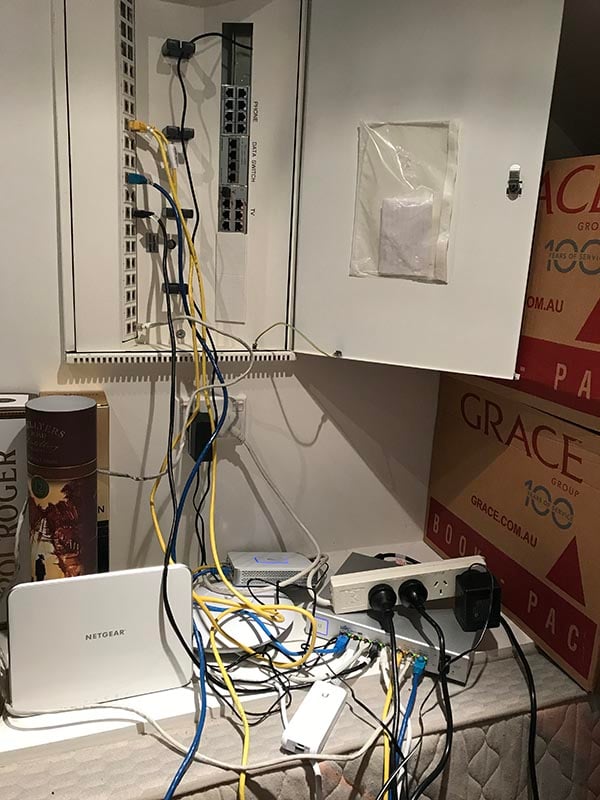
Now I'm sure there are many of you in a similar mess when it comes to cables under the desk or behind the TV or even with your own network setup, but I'm not real proud of this. Unfortunately, some design decisions made by whoever installed this when the house was built weren't real good:
- The switch and patch board aren't mounted in a standard 19-inch server rack
- There's no space to mount other peripherals such as the Netgear Arlo base station
- There's only 2 power points nearby hence the power board
- The switch embedded in the wall is only 10/100 and not gigabit hence the 8 port Ubiquiti switch
So whilst the mechanics of my network are functioning beautifully, it's not exactly how I'd do things if I was designing everything from ground up and that left me... wanting. Fortunately, I found a channel through which to vent my wanna-be-network-engineer inner self courtesy of my brother and his wife buying a new house. Actually, it was better than a new house because it was an old house they were renovating which meant a significant amount of internal work and plenty of scope to design a network properly. This is a place they'll probably be in for decades too so they wanted things done right.
Scott and Cathy are a pretty good example of a modern family with increasing connectivity needs. Scott runs the country's third-largest personal training business and Cathy is an Apple Distinguished Educator who does many similar things to me in terms of travel, speaking etc. They both work from home a lot, they both have multiple devices and they've got 2 young kids who are both increasingly demanding on the existing network connected devices (by which I primarily mean Netflix!) and of course will have their own multitude of connected devices before you know it.
The first design network decision was easy - in-wall access points:
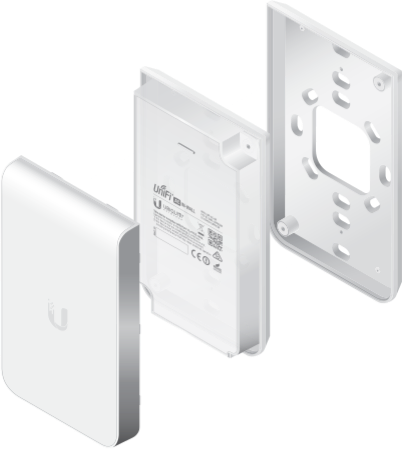
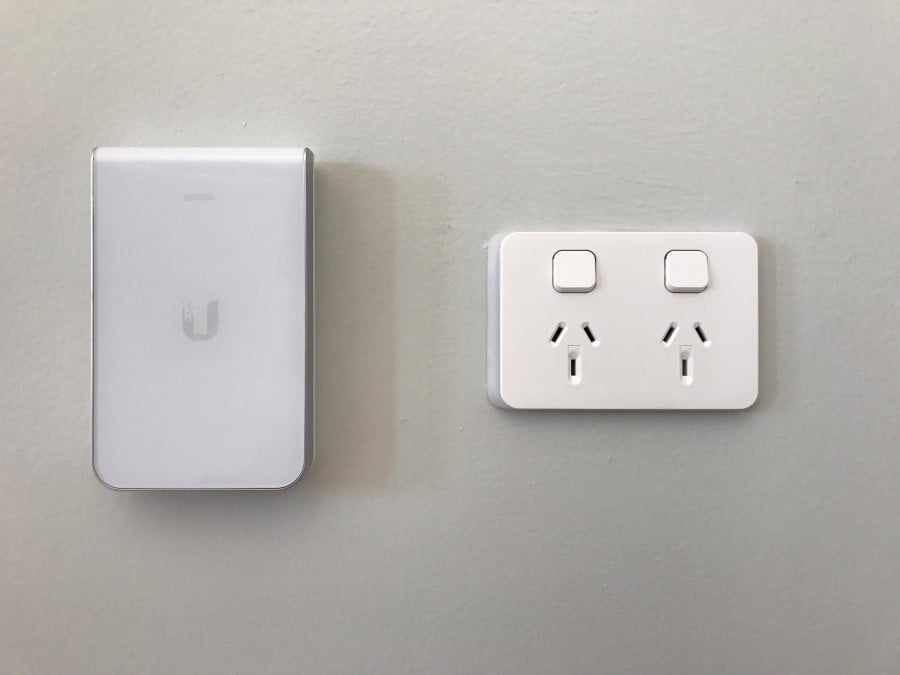
This is Ubiquiti's UAP‑IW and it's literally a wireless access point inside an ethernet outlet. What's awesome about this is that you're going to be putting these face plates in rooms you want ethernet run to anyway, doing it like this also satisfies the requirement for wifi so you don't need wall jacks and access points. What's less awesome though is that they don't do 5G and they don't do 802.11ac either so in other words, regardless of how cool they are, they're yesterday's wifi technology.
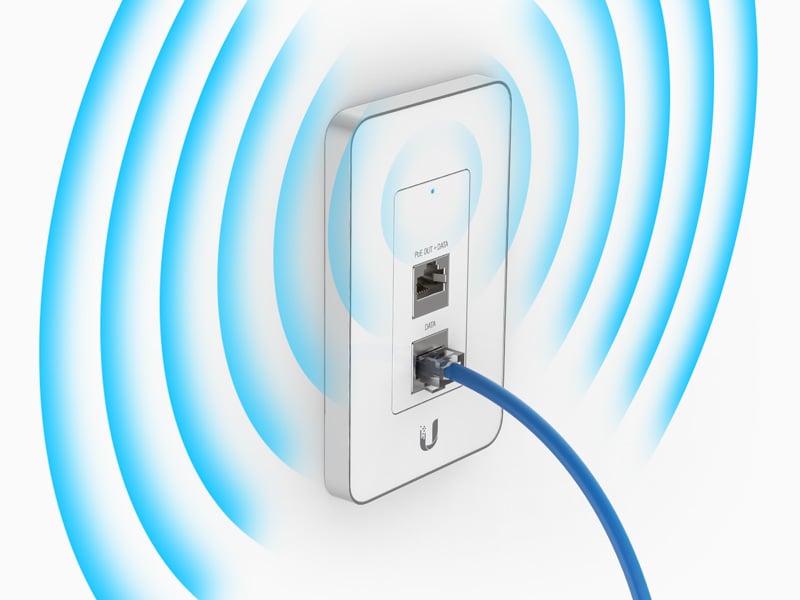
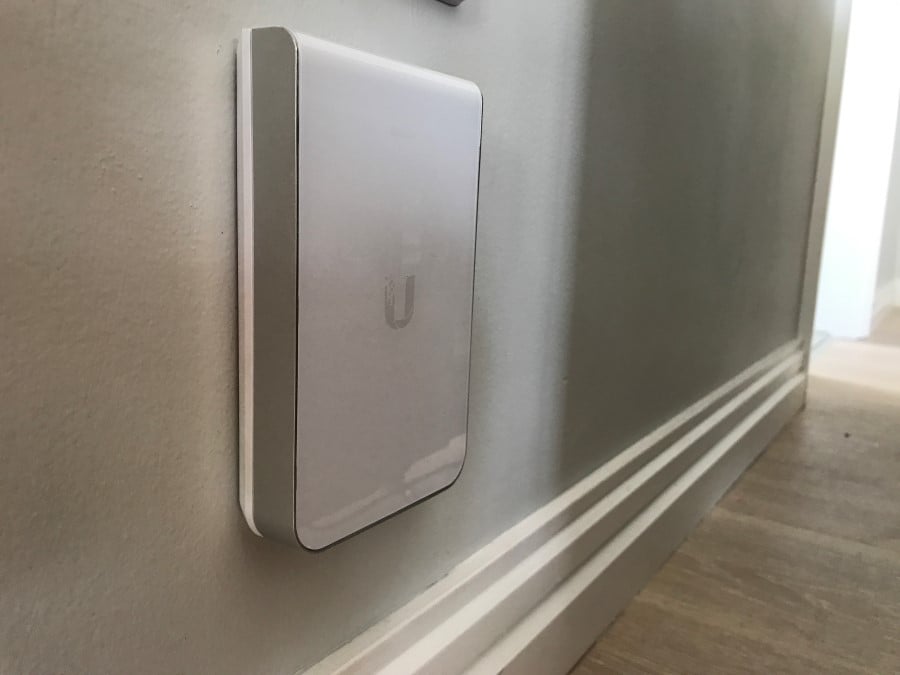
But there's a new one, and that's the UAP–AC–IW:
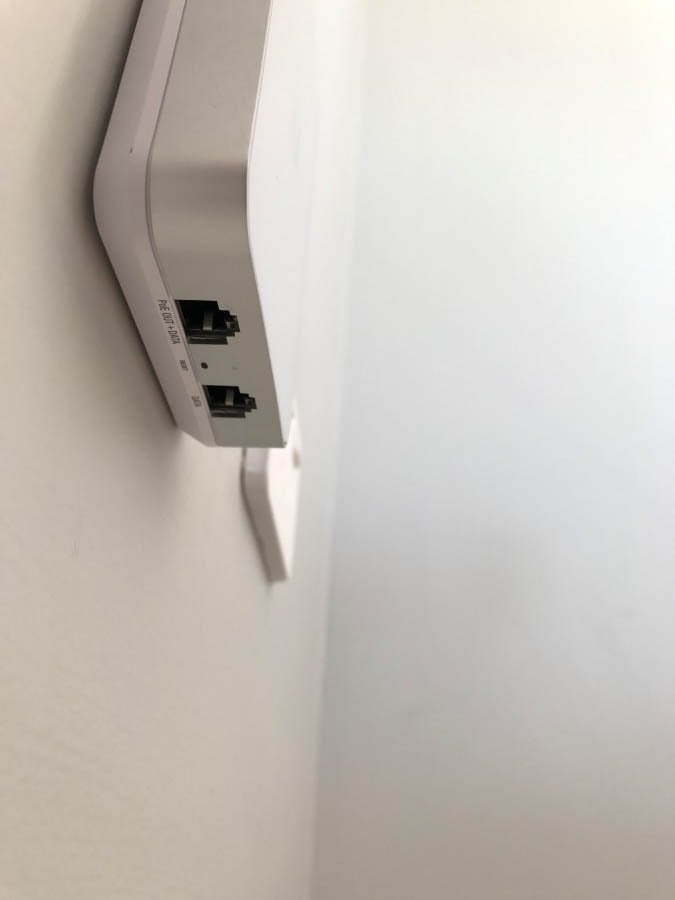
Physically, this is slightly different to the previous generation in that the jacks are at the bottom of the unit so the cables go straight down rather directly out into the room like most ethernet outlets. It looks like this underneath:
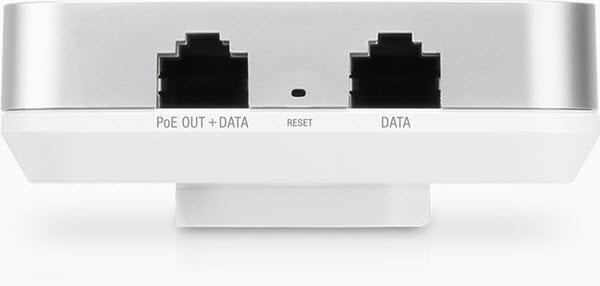
But more importantly, it can talk 5G and 802.11ac so in other words, it's a modern-day spec wifi access point. It's not quite as fast or has as long a range as the UAP-AC-PRO devices I put in my home, but it doesn't need to either when the scope of coverage is predominantly the room it's mounted in.
This was the perfect solution for wifi, only problem was... they hadn't been released. There was a lot of pre-release info around but they hadn't quite hit the market and Scott and Cathy were about to start making construction commitments that required devices we could wire in. I reached out to Ubiquiti and it turned out the delay was due to quality controls having not yet been fully met. Functionally they were perfect, but they weren't yet 100% happy with the fitment of the covers. But if I wasn't the fussy type, how many did I need and would I like them to send me over a box of near perfect ones for free? 7, and yes please :)

So that's my disclosure bit, I got my hands on the APs courtesy of a manufacturing shortcoming that frankly, I can't see. They look perfect to me and besides, they were going to be mounted and rarely touched anyway. With that sorted, the workers could start knocking holes in the right places and running Cat6 cabling:
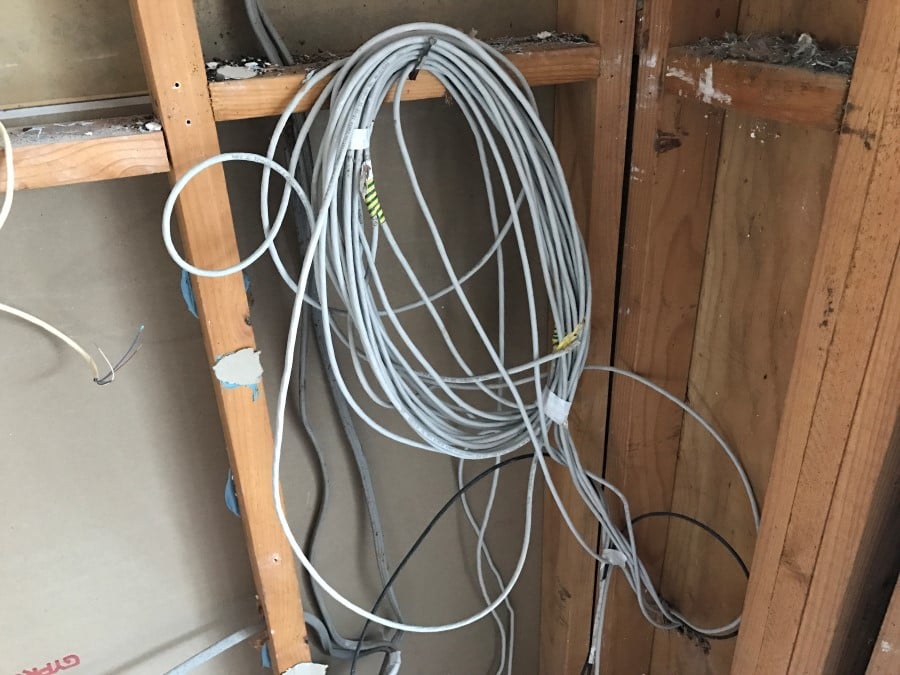
The benefits of Cat6 over 5e includes speeds of up to 10 Gbps rather than only 1 and an improved signal to noise ratio. Cost isn't much more and you're basically making a lifetime decision on cable quality here so 6 was a no brainer. Consequently, we ended up with a bunch of cabling run to one corner of the house:
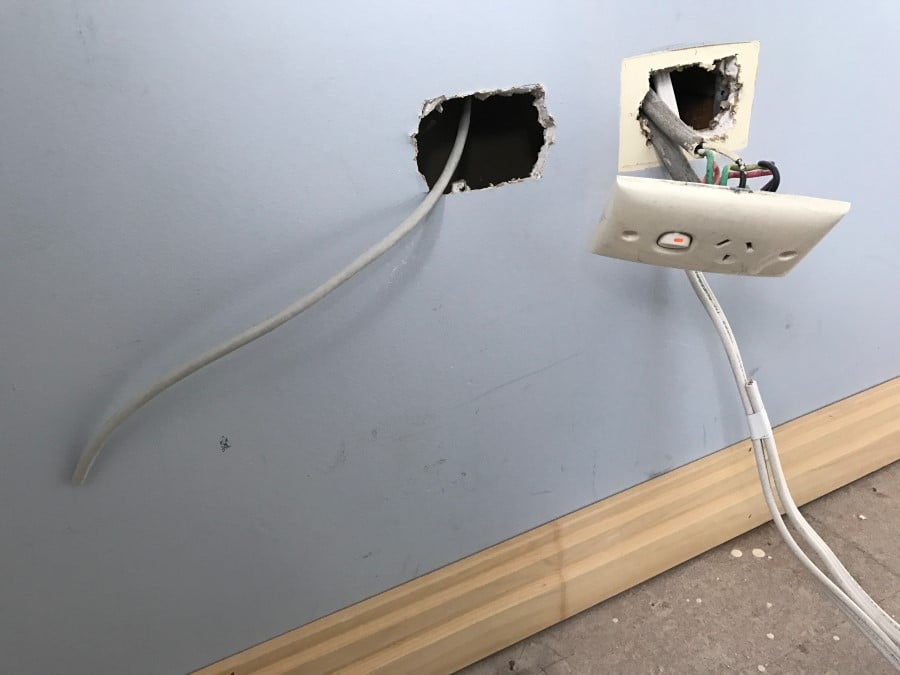
The wrong corner. Ultimately, all these cables needed to terminate at a patch board. That would sit alongside a switch. Ideally in a cabinet. In which we'd place other peripherals too. The electrician (in all his YOLO wisdom) had decided that placing all this stuff in the home office made sense. It didn't and the main reason for that is that this is stuff you rarely touch once it's set up. It's also stuff that may have audible fans too and by the time it's all put in a server cabinet (which I'll get to soon), it's going to take up a bit of space. Particularly because this was an older house with 1980s views on room sizes, space was important and it made absolutely no sense to unnecessarily chew up valuable bits of it in a location where it was at a premium.
I'd always wanted it out of the way in the garage or an otherwise non-premium location, preferably mounted up out of the way of everything else. Consequently, there was some arguing with the sparky followed by feet-stamping on his part and eventually acknowledgement that he ran the cables to wrong bloody place counter to instructions. So we got our way and it was re-run appropriately, but there's certainly a moral to the story here about not letting tradesmen make decisions like this and watching them like a hawk.
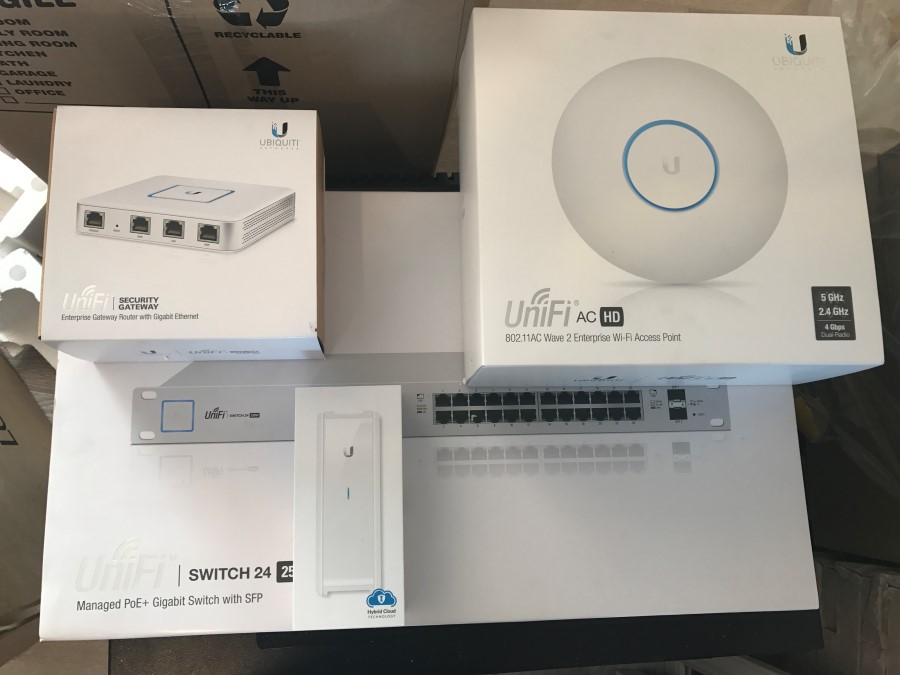
With that now under control, there were a bunch of other bits to order. I'm going to list everything here in one go because it will make it easy for others to replicate should they want to do the same build:
- 24 port Cat6 patch panel
- US-24-250W 24 port gigabit switch
- USG security gateway
- UC-CK Cloud Key
- 6RU wall mount server rack
- Pack of 10 x 25cm Cat6 patch cables
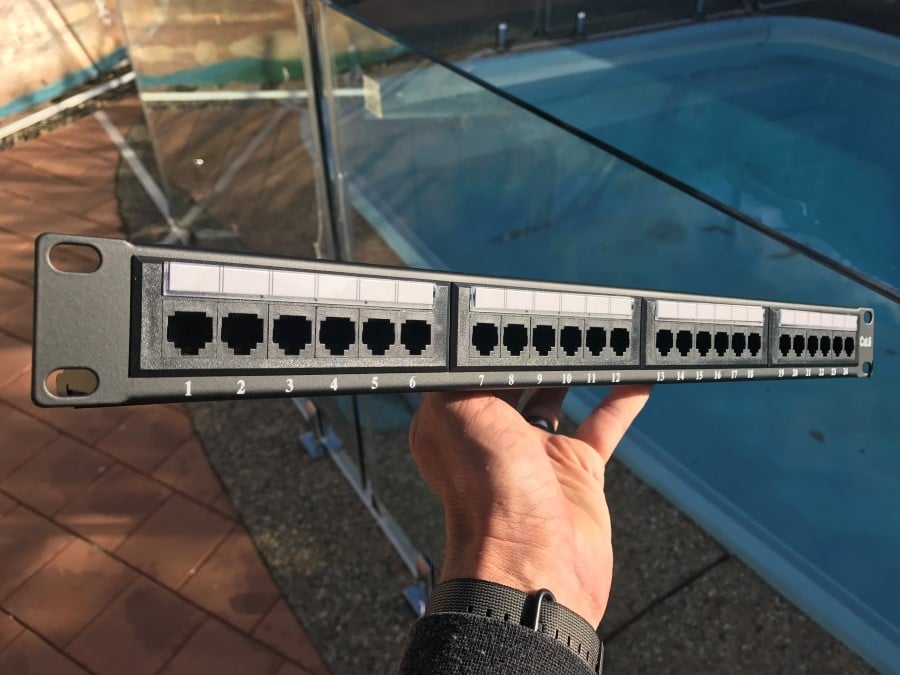
Let me explain the mechanics of these parts here for those who may not be familiar with all of this (that included Scott and Cathy too so there was a bit of education throughout this) and we'll start with the patch panel:
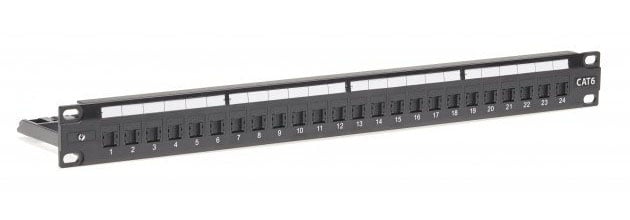
This is simply the other end of the cables that connect to each of those in-wall access points. It's a dumb unit in that it's not powered and it doesn't provide any form of communication, it's simply a row of female jacks. We didn't need 24 of them, but by the time you buy a unit that can mount in a rack it's that wide anyway, plus it was only a $95 purchase. (Also, all prices are Aussie dollars, multiple by about 75% for USD, 71% for EUR and 60% for GBP.)
Next up is the switch which is both the most essential and most expensive component of the whole setup:
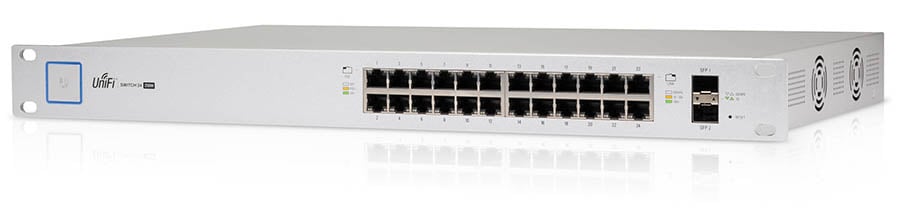
This is a US-24-250W and as the name suggests, there's 24 ports that'll enable everything to be networked up together. It's a "power over ethernet" switch (PoE) which means that each of those ports can send power down over the Cat6 so devices like the in-wall jobs don't need a local power socket. The relationship to the patch panel above is simply that after each room is hard wired into the panel, it's "patched" into the switch so you end up with a bunch of short cables from one to the other (I'll show what that ultimately looks like a little later on). Strictly speaking, we didn't need 24 ports and could have gotten away with 16, but even in the immediate term we were going to use 10 of them and I could conceive of future requirements getting us close to the 16 limit on the next model down. Besides, we're talking a difference of $175 (tax deductible dollars) which was easily justified.
I won't go into the purpose of the USG Security Gateway and Cloud Key here as I discussed them in detail in the previous post. Suffice to say that the former performs routing and firewall tasks whilst the latter contains the management software to configure the entire thing. You want both and cost wise they're a small part of the overall spend.
To tie everything in neatly together, we ended up getting a pretty generic 6RU cabinet from Data World for $150:
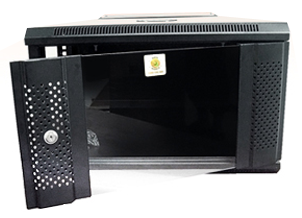
I was undecided as to whether we should go that direction or a similar offering for nearly twice the price as I frankly wasn't sure about the quality. But having now seen it, it's absolutely fine. I can see where extra money could go (such as the quality of the hinges which make the door sag a little), but there's certainly no regrets. We went for a 6RU (rack units, or how many standard height rack items it can fit) rather than 4 because we need 1 for the patch panel, 1 for the switch and then plenty of room to sit other devices such as the modem and other networking bits. Here's what it looked like once it arrived:
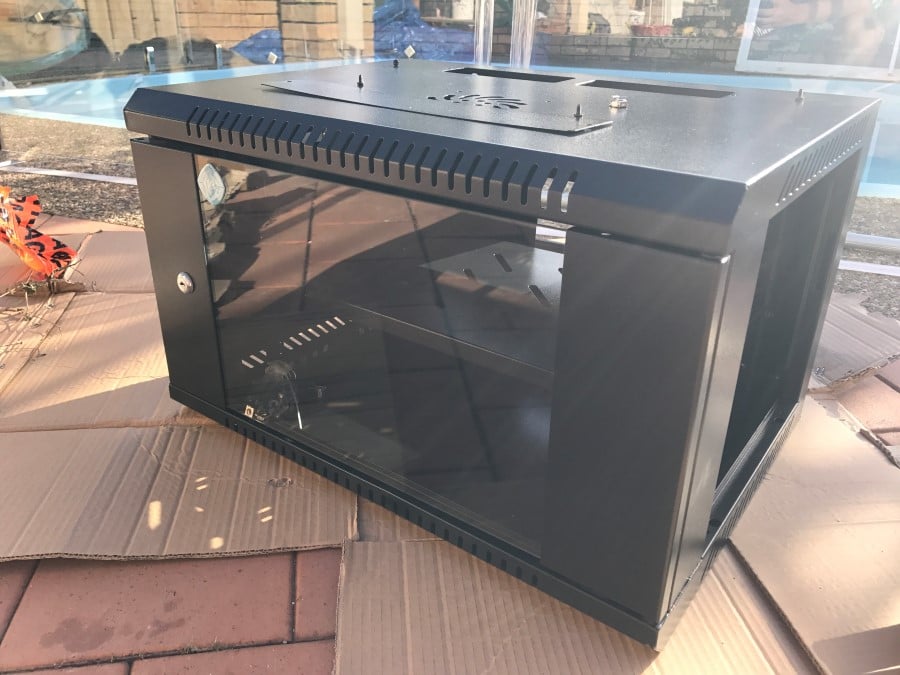
And whilst sitting out by the pool opening goodies, here's how the patch panel came out:
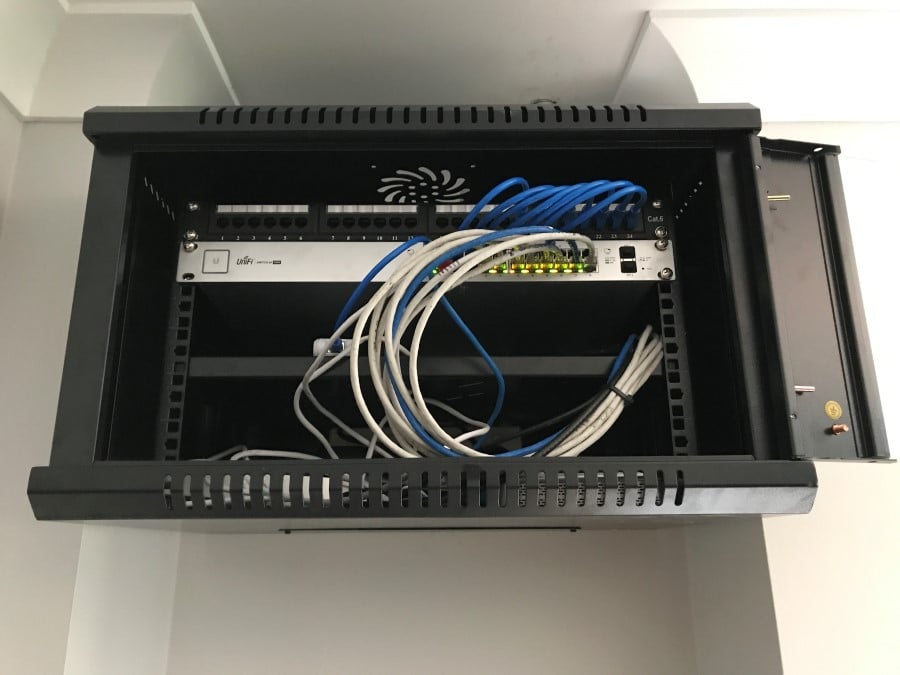
It's hard building a network in a construction zone whilst trying to keep the dust out so I assembled the cabinet and patch panel outside then moved in with the box of Ubiquiti goodies:
You'll also see there's a UAP‑AC‑HD sitting on top. Ubiquity recently sent me over a few of these to try and they're the big brother to the UAP‑AC‑PRO devices I have in my own home (that's also the only other disclosure here - everything else was paid for by Scott and Cathy). They'll support 500+ users which oughta do it! But it also gave us an easy way of getting everything set up in the one place given the in-wall units were spread around the house and the patch panel wasn't yet wired.
Before starting to add hefty bits to the cabinet, we did a quick placement test:
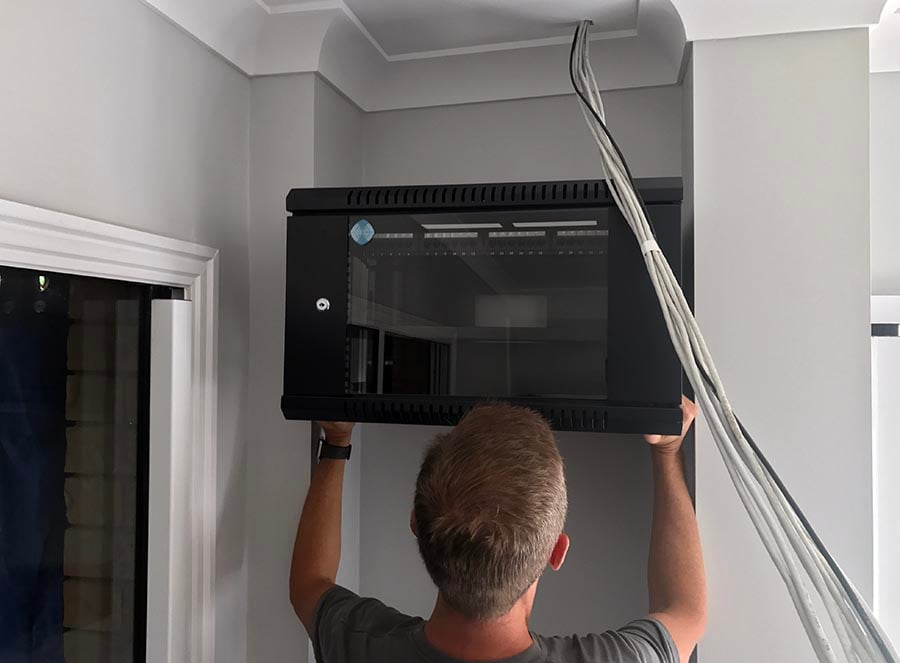
This is such a good spot for it - it's up out of the way in the room that'll be used as a gym so a bit of fan noise is ok and it fits just perfectly in that gap. It could go high whilst being easily accessible with a stool yet still have sufficient room for airflow above and provide plenty of room underneath for shelving. And everything that needed to go in that unit could easily fit, so that's what I did next:
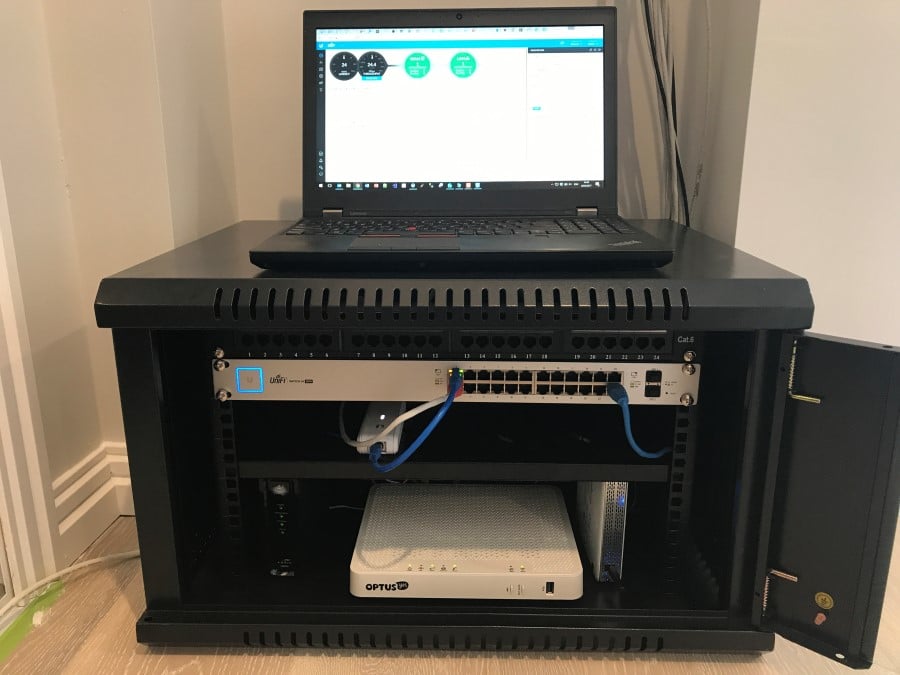
About here, I started getting a bit jealous because this is looking very nice! The shelf in the rack is perfect for resting the Cloud Key on and we've got the NBN modem (Australia's new National Broadband Network) sitting bottom left, Optus' access point in the middle (they're the ISP and the device apparently also provides phone connectivity) and the security gateway on the right. The UAP‑AC‑HD access point is sitting out of sight and wired into the bottom right port of the switch. And that's how I left it, waiting for the cabinet to be mounted on the wall (it comes with the required brackets), the mass of cables you see in the background to be patched in and power outlets to be installed on the wall behind it and routed into the cabinet. I left all the patch leads in place to make it crystal clear which ports I'd like wired in to keep everything neat:
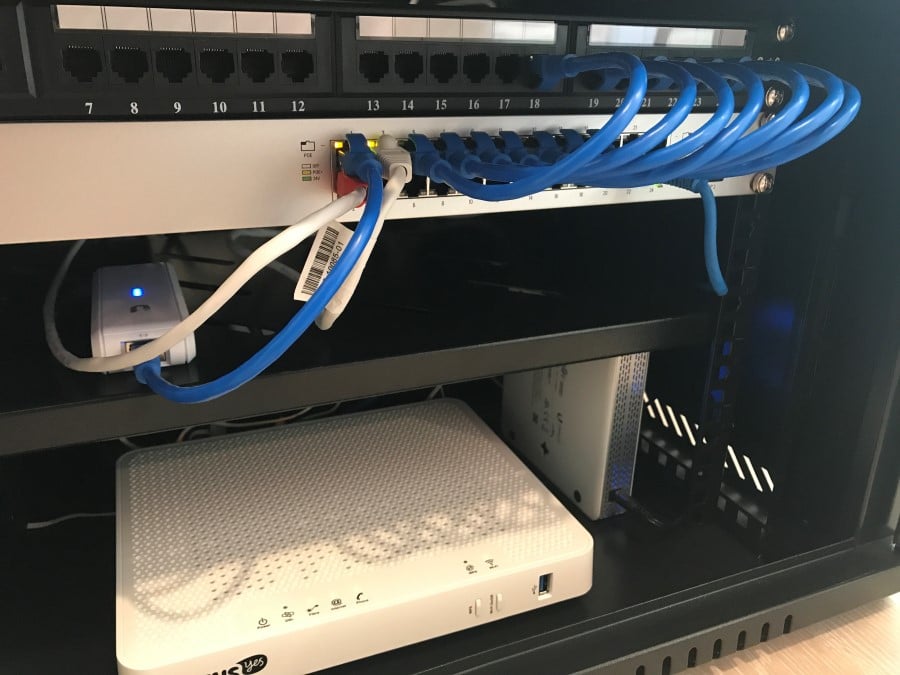
I mentioned the electrician was a bit unreliable, right? A week later things still weren't patched but the cabinet had been mounted so I headed back over to take a look. I realised that all the Cat6 cables actually had RJ45s installed on them anyway (which is pointless when they should be wired into the patch panel) so whilst it wasn't going to be pretty, I could wire the whole thing in and then setup the in-wall units. Here's how it now looked:
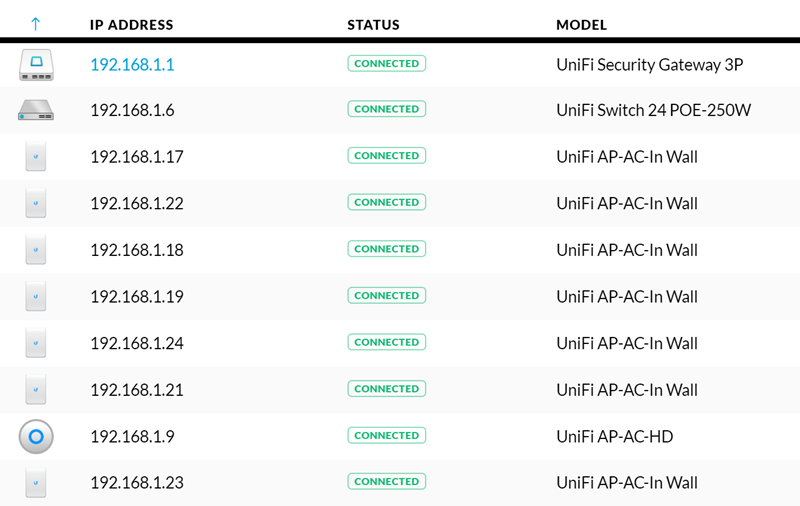
Then it was just a matter of adopting each of the access points. This is ridiculously simple: plug it in, go to the list of devices in the management interface served by the Cloud Key and click "adopt" next to each one. Same for upgrades because there was new firmware available so a quick update on those and everything was connected:
Because they all inherit the existing wifi settings I configured for use with the UAP‑AC‑HD, as soon as the adopted clients around the house begin connecting, it makes for a very pretty picture:
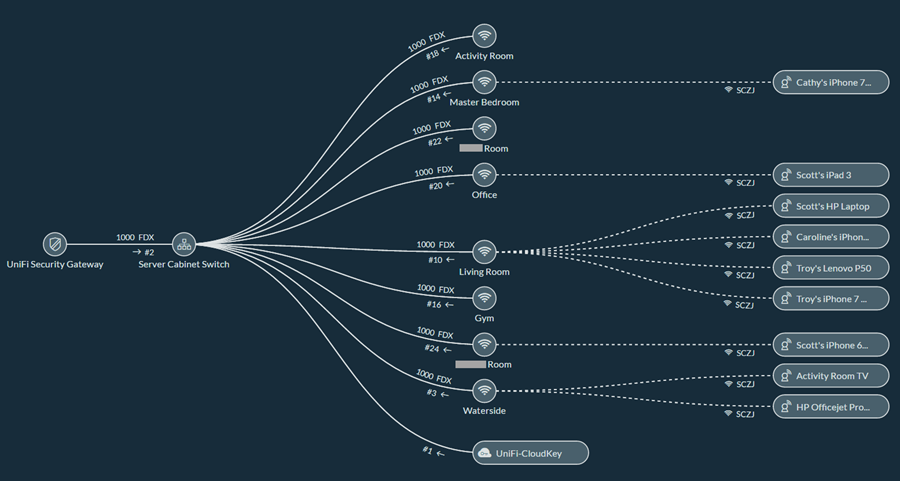
You'll see these are all named in a friendly: there's a "locate" feature on each access point which causes the light on it to flash when triggered by the management interface so we figured out which was which then put a logical name on it (APs in the kids' rooms have their names obfuscated for their privacy). We also named each client on the network which is why you see things like "Troy's Lenovo P50". This is great for troubleshooting, identifying which client is sucking down the most data or simply stalking who's coming and going (it's all logged). It also means you can make really cool maps like this:
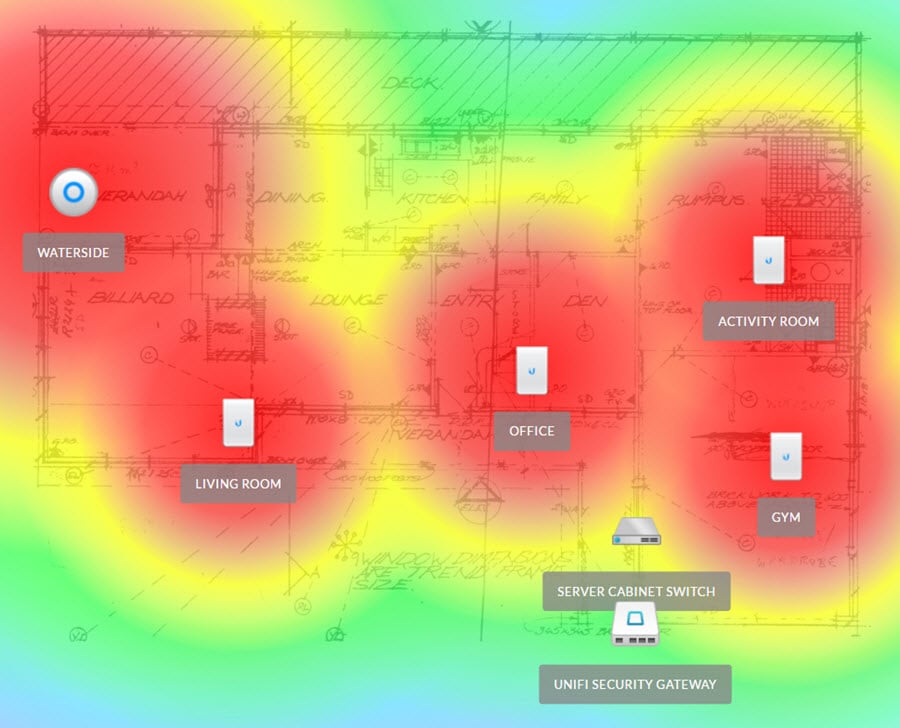

This is the original 1983 floor plan loaded into Ubiquiti's management interface then each access point is dropped in place. When you load in a map, you can drag a line between two points then tell it how long that distance is so that the range of each AP can be plotted appropriately. The UAP‑AC‑HD we named "Waterside" (every time I see this I can't help but think they really need a water slide...) is the UAP‑AC‑HD so it has a greater range than the in-wall units. (This unit isn't yet mounted in the indicated location, we're still waiting on the electrician to run another Cat6 line.) Based on this diagram, signal strength is weakest around the deck area in the first picture but this is also plotted against the 5G signal which whilst faster, has less range. Here's the same map with the 2.4G spectrum instead:
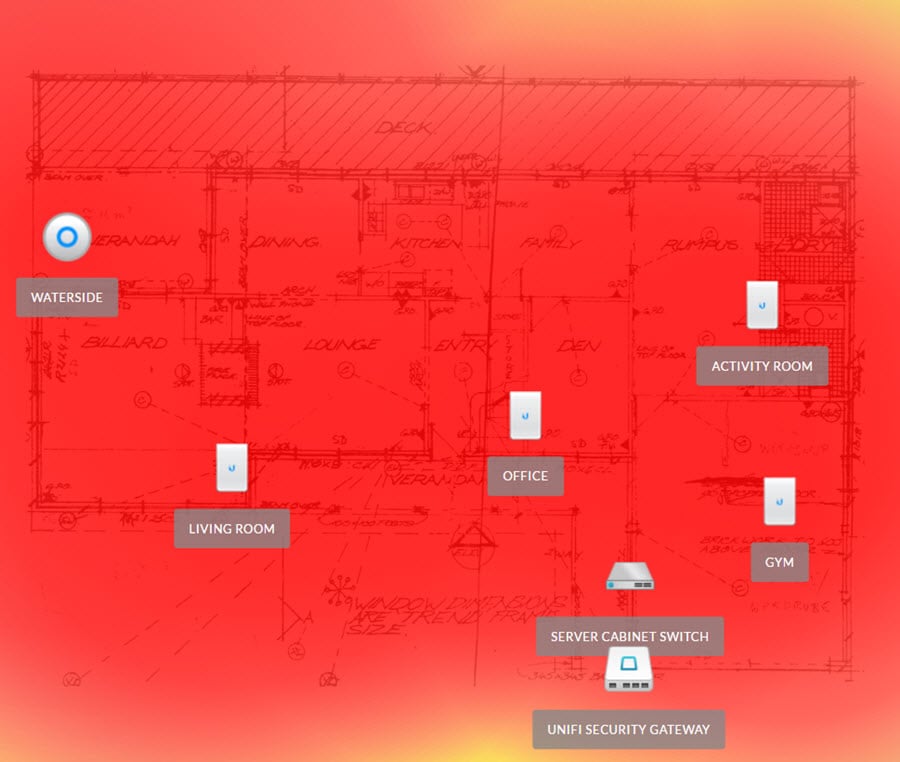
Devices can switch between either spectrum so the bottom line here is that there's more than enough coverage everywhere. Of course there are many other variables such as the walls and floors the devices need to pass through, their construction, other radio interference and so on, but this gives you a pretty good idea of things.
Finally, let me show you what the in-wall access points look like fitted in the painted house because I suspect that's what will really get a lot of people thinking differently about their home network. Here's a good sample set:
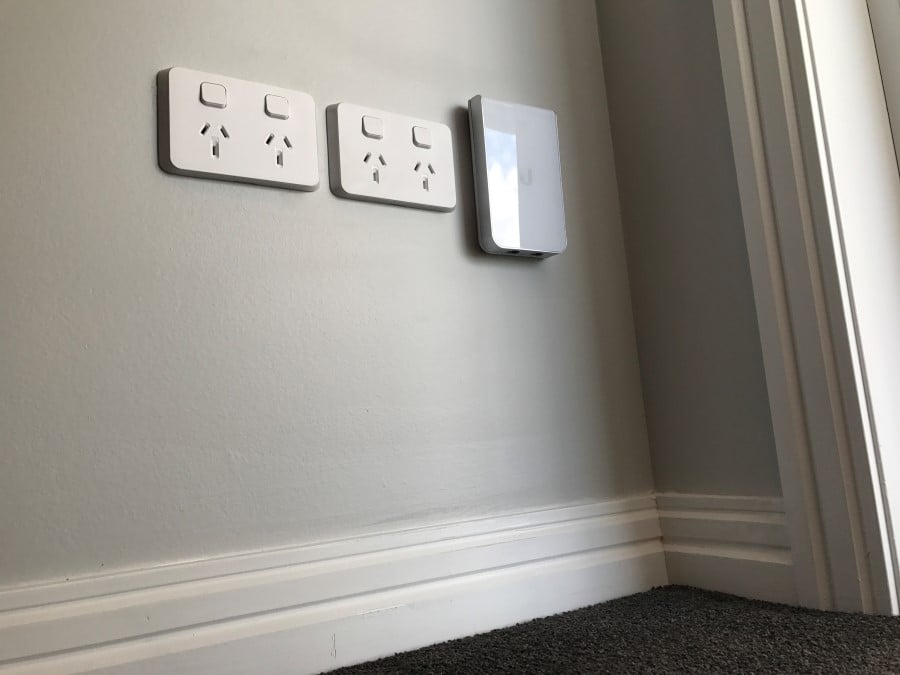
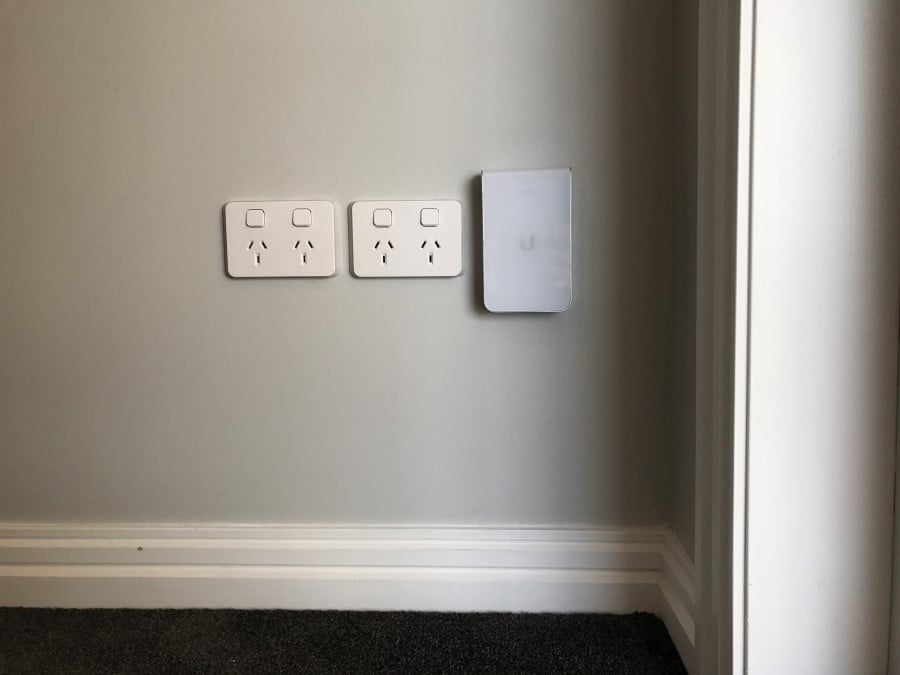
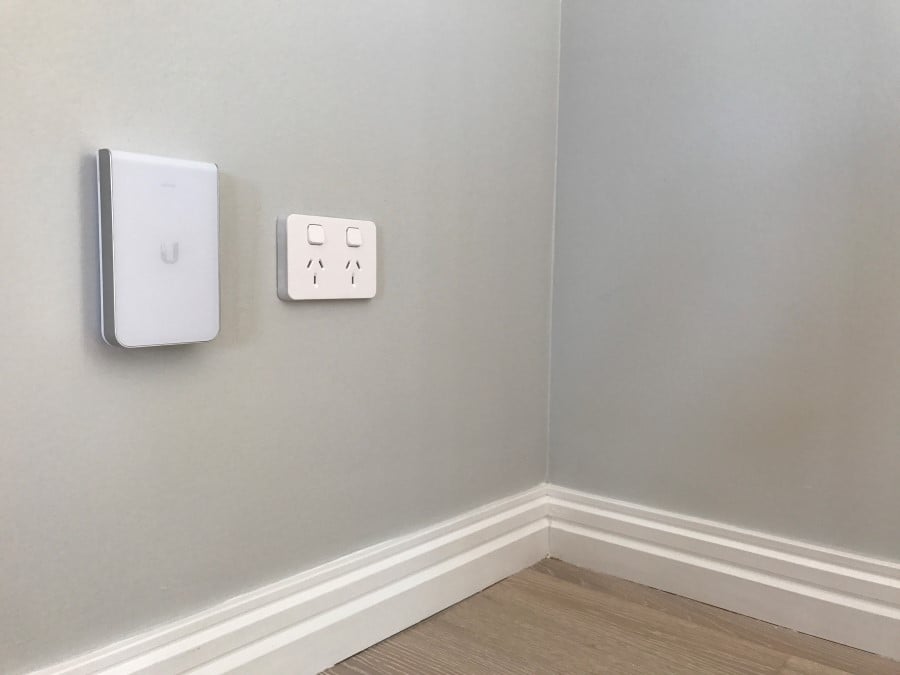
I think that's a sensational outcome! Each unit is really well integrated with the room and blends in well with the existing power outlets, not to mention the colour scheme. They're slim enough and stylish enough that unlike the UAP‑AC‑PRO units I have scattered around my house, they actually feel like a part of the place. For the folks concerned that their non-tech-significant-other isn't real keen on the larger units like I have messing up the room's aesthetics, this absolutely nails it on the design front.
There was only one issue I ran into during the entire build and it was when I went back to setup the in-wall units after the cabinet had been mounted on the wall. I'd set everything up perfectly earlier on - it was glorious - but when I came back, the management interface was dead. The power had been pulled during installation (who knows how many times) and long story short, the Cloud Key wouldn't boot and I couldn't access the admin interface. I struggled with it for probably 20 minutes then decided to cut my losses and factory reset it with an expectation of having to spend another 20 minutes setting it all up again. But as soon as it booted, I was presented with the following:
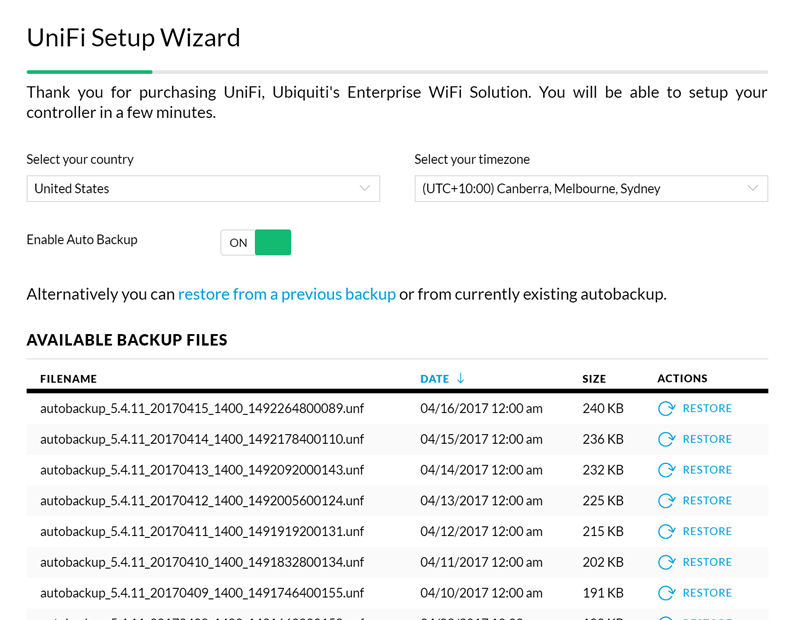
I'd enabled automatic backups to the local micro SD card in the Cloud Key so once a day, the entire configuration was saved. When the device booted after factory reset, it allowed me to simply grab the latest backup and it was job done. That's pretty cool.
I'll finish this post where I started the first one I wrote about Ubiquiti:
I'm increasingly of the view that both my time and my sanity are worth more and more as the years progress
A new (or renovated) house is like a blank canvas when it comes to designing a network that helps you keep your sanity. We're so increasingly dependent on connectivity for work and play alike be that via PCs, mobile devices or the IoT stuff we could barely conceive of even a few short years ago. If you're in the same boat as Scott and Cathy, take the time to design a home network upfront and get it done right. It's too early to give a full review of what it's all like to use day by day but based on everything above I reckon it's a pretty fair assumption to say that they'll never even think about it, which is exactly how a home network should work!