| << Part 2: MSBuild and deployable packages | Part 4: Continuous builds with TeamCity >> |
In the first two parts of this series we got config transforms working and the web app successfully bundled into a nice self-contained deployable package. Next up: get the thing to publish.
For the most part, the vast majority of web app deployment has historically been done by pushing the entire site out over either UNC or FTP, a practice which has a series of fundamental shortcomings that set deployment up for potential failure. To begin with, by default neither protocol is encrypted. Yes, there’s SFTP and FTPS but it’s not often you see these applied, particularly not as a standard offering by hosting providers. Remember, your connection strings and other potentially sensitive information (beyond just the code!), is being sent across the wire in plain text.
Then there’s the issue of the content; an awful lot of web content is bloated HTML, CSS, images and JS files. Pushing it all out on every publish is a very time consuming exercise when in reality, most deployments beyond the first one usually only include small change sets.
Finally, the traditional tools available for publishing via these channels tend to only push files out, they don’t remove files from the target. Refactor your app to change the file structure and publish via the traditional way and there’s a very good chance you’re going to end up with a whole bunch of rogue files in the target that simply shouldn’t be there anymore.
So the old way of doing things is usually insecure, very slow and frequently leaves the target website in a mismatched, Frankenstein kind of state of different versions. None of this is very desirable!
Web Deploy
This is where Web Deploy comes in. This technology goes well beyond just copying over web content; it facilitates synchronisation between sites (not just publishing new content but also deleting redundant content from the target), replicating IIS configurations, configuring certificates, setting up ACLs and on top of all that, making a provider model available to extend the behaviour.
Web Deploy has integration points with a number of familiar tools. The Microsoft Web Platform Installer for one, but more importantly in the context of this post, it integrates with the IIS and Visual Studio 2010. It’s also accessible via the command line with the MSDeploy command which is what we’re going to use to get the package we created earlier onto our web server in an automated fashion.
Now for the bad news; when it comes to Web Deploy, IIS6 is not exactly a first class citizen. Then again, IIS6 is now almost three years out of date so I guess it’s understandable that there’s a degree of compromise. As it turns out, a lot of the work I’ve been doing with Web Deploy has been constrained to IIS6 by virtue of the infrastructure I’m using being Windows Server 2003. However, I’m also running a virtual machine complete with Windows Server 2008 and IIS7 so to try and keep everyone happy I’ll divide any version specific information into two parts.
Installation and configuration
First up, get the installer from the Web Deployment Tool Installation page on TechNet. If you want a really clear step-by-step guide on how to get this running, go take a look at Scott Gu’s Automating Deployment with Microsoft Web Deploy. Now let’s look at where we start diverging based on IIS version:
| For IIS6, Web Deploy activities are constrained to using the Web Deployment Agent Service (MsDepSvc). After installation you’ll see this appear as a service on the machine but it won’t be running, nor is it set to run automatically. Go on into the services on the machine, set it to start automatically and then start it running. The big drawback with MsDepSvc is that you need admin rights (i.e. be a member of the Administrators group on the server) to use it. | In IIS7, we can jump straight over to the Web Management Service (WMSvc) and make use of the IIS7 Deployment Handler. This one also won’t be running automatically so fire it up and ensure it starts when the machine does in future. The big gain over IIS6 here is that WMSvc can be configured for non-administrators to deploy to. Obviously this makes a lot of sense, particularly when you consider shared hosting arrangements. |
One little sidenote on versions; you still get the Web Deployment Agent Service in IIS7:
![]()
You can use it in place of the Web Management Service but given the security model around deployment by administrators only, I imagine there aren’t many use cases for its existence in the newer web server.
Deploying from Visual Studio 2010 via Web Deploy
Let’s get on with actually deploying something. For this series of posts, I’ve set up a Windows Server 2008 Virtual PC running IIS as I mentioned earlier but it’s also running VisualSVN Server and JetBrains TeamCity. The name of the machine is “AutoDeploy” so you’re going to see this name pop up a bit in screen grabs and code samples.
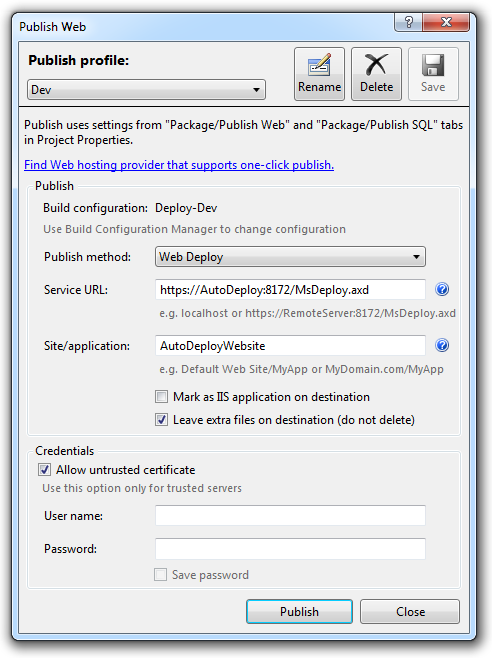
Right, let’s go back to the app we published locally to the file system in part 1 and right click the web project and choose “Publish…” but this time, I’ll change the publish method to “Web Deploy”. The Service URL is the endpoint made available by Web Deploy and it will differ depending on your version of IIS:
 |  |
| The Web Deployment Agent endpoint is: http://AutoDeploy/MsDeployAgentService This is obviously just a plain HTTP path with no TLS and accessed over the default HTTP port 80. | The IIS Deployment Handler endpoint is: https://AutoDeploy:8172/MsDeploy.axd You’ll want to allow untrusted certificates unless you have a legitimate one installed on the target machine. |
For either server, the site/application name is the one you specify when creating the IIS website. It looks a little different in II6 and IIS7 but conceptually it’s the same thing. Here’s what I’m seeing in my VPC when I create the site:

In this case my site name is “AutoDeployWebsite”. I’ll plug this into the publishing page in Visual Studio 2010 along with the other configurations described above and here’s what we end up with:
Click the “Publish” button and we should be away. Visual Studio may ask for authentication before going any further. For the sake of simplicity, I’m just going to authenticate as the administrator. Obviously that’s the only option you have with IIS6 anyway (or at least an account in the administrators group), but for IIS7, take a look at the IIS website post on Configure the Web Deployment Handler.
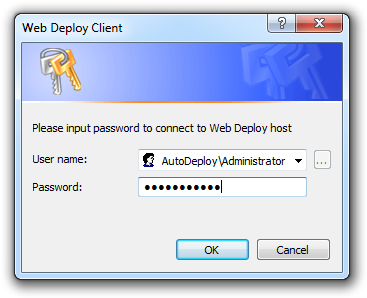
Interestingly, if you don’t enter any credentials when challenged then Visual Studio will try and use NTML instead of basic auth. Frankly, I find this very unintuitive and downright confusing. People are used to providing credentials when challenged and for this to imply falling back to basic auth is a bit unexpected.
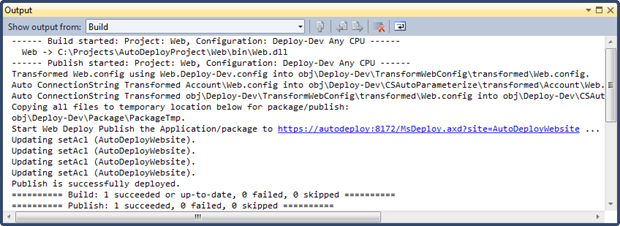
After a little bit of thinking time, you should see the output window return some meaningful results:
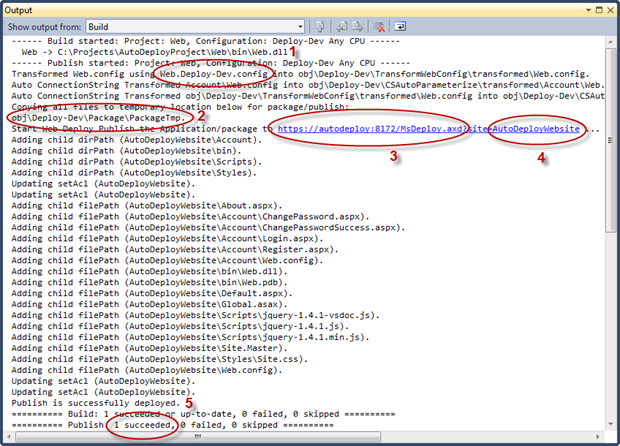
This should include:
- The config transform applied to the project
- The location of the successfully packaged project
- The service URL for MsDepSvc (IIS6) or WMSvc (IIS7)
- The name of the website in IIS
- The result of the deploy which should (hopefully) be successful
Now we’ll take a quick look at the website and make sure everything seems normal. This is just a plain old ASP.NET web application so it should be familiar to you. As we saw earlier on, I’ve stood it up on port 90 so let’s go ahead and see what’s there:
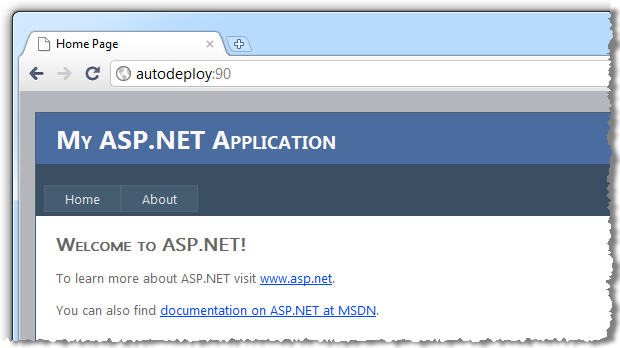
So there we have it, successful deployment via Web Deploy!
Publishing only changes
Let’s run that exact same publish process again and inspect the build output results:
See that? Where are all the files we saw in the previous deployment?! It turns out Web Deploy is a bit more intelligent than a mere copy and paste. Here’s how Scott Gu explains it:
Web Deploy is smart enough to compare the remote server with your local project – and only copy the files it needs to. So if you make a quick few changes to a large project, and then re-publish again – only those files that changed will be copied over. The files that weren’t updated won’t need to be copied again. This makes re-deploying/updating a site much faster – especially when there is a lot of static content and large images in the project.
So this is an extremely network-friendly means of publishing. Not only does this practice greatly reduce the total duration of a publish, but by extension it also means the window of downtime for the application is minimised. It also means you can be confident that the target website is going to look exactly like what’s in your package. Predictability rules!
Deploying from the command line with MSDeploy
Now that we know the config transforms are working beautifully, the app is getting packaged and Web Deploy is running in the target, we need to get deployment happening from the command line. Just as I explained back when I talked about MSBuild, the deployment process needs to occur unattended once we get to the build sever so it’s time to go back to the command line.
Say hello to msdeploy.exe. After running the same Web Deploy installer used further up for the server, you’ll find this little guy sitting down in C:\Program Files\IIS\Microsoft Web Deploy (or Program Files (x86) for us 64 bit folks). This is the command that’s going to help us get the package published.
Actually, that’s only partially correct because there’s an abstraction to MSDeploy which makes things a little easier. Back in part 2 when we published the app locally, a number of files were created in the obj/Deploy-Dev/Package folder including one called Web.deploy.cmd. As explained in the link, this command file can be used to install the package in-process on the local server or install it remotely using either MsDepSvc or WMSvc.
But before we do that, there’s one more configuration we want to make to the web application. Let’s open up the project properties, select the build configuration for Deploy-Dev and then enter the IIS website:
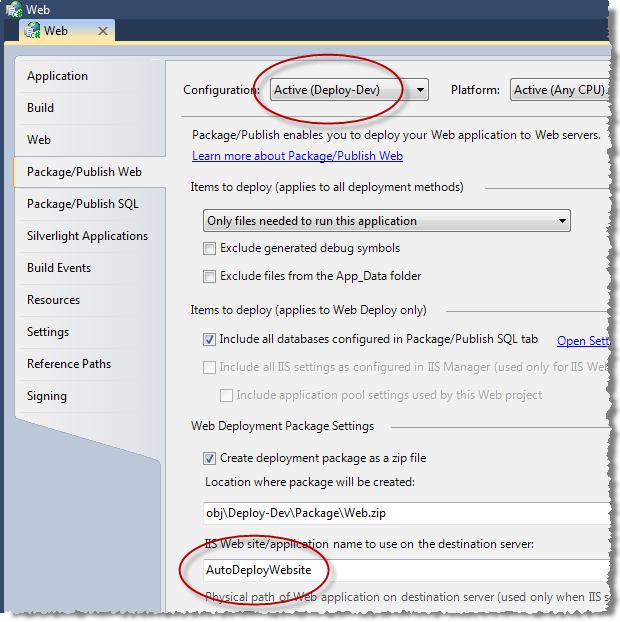
The reason we need this is that it’s used in the SetParameters.xml file we looked at earlier when the package is created, the one which defined the connection string for the target environment. In fact the IIS website gets published into its own setParameter node just above the connection string when you next create a package from the app:
<setParameter name="IIS Web Application Name" value="AutoDeployWebsite" />
<setParameter name="AutoDeployDb-Web.config Connection String...
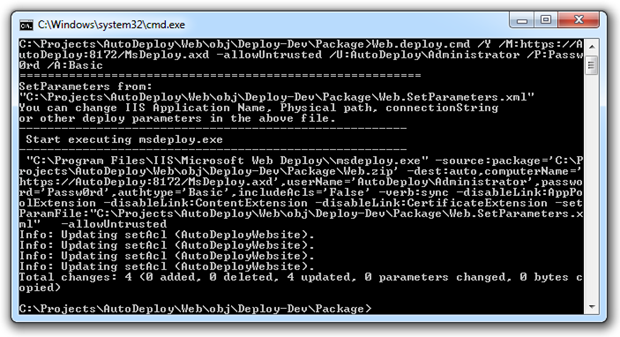
Moving back to Web.deploy.cmd, we’re going to call it with the bare minimum of parameters so it will look like this:
Web.deploy.cmd
  /Y
  /M:https://AutoDeploy:8172/MsDeploy.axd
  -allowUntrusted
  /U:AutoDeploy\Administrator
  /P:Passw0rd
  /A:Basic
There are 5 important parts to this command:
- The /Y switch which calls MSDeploy without the “-whatif” flag. We don’t want a report on what will be changed by the operation, we just want to do it.
- The /M switch is obviously the destination we’re publishing to.
- The –allowUntrusted switch is the equivalent of checking the “Allow untrusted certificate” box in the Visual Studio publish dialog earlier on.
- The /U and /P switches are clearly the credentials required to access Web Deploy. In the IIS7 world you wouldn’t want to use an administration account but this makes for an easy demo.
- The /A switch is one that actually caused me quite a bit pain for about a day there. The thing is, without this – which is obviously setting the authentication to “Basic” – your plain text credentials aren’t going to be authenticated (there’s another cry for help on Stack Overflow). One of the reasons this threw me is that I’d been happily deploying to IIS6 via MsDepSvc and even IIS7 with an almost identical syntax for quite some time and didn’t have a problem. Obviously WMSvc just handles things a little differently.
When the command runs, the output shows how this is really just a wrapper for MSDeploy (you can see msdeploy.exe being called on line 12 below) which then adds a whole series of other parameters. The rest of the output is pretty reminiscent of what we saw from Visual Studio:
However, there is one thing worth pointing out that’s actually kind of fundamental to the principle of the entire application being deployable from scratch using this command and that’s the “0 deleted” message. Watch what happens when I create an arbitrary text file on the target website then run the same deployment comment again:
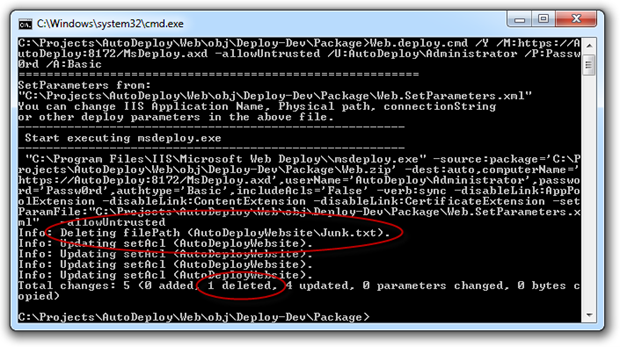
See that? The “Junk.txt” file I created is now gone. Conceptually, this is important because it means that every single time you deploy the website it’s going to be in the same state as the last deploy, regardless of the files accumulated on the web server since the last one. Obviously you want to ensure your app is structured such that you’re not going to lose data you shouldn’t. Predictability, predictability, predictability.
Incidentally, you can (and really should) always deselect the “Leave extra files in destination (do not delete)” checkbox in the Visual Studio publish window to achieve the same thing, it’s just already checked by default whereas the command line operates in the reverse and will delete extra files by default. The IDE is kind of the predictability anti-pattern by default!
The incredible all-in-one build, package and deploy command
I say “incredible” because frankly, I didn’t think I’d get this working and when you see the idiosyncrasy in its implementation, you’ll understand why. In writing this blog series I’ve been going between ensuring everything runs against the VPC with IIS7 which is not joined to an AD domain and needs to be authenticated to from outside via basic authentication and ensuring everything plays nice in a more formal environment with AD and NTML integrated authentication but running IIS6. There’s nothing worse than reading code samples which work great in a conceptual context then fall to pieces when you introduce them to the real world!
Let’s go back to MSBuild for a moment and we’ll reconstruct the command to build, package and deploy:
msbuild Web.csproj
  /P:Configuration=Deploy-Dev
  /P:DeployOnBuild=True
  /P:DeployTarget=MSDeployPublish
  /P:MsDeployServiceUrl=https://AutoDeploy:8172/MsDeploy.axd
  /P:AllowUntrustedCertificate=True
  /P:MSDeployPublishMethod=WMSvc
  /P:CreatePackageOnPublish=True
  /P:UserName=AutoDeploy\Administrator
  /P:Password=Passw0rd
Based on what we’ve covered in this post already, this should be mostly self-explanatory. The same command can be happily run against MsDepSvc by using the appropriate service URL and exchanging the MSDeployPublishMethod value from “WMSvc” to “RemoteAgent”.
The difficultly I had which almost put the brakes on this in the integrated auth world was that I simply couldn’t get it to work over NTML. Back to Stack Overflow again and it turns out that dropping the username and password alone and even explicitly specifying the auth type as NTML won’t achieve anything. In the end, the solution was as simple as passing the username parameter with no value. Go figure!
So that’s it for the command line, we can now script the build, package and deployment which sets us up very nicely for automation.
Support for Web Deploy
Just one more thing before wrapping up part 3; how prevalent is Web Deploy? This is fairly new age technology, so what’s the Web Deploy support like from hosting providers? It’s actually pretty good with many of them making it available in their standard offerings. For example, there’s WinHost:
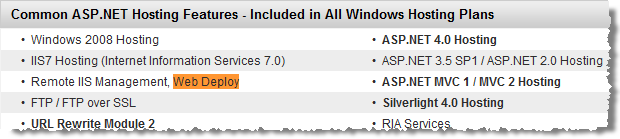
And Discount ASP.NET:
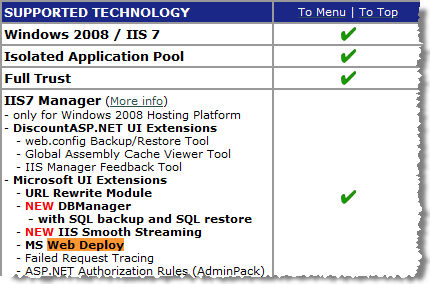
…and plenty of others. The point is that Web Deploy is beginning to be embraced as a means of getting .NET web content out there easily and effectively. Considering the bad old days of FTP, having a host offer a secure Web Deploy endpoint is a very nice addition to the service.
Coming next…
Next up we’ll move into TeamCity and get the entire solution automatically building on each VCS change then in the final part of the series, we’ll get that web app auto deploying.
| << Part 2: MSBuild and deployable packages | Part 4: Continuous builds with TeamCity >> |