You know how security people get all uppity about SSL this and SSL that? Stuff like posting creds over HTTPS isn’t enough, you have to load login forms over HTTPS as well and then you can’t send auth cookies over HTTP because they’ll get sniffed and sessions hijacked and so on and so forth. This is all pretty much security people rhetoric designed to instil fear but without a whole lot of practical basis, right?
That’s an easy assumption to make because it’s hard to observe the risk of insufficient transport layer protection being exploited, at least compared to something like XSS or SQL injection. But it turns out that exploiting unprotected network traffic can actually be extremely simple, you just need to have the right gear. Say hello to my little friend:

This, quite clearly, is a Pineapple. But it’s not just any pineapple, it’s a Wi-Fi Pineapple and it has some very impressive party tricks that will help the naysayers understand the real risk of insufficient transport layer protection in web applications which, hopefully, will ultimately help them build safer sites. Let me demonstrate.
What is this “Pineapple” you speak of?!
What you’re looking at in the image above is a little device about the size of a cigarette packet running a piece of firmware known as “Jasager” (which over in Germany means “The Yes Man”) based on OpenWrt (think of it as Linux for embedded devices). Selling for only $100, it packs Wi-Fi capabilities, a USB jack, a couple of RJ45 Ethernet connectors and implements a kernal mode wireless feature known as “Karma”.
Huh? This is starting to slip into the realm of specialist security gear which is increasingly far away from the everyday issues we deal with as software developers. But it’s exceptionally important because it helps us understand in very graphic terms what the risk of insufficient transport layer protection really is.
The easiest way to think of the Pineapple is as a little device that sits between an unsuspecting user’s PC (or iPhone or other internet connected device) and the resource they’re attempting to access. What this means is that an attacker is able to launch a “Man in the Middle” or MiTM attack by inspecting the data that flow between the victim and any resources they’re accessing on the web. The physical design of the Pineapple means that victims can connect to it via its Wi-Fi adapter and it can connect to a PC with an internet connection via the physical Ethernet adapter. It all looks a bit like this:
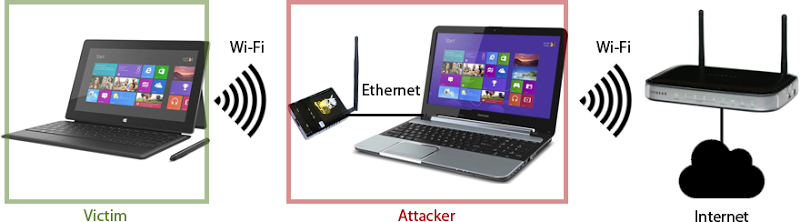
This isn’t the only way of configuring the thing, but being tethered to the attacker’s PC is the easiest way of understanding how it works. The point of all this is that it helps tremendously in understanding the risk of insufficient transport layer protection because ultimately, it’s websites that don’t do a good enough job of this that put the victim at risk. More on that later.
But why on earth would a victim connect to the Pineapple in the first place?! Well firstly, we’ve become alarmingly accustomed to connecting to random wireless access points whilst we’re out and about. When the average person is at the airport waiting for a flight and sees an SSID named “Free Airport Wi-Fi”, what are they going to do? Assume it’s an attacker’s honeypot and stay away from it or believe that it’s free airport Wi-Fi and dive right in? Exactly.
But of course that’s still a very conscious decision on behalf of the user. As it turns out, the Pineapple packs a much more subversive party trick to lure unsuspecting victims in…
Karma, baby
The Karma feature is best explained on the Pineapple website:
Most wireless devices including laptops, tablets and smartphones have network software that automatically connects to access points they remember. This convenient feature is what gets you online without effort when you turn on your computer at home, the office, coffee shops or airports you frequent. Simply put, when your computer turns on, the wireless radio sends out probe requests. These requests say "Is such-and-such wireless network around?" The WiFi Pineapple Mark IV, powered by Jasager -- German for "The Yes Man" -- replies to these requests to say "Sure, I'm such-and-such wireless access point - let's get you online!"
Wait, what?! So devices just randomly connect to the Pineapple thinking it’s a legitimate AP? Yep, here it is in detail:

Simple, huh? The problem is that wireless devices are just too damn trusting. Once they establish a connection with an access point they usually happily reconnect to it at a later date. Of course if it’s a protected network they still need to have the right wireless credentials, but if it’s an open network then the Pineapple asks for no such thing, it just lets the device straight in whether the device thinks it’s connecting to a legitimate access point or not.
So that’s how she works, a combination of simply providing an access point that victims connect to on their own free will or being tricked into connecting via Karma. Let’s get it setup and see it all in action.
Windows tethering
The easiest way to access the device and get started with configuring everything is to tether it to a PC with two network interfaces. This can be one with a couple of NICs connected to Ethernet or in most cases (and as with the diagram above), a laptop which commonly has a wired NIC and a wireless one.
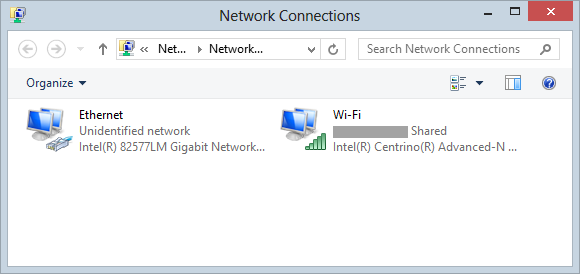
What we’re going to do is configure the wired Ethernet NIC which we’ll plug the Pineapple into then share the connection on the wireless adapter so that the traffic from the Pineapple can be routed through it, effectively just passing everything through the PC. This is all pretty straight forward and it starts out from the Network Connections settings:
Just one little note before proceeding: I’m going to obfuscate any SSIDs or MAC addresses used in this post with a grey box simply because they explicitly tie back to my devices (or my neighbours’ devices!) and I’m not real keen on publicly identifying them. Who knows what they might get up to in future…
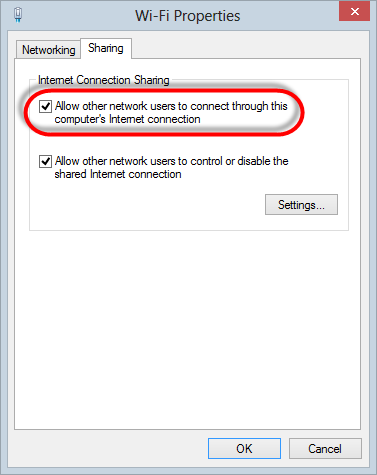
Jump into the properties of the wireless adapter, and head over to the sharing tab then make sure that “Allow other network users to connect through this computer’s Internet connection” is checked:
That’s that adapter done, now let’s do the wired one. Jump into the properties locate the “Internet Protocol Version 4 (TCP/IPv4)” item:
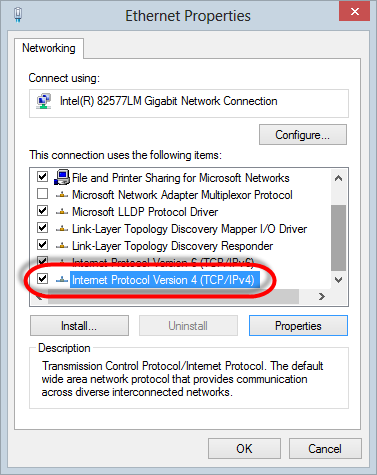
Now grab the properties of that guy and configure a static IP address and subnet mask and set the DNS server as follows:
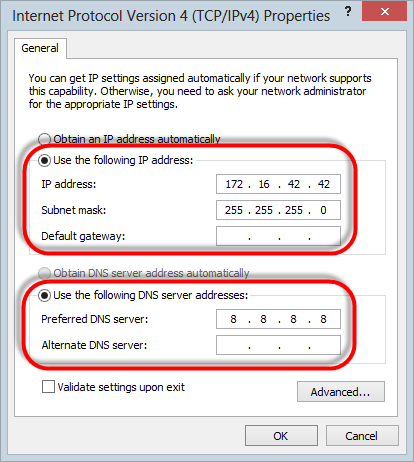
That’s it – job done.
Accessing the device
Once tethering is setup and the Pineapple is connected to Ethernet via its PoE LAN port, you should be able to access the Pineapple directly from within your browser via the IP address. You can hit it on 172.16.42.1/pineapple or if running a newer version of the firmware (more on that later), the IP address and port 172.16.42.1:1471. All things going well, you’ll be challenged to authenticate:
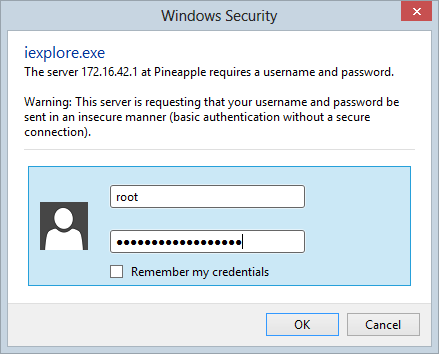
The default credentials are username “root” and password “pineapplesareyummy” after which you should be in:
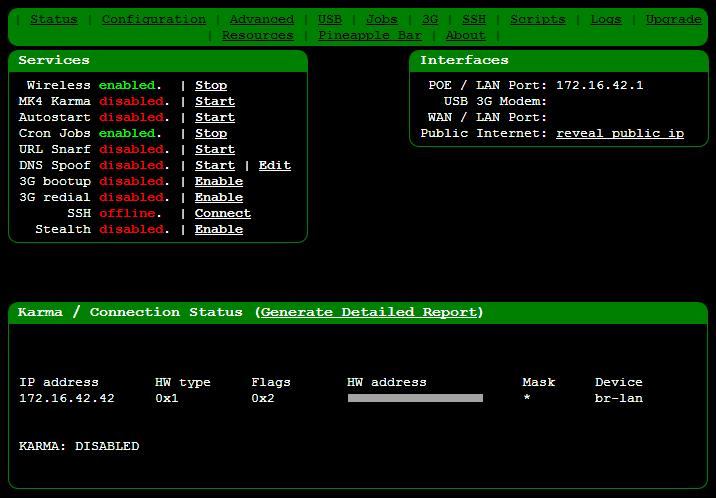
That’s the first bit done, tethering is working and we can actually access the device, now for a bit of preparation.
Housekeeping
Before you start anything, get the firmware up to date. If I’m honest, I’m always scared about updating any firmware on any device because when it goes wrong it’s often a whole world of pain to get yourself back out of trouble again. You’re much better off doing this before you create any dependencies on the device or configure anything. I had a couple of glitches doing mine and it took a few goes, but in theory, you jump over to the “Upgrade” link on the nav, hit “Check for Upgrades” then if required, pull down a package, enter the MD5 hash of it (provided on the upgrade site) and upload the package:
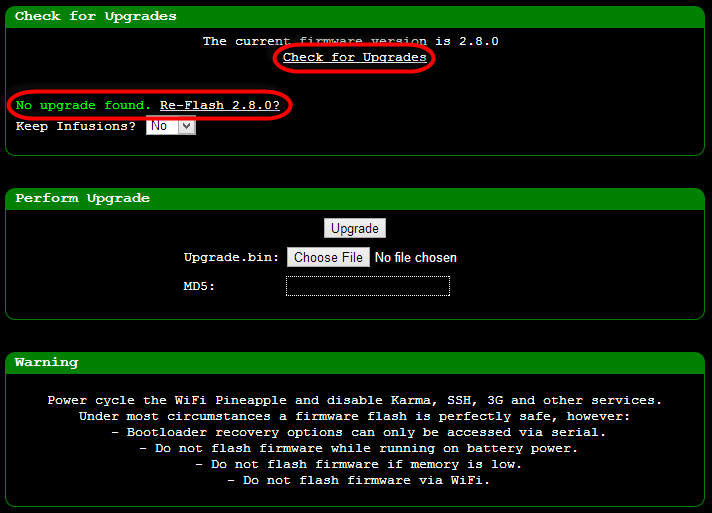
One little thing you want to remember here: if like me, your GUI was originally accessed via 172.16.42.1/pineapple, keep in mind the newer version of the firmware now puts the GUI behind a port so you want to hit 172.16.42.1:1471 instead. If, also like me, you try hitting the old address after the install and reboot you’ll keep getting redirected and not much will happen. Then you’ll think you’ve rooted your device (that’s the Australian rooted, not the American one) and start wondering how in the hell you’re ever going to get it back to a known good state and, well, just remember the port change!
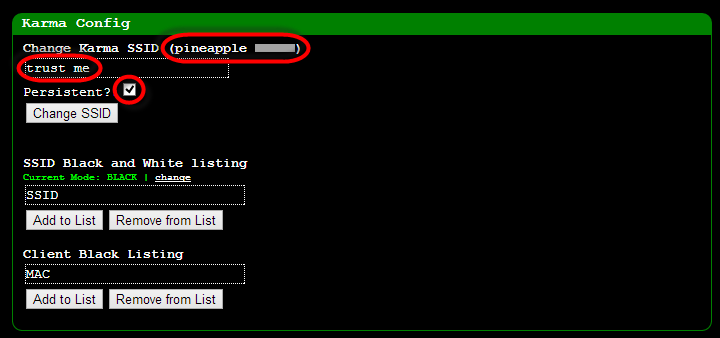
Next up, jump into configuration and change the default SSID. The device is configured to show “pineapple” followed by the first and last octets of the Wi-Fi adapter. Change it to something a little more subtle and make it persistent so that when you fire it back up later you’re not reverting to the default:
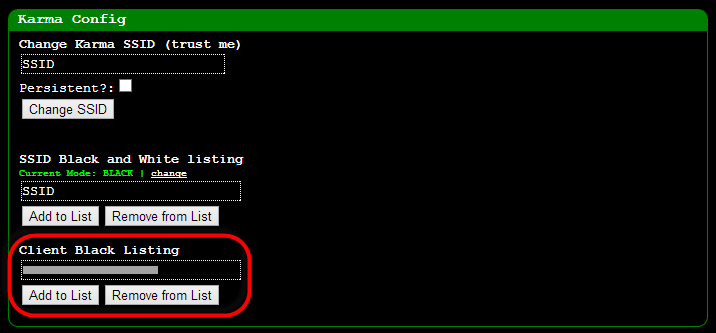
The other thing you want to do on the configuration page is to blacklist the MAC address of the machine you’re going to be orchestrating the Pineapple from and any other devices you don’t want inadvertently connecting to it. This is important if you don’t want to “Pineapple yourself”! Seriously though, it can get very confusing otherwise so this makes good sense.
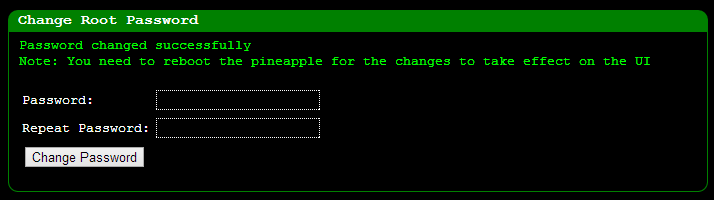
Lastly, let’s change that default password, the last thing you want is someone else taking over your Pineapple whilst you’re pretending to be a l33t hax0r! Over to the “Advanced” link then down to the bottom of the page:
That’s pretty much it for what I felt need to be configured via the UI, let’s go and get a bit low-level and enter the command shell.
SSH’ing in
This is where it gets a bit scary for Windows people! Keeping in mind that the Pineapple is ultimately just a little Linux box with some fancy party tricks, there are times when you’ll need to get your hands dirty and enter the secure shell world. This is something I do very, very rarely and if memory serves me correctly, it was 1999 when I last regularly used a *nix machine so it was pretty unfamiliar territory for me as well.
Moving on, one of the easiest way of SSH’ing into the device from Windows is to go and grab PuTTY. With this in hand, the only configuration you need is the IP address of the device:
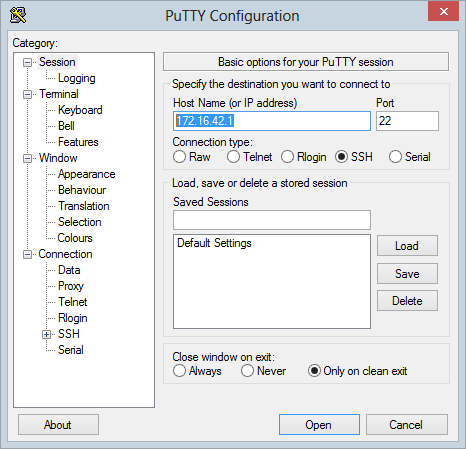
Open the connection and you’re into the shell:

Follow the instructions in the screen above enough times and suddenly the shell doesn’t seem to look so bad!
Keep in mind that this is the OpenWrt distro of Linux and being intended for embedded devices, it’s a pretty lean edition. Don’t expect to find all the features you’d normally see in a full blown desktop edition – many of them are not there so keep that in mind when attempting to use commands that might not be supported.
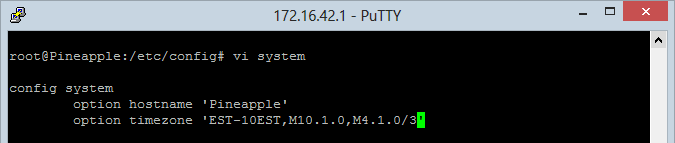
Once you’re SSH’d in you can go ahead and set the time and time zone correctly. This’ll be well outside your comfort zone if Linux shells are a bit foreign to you (and admittedly I had to look much of this up again), so here’s the whole thing step-by-step:
- Change the directory to /etc/config: cd /etc/config
- Edit the system file in vi: vi system
- Navigate down to the “option timezone” line and delete out the existing “UTC” value (unless, of course, you are in the UTC time zone!)
- Jump over to the timezones table on the OpenWrt site and find the appropriate one for your location.
- Enter the value from the “TZ string” column into the shell: Hit the “i” key to insert then type away
It should look kinda like this when you’re done:
- Save the file: Hit the esc key to stop editing then :wq<enter>
- Reboot the Pineapple: reboot <enter>
A little tip for new players: every time I tried saving the config change I got the following message and nothing actually saved:

This, quite clearly, means that there is no available capacity on the device and after wasting considerable time trying to work out why I couldn’t use vi correctly, this become quite clear. Welcome to Linux!
Working with ext4 format and USB drives
You’ve got very little space on the device, there’s literally only an 8MB ROM and 32MB of RAM so by the time you load everything into there just required for the device to run, there’ve not much left. It’s certainly not going to be enough to start doing fancy things like storing packet captures which mount up very quickly.
Fortunately it’s all expandable via USB so one of the first things you want to do is grab a spare thumb drive and get it ready for the Pineapple. But there’s a catch – as with many things Linux, this is a slightly different world to good old Windows so you can’t just take your NTFS formatted USB stick and chuck it in, you’ll need to partition it for ext4.
In theory, this is easy enough to do in the Windows world using a tool such as MiniTool Partition Wizard. That sounds just fine – except it’s not and you will only discover this through either banging your head against the wall for hours or reading what comes next. Whilst the aforementioned tool (and I assume others like it running on Windows) seemed like a good idea, I just couldn’t get it to play nice. I’ll spare you the detail as I’ve captured them all on the Hak5 forum, but in short, the USB would mount and be readable from shell but I could never install Infusions to it (think of them as apps for the Pineapple) which I’ll come to shortly. It turns out that additional partitions were being created and that simply made things not play nice with the Pineapple despite no obvious warnings to that effect.
The solution turns out to be that I needed to create the ext4 partition directly from a Linux machine. If this world is unfamiliar to you, there’s a (relatively) low friction process courtesy of an Ubuntu LiveCD. This involves downloading an Ubuntu ISO, burning it to CD (or DVD or bootable USB), running up an in-memory instance of Ubuntu and partitioning the USB from there. I then followed the guidance provided in the very easy to follow page on enabling USB mass storage with swap partition as the swap partition looks like will come in handy later on when you want to start doing some other tricks with the Pineapple.
That sounds like a hassle – running up an entire new operating system just to partition a USB drive – and certainly it was a drama getting to the point of realising that’s what I needed to do, but once you know what needs to be done it’s quite simple. Of course it would have been even simpler if I had a handy Linux machine hanging around somewhere and for many people, that will already be the case.
Once it’s all setup you should see the storage appear under the “USB” menu item like so:

You’ll also probably want to read from the drive back on your Windows machine at some point (I’ll save some packet captures to it a little later on) and I found DiskInternals Linux Reader did the job just fine.
Testing connectivity
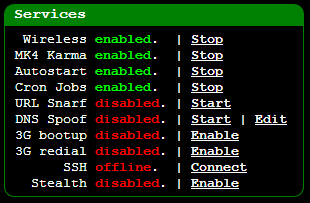
Now that we’ve got everything ready to roll, let’s jump into the fun stuff! Back in that first screen grab of the UI, only the “Wireless” and “Cron Jobs” services were running so let’s fire up “Mk4 Karma” and set it to run automatically via the “Autostart” feature so the device just needs to be powered up for everything to kick into action:
Now we should be able to jump over to a device such as my iPhone and see some new SSIDs:
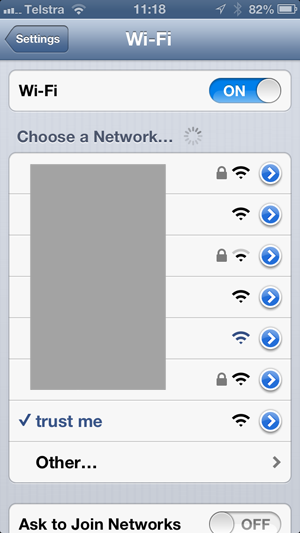
This is a whole lot more interesting once you understand what’s under the grey box (which again, I’ve deliberately obfuscated), so let me explain what’s happening; each unsecured network is the Pineapple responding to a probe request from the iPhone with the name of the SSID it was previously associated with. The names include that of an old wireless router I replaced some years back, my parents’ network I was connected to interstate just the other day and an airline lounge in a far flung corner of the world. All of the secured networks are legitimate (mine, my neighbour’s, etc.)
We’re also seeing the new SSID of the Pineapple that I set earlier (“trust me”) and I’ve gone ahead and explicitly connected to that for demonstration purposes. This now makes the homepage of the GUI much more interesting:
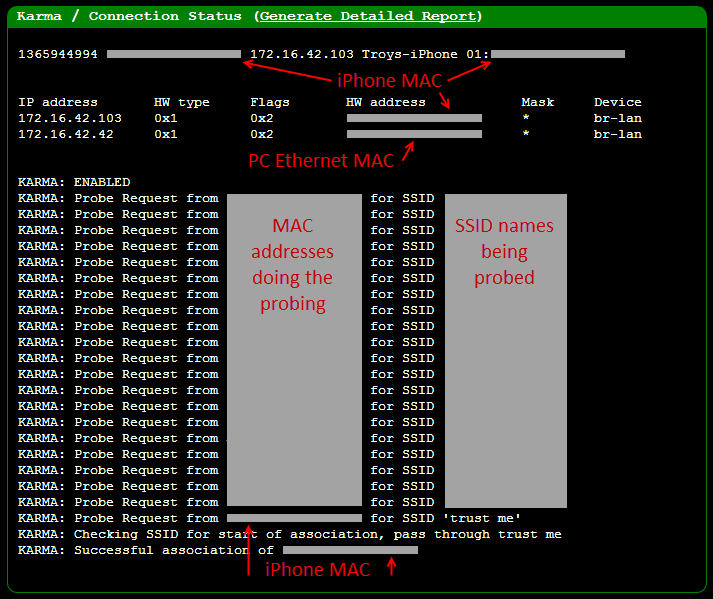
What’s particularly interesting is what you can’t see which are all the SSIDs being probed for. These are predominantly APs I’ve connected to in the past and the MAC addresses doing the probing are predominantly my own (the Wi-Fi strength on the Pineapple is not great so I’m seeing mostly nearby devices), but you do see a few unfamiliar ones pop up which are clearly other people’s devices. It does make you wonder what risks might be present from devices leaking SSID names they’ve previously associated to; “Why is my colleague’s Android trying to connect to ‘Mistress Angeliques BDSM Palace’?!”
Anyway, right at the end of the above image you can see the association of my iPhone to the Pineapple which means we can now drill down and get a detailed report of what’s going on:
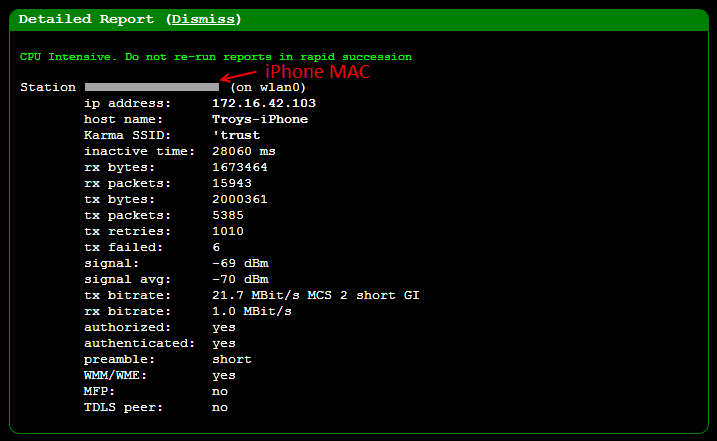
This is mostly self-explanatory, the signal strength is kind of interesting as it starts to give you a sense of the distance the victim might be from the device. Of course what will be really interesting is the rx bytes – that’s about one a half MB that the phone has already received through the Pineapple and under normal operating conditions, the user would have absolutely no idea there was an MiTM. Let’s move on to taking a sneaky look at those packets because that’s where things get really interesting!
Packet capturing
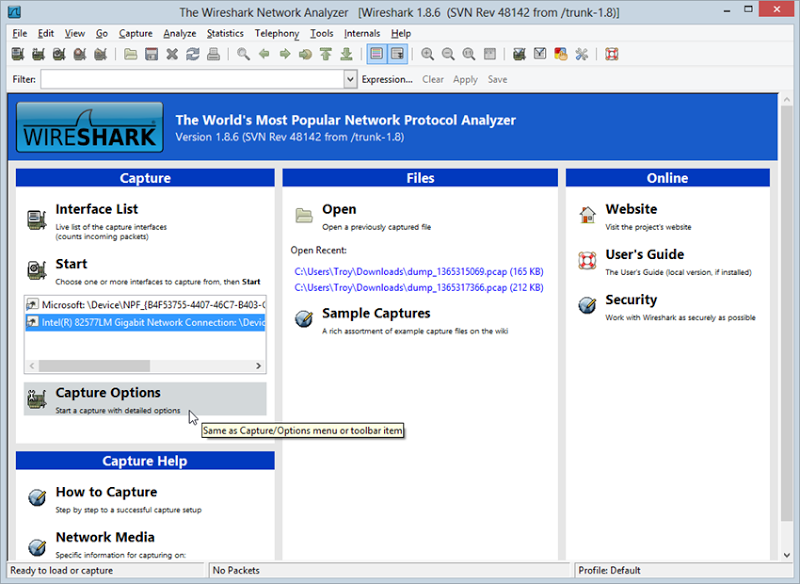
Now that we’ve got all the nuts and bolts in place, let’s start capturing the data. There are a couple of different ways of doing this and probably the simplest is to monitor the traffic moving through the Ethernet adapter on the attacker’s PC. Once we start getting into the realm of traffic monitoring we need to start looking at packets and the best way to do this on a PC by a long shot is to use Wireshark.
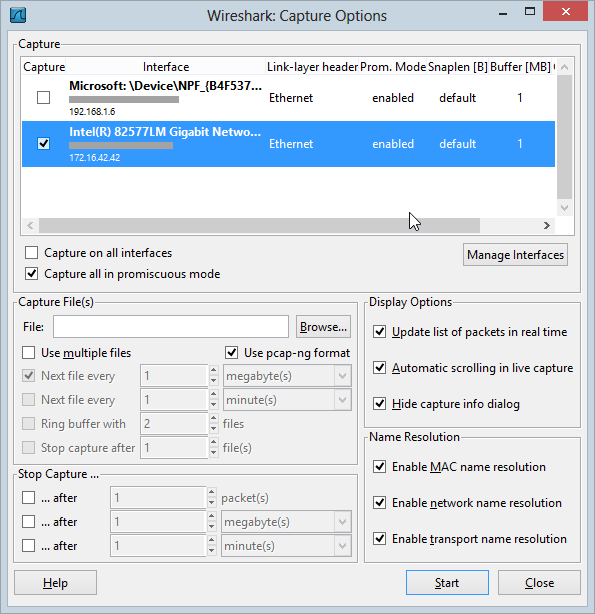
One of the best thing about Wireshark is that it’s free. This is no lightweight tool either, Wireshark is very full featured and is arguably the de facto standard for monitoring, capturing and analysing packets flying around a network. As powerful as Wireshark is, it’s also relatively easy to get started, just fire it up, choose the network interface you want to capture which in this case is the Ethernet adaptor (remember, this is the NIC the Pineapple is connected to) then jump down to the “Capture Options” button:
The capture options start to give you an idea of the extent of the configurability but we’ll just leave all that as default and start the capture:
Once started, you should immediately begin to see packets flowing through the NIC:
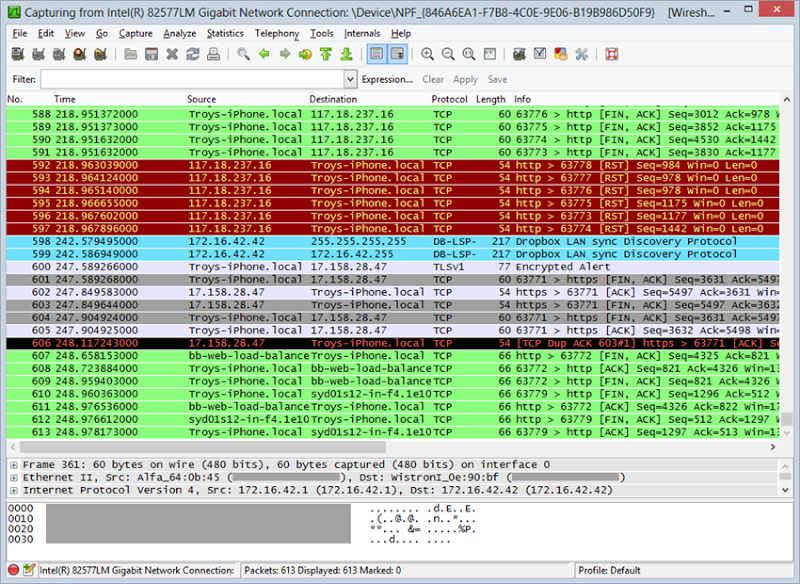
Right about here the penny should drop – this is someone else’s traffic! Ok, it’s really my own traffic from my iPhone but of course as we now know, the Pineapple has the ability to easily trick a victim into connecting to it whether deliberately or by default as their device looks for familiar SSIDs. Long story short is that this could just as easily be someone else’s traffic.
I’m not going to delve into exactly what we can do with that traffic right now because I have subsequent posts planned that will demonstrate that, for now though let’s just filter that traffic down to something a bit more familiar – HTTP. You see, the traffic above includes a whole bunch of different protocols which for the purposes of talking about secure website design aren’t going to be of much use. Let’s add in a filter of “http” and load up a popular website with developers:
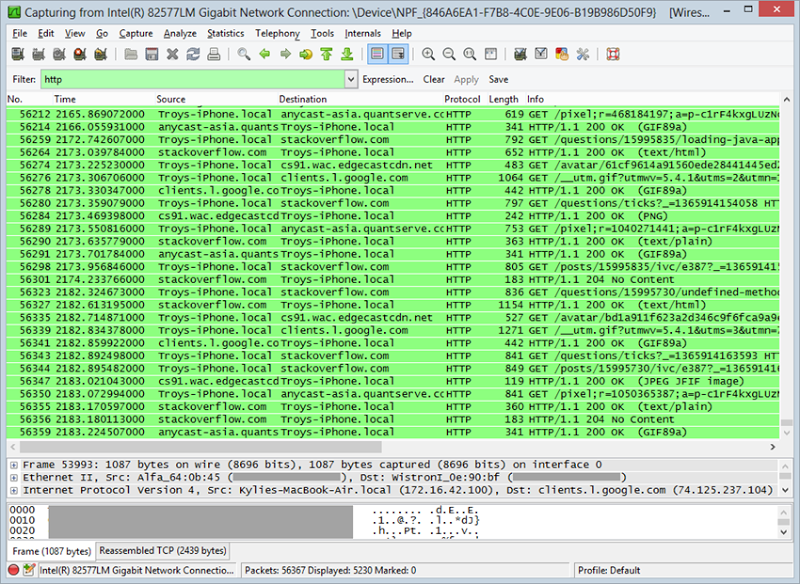
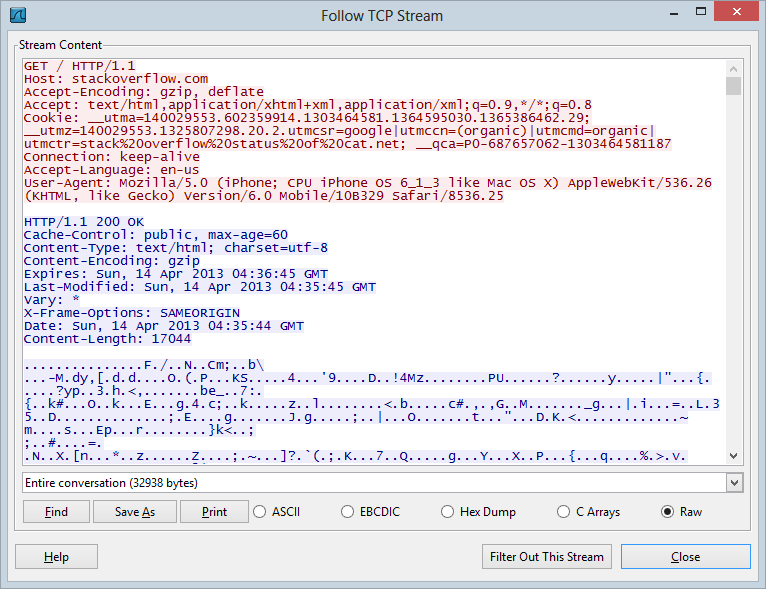
As I’ve written before, Stack Overflow serves everything outside the logon over HTTP so it’s easy to monitor that traffic (including the authentication cookie). Once the traffic is captured, you can either save it as a PCAP file for later analysis or right click and follow the TCP stream which then gets you into the entire request and response (including the headers with those valuable auth cookies):
I’ll stop there because that’s enough to demonstrate that everything is working as expected. Just to illustrate the power of the Pineapple, as I was writing this piece and watching the Wireshark traffic, a whole bunch of packets started appearing that weren’t mine:

Turns out that my wife had wandered into range with her MacBook Air and it had automatically associated to the SSID “Apple Demo” which I can only assume is the access point the Apple store connected her to when walking her through the shiny new machine she recently bought. So there you go – right out of the box a brand new machine is already falling victim to the Pineapple without even trying.
Infusions and unattended packet capturing with tcpdump
This is the last configuration I want to touch on simply because it covers couple of important points: Infusions and using the USB drive we setup earlier. With these concepts understood I actually feel reasonably well-equipped to use the thing so they’re worth capturing here.
The physical capabilities of the Pineapple should be pretty clear by now but what might not be quite as clear to the uninitiated is what can now be achieved with clever software. I’ll write a lot more about these capabilities in the future but for now I want to just take a quick look at the concept of Infusions.
Think of Infusions as apps and the Pineapple Bar as an app store for the Pineapple only with a couple of dozen apps that are all free. The Infusions cover a variety of different domains from informational to potentially malicious so there’s a good range of use cases in there. It’s accessible via the Pineapple from the “Pineapple Bar” link in the nav and it gives you some options like so:
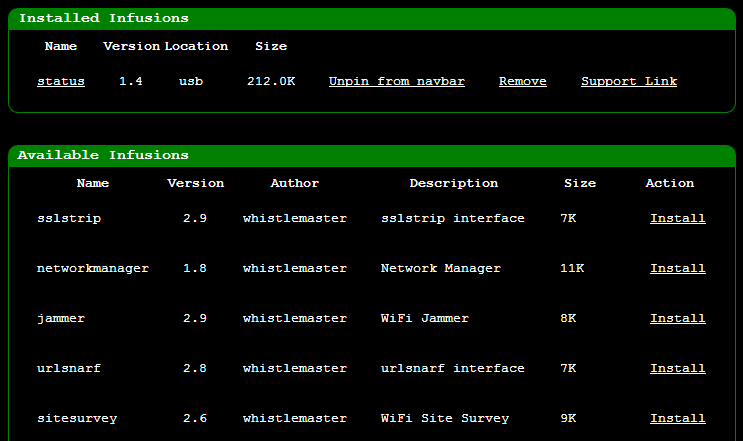
As you can see, I’ve already installed the “status” Infusion and by way of example, here’s the sort of info you get from it:
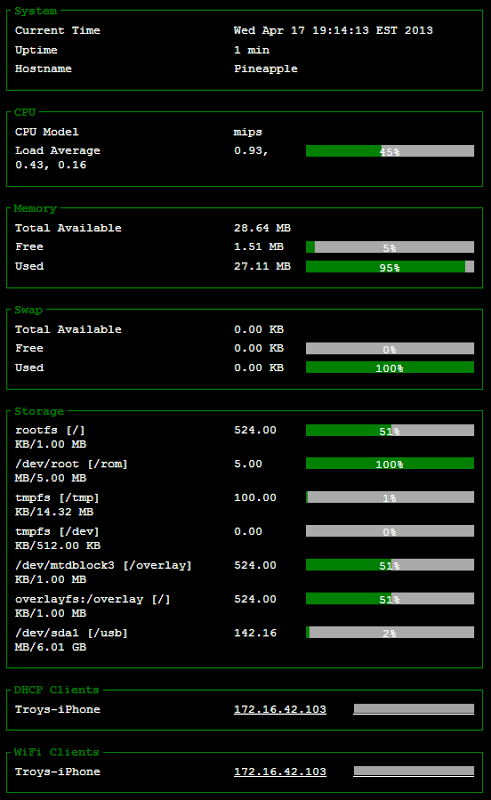
This can be pretty handy info in GUI format, there are also some neat real time graphs for things like CPU utilisation and bandwidth:

The really interesting one, however, is tcpdump. Now tcpdump is not an Infusion in and of itself, it’s an existing project which has been turned into an Infusion so that’s easily installable on the Pineapple and can then be managed from the GUI. What tcpdump offers is the ability to effectively do what we just did with Wireshark in terms of packet capturing but to do so locally within the device itself. What this means is that you can have the Pineapple independently capture traffic without needing to run Wireshark on a PC. In fact if you establish a connection from the Pineapple directly to the web (and there are several ways to do this), you don’t need a PC at all. Imagine just that little cigarette pack sized Pineapple sitting there on its own with its own power source and internet connection and any victims within Wi-Fi shot of it automatically connecting and having their packets captured. That’s powerful stuff.
Now that we have a correctly partitioned USB drive, Infusions can be installed directly to there:

Incidentally, it’s that highlighted “USB Storage” link that I never saw when creating the ext4 partition in Windows.
The thing with packet captures is that there can be a lot of them and they can chew up space really quickly depending on how liberal you are with the data you want to save. You can configure tcpdump to filter out a lot of the “noise” packets and restrict it to, say, only HTTP traffic or even just only to HTTP requests using the POST verb. For now though we’ll just run it up with the defaults to capture all the traffic running through the wired LAN port:
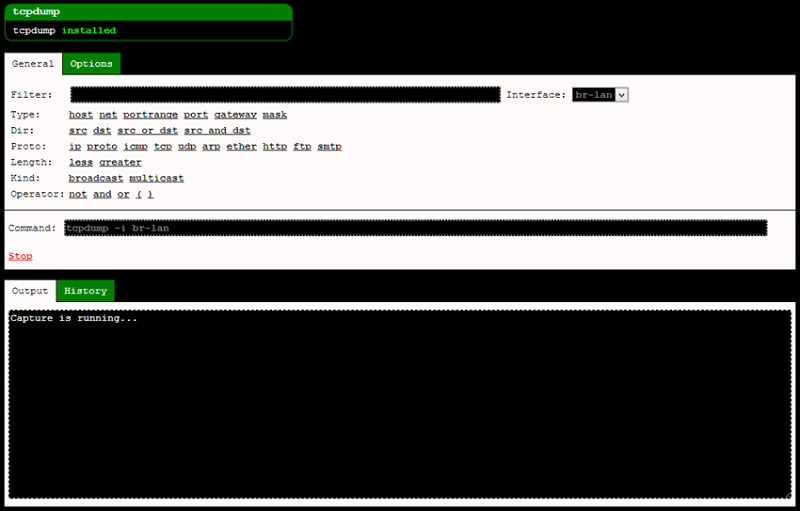
You can now sit back and let the traffic flow whilst the Pineapple captures everything anyone connected to it sends across the wire (or air, as it may be). With the iPhone connected, I browsed over to a site I know doesn’t properly protect user credentials and attempted to logon. Once done you can hit “Stop” and you’ll see a summary of the captured data:

Now we can jump over to the “History” tab and download the PCAP file:
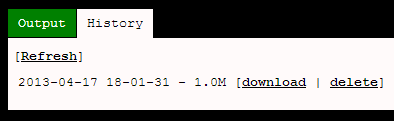
That PCAP file is just the same as what we captured in Wireshark earlier on and you can now load it back up into Wireshark and analyse it in just the same way as you would the packets it captured directly. Alternatively, you can pull the USB out, chuck it into the PC and read it with a tool like DiskInternals which I mentioned earlier. Here’s what we can now see from my brief visit to the site
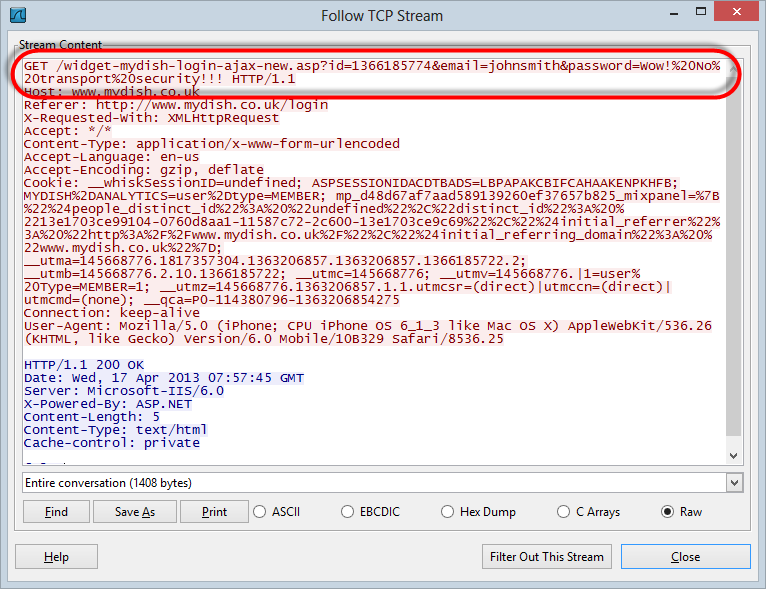
This site is particularly bad because the credentials just go into a GET request but of course the real story in the context of the Pineapple is that the whole thing is sent in the clear so it’s now easy to see everything sent by the victim and returned by the server. Keep in mind that this was all captured directly on the Pineapple (or at least on the USB) so the whole thing is now pretty well self-contained. That’s a good place to end the traffic capture for today, there’ll be much more in the future though…
Other miscellaneous info
For those of you thinking of getting yourself into a Pineapple (and I know there are a few based on Twitter chats alone), there are a couple of pre-purchase things worth pointing out. Firstly, I went el-cheapo and only got the device itself without any accessories. This means you get an AC adaptor for power and that’s it so it’s definitely not mobile.
Being able to take the Pineapple out in the wild definitely presents all sorts of opportunities not available while it’s plugged in to the mains so the USB battery pack is a must. As the name suggests, this also gives you the ability to power the device directly from USB so you can just plug it into your laptop if the juice in the battery runs out.
The other thing is that the Wi-Fi strength is pretty ordinary. By way of example, here’s how inSSIDer sees the Pineapple (in yellow, of course) versus my usual access point in blue from only about a foot away:

However, mover into the next room and the Pineapple just about drops off altogether:

There are a few different antenna options so if your intended use doesn’t involve connecting to a target within a very, very close distance then this would be worth a look. Other than that though, the only other thing that might be useful is a handy case and given HakShop has a Pineapple with battery and a case going for $115 at the time of writing, that’s probably your best bet.
The other thing that some people might find interesting is that a bunch of the code running on the Pineapple is up on GitHub. This is apparently the www folder of the device so it’s not the firmware itself, but it is a bunch of the PHP files and scripts which is kind of interesting to have a browse through.
Responsible use
I bought the Pineapple for the sole purpose of helping developers better understand the risks of insufficient transport layer security. You’re going to see me writing a lot more about the risks of loading logon forms over HTTP, embedding HTTPS login forms in HTTP pages, mixed mode HTTP / HTTPS and other similar risks. The Pineapple will help me move that discussion from a theoretical “An attacker might do this or could do that” to a very practical “Here, let me show you exactly why that pattern is risky”. Demonstrations of this kind are very powerful and they’re often the only way of getting the message through.
However, there is very clearly scope for misuse and abuse of unsuspecting victims. That incident I mentioned earlier where my wife walked into the room and suddenly I was watching her network traffic is a perfect example of how easy it is to do potentially evil things, sometimes without even trying. For those reading this and considering how they might use it, there are some great use cases for penetration testing or demoing (in)secure web app design but there is also some very, very thin ice out there. Caveat emptor.
What next for the Pineapple?
The great thing about the Pineapple is that it makes it dead easy to demonstrate a whole bunch of concepts that I often write about but haven’t always shown in execution. For example, why it’s not ok to load login forms over HTTP even if they post to HTTPS. Another one that has come up a few times (including in the Top CashBack post) is not embedding a login form that is loaded over HTTPS within an iframe in an HTTP page. There’s a whole heap of things that will be easily demonstrated within a controlled environment.
Then there’s the uncontrolled environment – the public. There’s a lot of grey area there about what can be done for the purposes of research and education without crossing the line into outright eavesdropping and getting on the wrong side of people. I do have some thoughts on it, but I’ll hold onto those for the moment…
Regardless, I’ll start producing some video material to demonstrate the ease with which this thing does its work because it’s immensely impressive to see in real time – at least I was impressed! I’ve already created a bit of video for a training program I’m putting together (more on that another day), and I reckon it comes up great. Stay tuned, there’s much, much more to come.
Useful Links
- Markiv: What We Know And What We Don't Know – good general overview of features and configuration
- Mark 4 setup script – very handy for seeing how to configure various things via the shell.
- You just can't trust wireless: covertly hijacking wifi and stealing passwords using sslstrip – good view of defeating SSL with the device
- Main Wi-Fi Pineapple site - all things Pineapple start from here