
Here’s your situation: you’ve got a heap of websites on traditional hosting models. Shared tenancies on single logical machines, dedicated infrastructure or even worse, not really any idea because you just keep paying that $5 per month and stuff works. Most of the time.
But you’ve seen the light and you want to move things to Azure en masse. A small handful of sites isn’t a drama, there’s a bit of setup work to create the Azure resources for each one and so long as you follow a pre-defined set of steps just perfectly, you’re fine. But like most things that require manual steps, it’s highly error-prone in terms of getting everything just right every time and it’s also very laborious. Once that handful of sites becomes dozens, it starts to feel like a bit of hard work. Not only that, but you’re going to want new assets in Azure in the future and having a repeatable way of doing that near instantaneously would be kind of nice.
I had this challenge recently – “we want to migrate a heap of websites to Azure and they’ll all fit into basically the same pattern” – so rather than have people clicking links in the Azure Portal, I gave them a single PowerShell script and unleashed them. I’m going to give you all the steps here that explain how it all works and give you the entire PowerShell script so that you don’t have to work out all the nuts and bolts from scratch. Enjoy!
Preparation
First things first – you’ll need an Azure subscription. Ok, kinda obvious but you can’t just jump into PowerShell and start running commands. I also already had a website which meant there was already an appropriate hosting plan plus I had an Azure SQL Database (remember this is the PaaS offering, not a full blown standalone SQL Server you can RDP into), which meant there was already a database server and appropriate firewall rules. That’s the assumption I’m making here and if I may make a suggestion, stuff that’s really only a one-off setup is worth just doing in the browser rather than trying to work out the commands for yourself. In fact even if you’re going to script the entire process, do a manual one first and figure out exactly how you want your end state to be.
Getting started with Azure PowerShell
Assumptions first: I assume you’ve got Azure PowerShell up and running so if that’s not the case, spend a couple of minutes over on the How to install and configure Azure PowerShell page and get everything playing nice. Make sure you can actually load up an Azure PowerShell session then read on.
Here’s a quick pro tip: check your subscription! On more than one occasion I’ve wondered why PowerShell changes I was making weren’t appearing in the Azure web portal and it would always turn out that I was in an incorrect subscription. Save yourself the pain if you have access to more than one subscription and always run this before starting:
Get-AzureSubscription
You’ll see a list of all your subscriptions and each one has an “IsCurrent” attribute. If you see something you weren’t expecting, flick on over to the correct one before getting down to business:
Select-AzureSubscription "Troy's Subscription"
Oh – and if you’re going to keep coming back to this subscription and it’s not already the default, here’s what you need:
Select-AzureSubscription -Default –SubscriptionName "Troy's Subscription"
There are a heap of references on the web to commands that don’t work with the current generation of Azure’s APIs so that should save you some pain, at least until it changes again and this becomes another incorrect reference! But seriously, do be conscious that the API does change in breaking ways and that you may well find commands that are no longer correct.
With that done, let’s start creating stuff!
Creating (and removing) the website
This bit can be dead easy, it’s just a single command:
New-AzureWebSite TroyPSTest
That’ll take seconds, after which you’ll have the following:
Instances                       : {}
NumberOfWorkers                 : 1
DefaultDocuments                : {Default.htm, Default.html, Default.asp, index.htm...}
NetFrameworkVersion             : v4.0
PhpVersion                      : 5.4
RequestTracingEnabled           : False
HttpLoggingEnabled              : False
DetailedErrorLoggingEnabled     : False
PublishingUsername              : $TroyPSTest
PublishingPassword              : mZvMGi2GfDc2iCepcPm6vsEd9hLxvtk3wl5NNtHxWaMqHDjAY8Apka4fXM3W
AppSettings                     : {WEBSITE_NODE_DEFAULT_VERSION}
Metadata                        : {}
ConnectionStrings               : {}
HandlerMappings                 : {}
Name                            : TroyPSTest
State                           : Running
HostNames                       : {troypstest.azurewebsites.net}
WebSpace                        : AustraliaEastwebspace
SelfLink                        : https://waws-prod-sy3-001.api.azurewebsites.windows.net:454/subsc
                                  riptions/62e2a1e5-4eda-4c1e-805e-44a6c8f8afbd/webspaces/Australia
                                  Eastwebspace/sites/TroyPSTest
RepositorySiteName              : TroyPSTest
Sku                             : Free
UsageState                      : Normal
Enabled                         : True
AdminEnabled                    : True
EnabledHostNames                : {troypstest.azurewebsites.net, troypstest.scm.azurewebsites.net}
SiteProperties                  : Microsoft.WindowsAzure.Commands.Utilities.Websites.Services.WebEn
                                  tities.SiteProperties
AvailabilityState               : Normal
HostNameSslStates               : {troypstest.azurewebsites.net, troypstest.scm.azurewebsites.net}
AzureDriveTraceEnabled          :
AzureDriveTraceLevel            : Error
AzureTableTraceEnabled          :
AzureTableTraceLevel            : Error
AzureBlobTraceEnabled           :
AzureBlobTraceLevel             : Error
ManagedPipelineMode             : Integrated
WebSocketsEnabled               : False
RemoteDebuggingEnabled          : False
RemoteDebuggingVersion          : VS2012
RoutingRules                    : {}
Use32BitWorkerProcess           : True
AutoSwapSlotName                :
SlotStickyAppSettingNames       : {}
SlotStickyConnectionStringNames : {}
Have a skim through that – the terms will be mostly familiar to you if you’ve spent a bit of a time in Azure websites but you’re probably not used to seeing it all sitting there together. This, however, should be very familiar to the seasoned Azure website user:
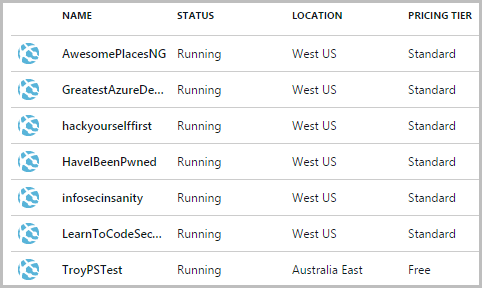
That’s just your usual portal albeit with the new site now appearing in the list. Remember, PowerShell is just one interface into what is ultimately the same underlying platform you’ve been using in the browser, only way faster! There is, however, one problem: this website has been created in the “Australia East” location and set up as a freebie. I really want to put it in West US and make it standard so it sits on my existing logical machine and doesn’t charge me any more cash. No problem, let’s just nuke the site:
Remove-AzureWebsite –Name TroyPSTest
You’ll get a confirmation prompt (which you can override with the “-Force” parameter) then yeah, that’s it, site gone! Take a moment to drink that in – we’re creating and removing websites via the command line in some far-flung remote location with the same ease we’d create a local folder. When you can manage resources in such a low-friction way, you can start to really change the way you work in a very positive way.
Creating the website in the right location
Moving on, we need to adapt that original command to get the site in the right location. There’s a “-Location” parameter that can be applied on website creation so that original command now changes to this:
New-AzureWebSite TroyPSTest -Location "West US"
Clearly your desired location may be different so be careful if you’re copying and pasting! Back to the portal in the browser and now we find it in the correct place:
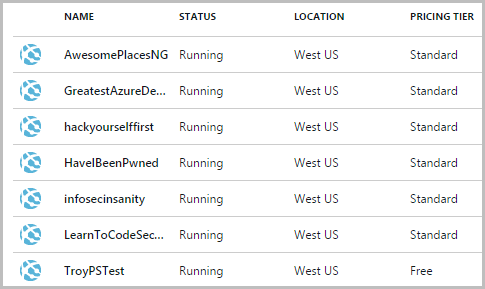
Remember – at present there’s still no migration facility to automagically shuffle assets between data centres so make sure you’ve got this right before proceeding otherwise you’re pretty much going to be starting again from scratch. You’ll see the pricing tier is still “Free”; we’ll come back and sort that out shortly as it’s not something we can configure at the point of site creation.
Setting website parameters
When you stand up a new Azure website, by default you’ll get this:

Now because I’m a pretty security conscious sort of person (and so should you be), I really don’t want PHP running on the site. That’s not because there’s anything inherently bad about PHP, it’s just that I don’t need it. So let’s just turn it off:
$properties = @{phpVersion=""} Set-AzureRmResource -Name "TroyPSTest" -ResourceType "Microsoft.Web/sites/config/web" -ResourceGroupName "Default-Web-WestUS" -Properties $properties -ApiVersion 2015-08-01 -Force
That’s dead easy but there’s only so much we can configure using Set-AzureWebsite. For everything else, we’ll need to jump over to the Azure Resource Manager so let’s do that now and sort out the pricing tier.
Configuring the pricing tier
The pricing tier is a little trickier and it’s not something we can set at the time the site is created nor using the Set-AzureWebsite cmdlet, rather it requires us to modify the site once created. That’s just fine, we’re going to need to do a bit of that later anyway and it’s going to require us to jump over into resource manager mode:
Switch-AzureMode AzureResourceManager
This gives you a whole new set of cmdlets you can use to manage the environment which you don’t get with the Azure Management Cmdlets which is what we were just using. You’ll see me jumping out of this mode and the initial mode known as service management mode as we require access to different sets of cmdlets.
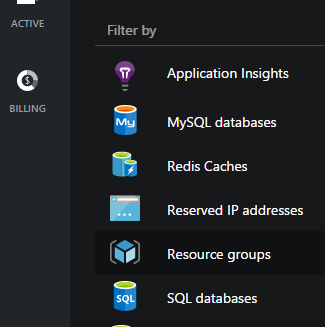
What we’re going to do now is to start working with resource groups. Think of these as a logical collection of assets within an Azure subscription, for example all my websites are under one called “Default-Web-WestUS”. You can locate this in the Azure portal via the resource groups link:
We’re also going to need the version of the Azure API we’re using so go and grab that as well and again, be conscious that it may change in breaking ways over time. Now we can retrieve the website and assign it to a variable I’ll call “$r” (be careful if you’re copying and pasting that you have the correct API version):
$r=Get-AzureResource -Name TroyPSTest -ResourceGroupName Default-Web-WestUS -ResourceType Microsoft.Web/sites -ApiVersion 2014-04-01
With the website now assigned to the variable, we can start to perform various actions on it, including listing out every known attribute by simply typing $r and running that command alone. It’s good for verification sometimes because what we’re going to do over the next couple of steps will make changes to the site and we don’t want to inadvertently make those on the wrong site. Listing out the value of $r will give you a whole heap of JSON; another thing we can do is print out just a subset of the information such as the direct properties of the entity:
$r.Properties
Which will give us a key value pair for each property:
Key                                                         Value
---                                                         -----
name                                                        TroyPSTest
state                                                       Running
hostNames                                                   {troypstest.azurewebsites.net}
webSpace                                                    westuswebspace
selfLink                                                    https://waws-prod-bay-003.api.azurewebsites.windows.net:...
repositorySiteName                                          TroyPSTest
owner
usageState                                                  0
enabled                                                     True
adminEnabled                                                True
enabledHostNames                                            {troypstest.azurewebsites.net, troypstest.scm.azurewebsi...
siteProperties                                              {[metadata, ], [properties, System.Collections.Generic.L...
availabilityState                                           0
sslCertificates
csrs                                                        {}
cers
siteMode
hostNameSslStates                                           {System.Collections.Generic.Dictionary`2[System.String,S...
computeMode
serverFarm                                                  Default2
webHostingPlan                                              Default2
lastModifiedTimeUtc                                         22/12/2014 00:57:04
storageRecoveryDefaultState                                 Running
contentAvailabilityState                                    0
runtimeAvailabilityState                                    0
siteConfig
deploymentId                                                TroyPSTest
trafficManagerHostNames
sku                                                         Free
premiumAppDeployed
scmSiteAlsoStopped                                          False
targetSwapSlot
hostingEnvironment
microService                                                WebSites
cloningInfo
What we’re going to do now is change a few properties that get the website into the correct pricing tier. By default, when the website was created it went into a new server farm with a new web hosting plan and as we already know, the pricing tier (also known as the SKU) was set to “Free”. What we’ll do now is set those attributes to align with my other sites by assigning an array of the appropriate name value pairs to a new variable we’ll call $p:
$p = @{ "sku" = "Standard"; "serverFarm" = "DefaultServerFarm"; "webHostingPlan" = "DefaultServerFarm" }
The final step now is to assign those properties back to that new website like so:
$r2=Set-AzureResource -Name TroyPSTest -ResourceGroupName Default-Web-WestUS -ResourceType Microsoft.Web/sites -ApiVersion 2014-04-01 -PropertyObject $p
I’m outputting the result to $r2 so it’s easy to inspect the new settings after they’ve been applied. Just for a sanity check though, let’s see how things look in the portal now:
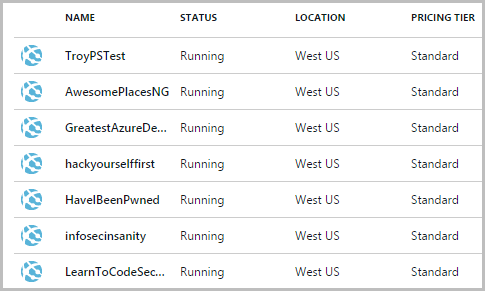
Ok, that looks way better and just to be sure they’re actually using the same hosting plan and not costing me extra dollars, let’s click through to the summary:
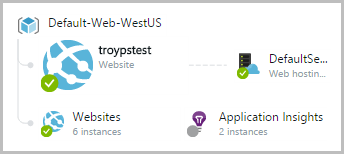
This is great, they’re all in there as peer resources in that default server farm so that’s that done.
Adding a staging deployment slot
One of the really neat things about the Azure website service is the ability to have deployment slots for staged deployment. This means you can push your website to an isolated instance where you can test it and make sure things play nice before actually deploying it to the live site on your production domain. Not only that, but you can even start routing a percentage of your traffic to a different slot with a new version of the site in what’s known as “testing in production”. This will make traditionalists’ heads spin – “Testing in production – you can’t do that!” – but it makes a lot of sense for your production ready site to be exposed to a small percentage of your audience first just to be sure everything plays nice.
I’m going to jump back into the Azure management cmdlets now as I want to create a new service.
Switch-AzureMode AzureServiceManagement
Adding a deployment slot is a piece of cake:
New-AzureWebsite TroyPSTest -Location "West US" -Slot "Stage"
Note that this is the same command as earlier, we’re just passing it a “Slot” parameter as well this time. Take careful note of this – a single “website” may have many “slots” and later on you’ll see how commands that don’t explicitly reference the slot fail rather badly once you have more than just the default one. Jumping over to the portal, you should now see it appear under the original site as a new deployment slot:
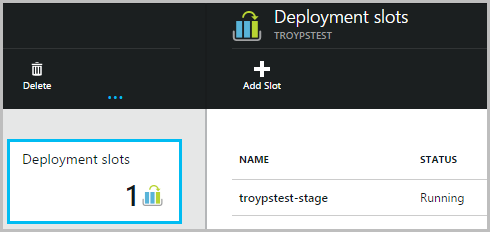
It’s important to note that this site has inherited the hosting plan and pricing tier we set earlier. It’s also inherited the PHP setting which is automatically disabled for the new site.
Creating the Azure SQL database
Now before embarking on this next part of the process, I already had an Azure SQL DB and I wanted to put all the other ones on the same instance. That means I already had a server name – “snyb5o1pxk” – plus I already had credentials to access it with “god rights” and the appropriate firewall rules in place to make remote connections from my IP address. As a one off for the server, this is worth just doing this directly in the portal. Oh – and just in case you start thinking about creating separate servers for every project, do be conscious of the Azure subscription service limits, quotas and constraints.
In terms of the command to actually provision the database on the server, this is a very similar deal to how the website is created and it looks just like this:
$db=New-AzureSqlDatabase -ServerName "snyb5o1pxk" -DatabaseName "TroyPSTestDB" -Edition "Basic" -MaxSizeGB 2
We don’t necessarily need to assign the result to the $db variable, but it makes it easy to then print it to the screen at any time later on and see what we have:
Name                                       : TroyPSTestDB
CollationName                              : SQL_Latin1_General_CP1_CI_AS
Edition                                    : Basic
MaxSizeGB                                  : 2
MaxSizeBytes                               : 2147483648
ServiceObjectiveName                       : Basic
ServiceObjectiveAssignmentStateDescription : Complete
CreationDate                               : 22/12/2014 11:51:28
RecoveryPeriodStartDate                    : 22/12/2014 12:21:27
That’s about as simple as it gets – we now have a DB!
Tagging the resource
One thing that happens as you start to get heaps of resource in your portal is that things get disorganised. Tags in Azure are akin to the tags you’re familiar with say, on this very blog: zero functional value, but it keeps logically related stuff grouped together.
Firstly, it’s back to resource manager mode:
Switch-AzureMode AzureResourceManager
Before you can apply a tag, you need to create one. I decided to tag by project name, you could also tag by environment (stage, test) or any other taxonomy you decide to apply. Here’s how mine looks:
New-AzureTag -Name Project -Value TroyPSTest
We can now use this tag in a number of places, namely to identify both the website and the database as belonging to the one logical group of resources. Let’s now apply it to the website:
$r2=Set-AzureResource -Name TroyPSTest -ResourceGroupName Default-Web-WestUS -ResourceType Microsoft.Web/sites -ApiVersion 2014-04-01 -PropertyObject $p -Tags @{ Name = "Project"; Value = "TroyPSTest" }
Note that the properties variable we defined earlier is also being passed. Whilst the doco states this as being optional, I found PowerShell wasn’t real happy when it didn’t get this (I said it was a little fickle, right?). No biggie, it’s defined already so I’ve just thrown it back into the parameters collection. Of course the sensible thing to do would be to use a single Set-AzureResource command and pass both the properties and tags in one go, the approach above is just to introduce different concepts one by one.
Let’s also tag the SQL DB:
Set-AzureResource -Name TroyPSTestDb -ResourceGroupName Default-SQL-WestUS -ParentResource servers/snyb5o1pxk -ResourceType Microsoft.Sql/servers/databases -ApiVersion 2014-04-01 -Tags @{ Name = "Project"; Value = "TroyPSTest" }
Back over to the portal and both the website and the DB are now sitting next to each other under the “TroyPSTest” tag:
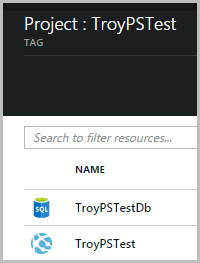
Right, now I’m feeling all very organised!
Setting the host name on the website
Here’s a bit of a chicken and egg one for you: you’re going to want a host name on the website which means you’re going to want to run something like this:
Set-AzureWebsite -Name TroyPSTest -HostNames @('troypstest.troyhunt.com')
However, that’s going to give you this:
Set-AzureWebsite : BadRequest: A CNAME record pointing from troypstest.troyhunt.com to troypstest.azurewebsites.net was not found. Alternative record awverify.troypstest.troyhunt.com to awverify.troypstest.azurewebsites.net was not found either.
If you’ve ever added a host name to a website via the portal before, you’ll know it’s not possible until you’ve create a CNAME on the domain record. However, you need to know the name of the website in Azure before you can do that and whilst this is a name you provide yourself, it also needs to be unique and not be used by any existing Azure websites owned by anyone. You could go off and configure your DNS records before running this script on the assumption that the name you choose for the website (which consequently goes into the CNAME) will be allowed, but if it’s “foo” then you’re going to have to go back and edit DNS again later on.
Creating a SQL login and user
One of the last thing we’ll need to do is to make sure the website can actually connect to the database and that means creating a new SQL login. Yes, you could have the website use the credentials that were provided when you first created the server but no, don’t do this. You don’t want anonymous people wandering around your website with it then making connections to the database using a privileged account that can do absolutely anything it wants. What you want is a unique account for the app which you can then go all principle of least privilege on.
When creating the login via PowerShell, there’s no native commands to do this so instead we’re going to use SMO to run the SQL commands against the remote server. To do that, we’re going to need to import the SQLPS module first:
Import-Module SQLPS -DisableNameChecking
Now we can go ahead and connect to that existing SQL server and select the master database into a new $db variable:
$conn.ConnectionString = "Server=tcp:snyb5o1pxk.database.windows.net;Database=master;User ID=troyhunt;Password=P@ssw0rd;"
$srv = New-Object "Microsoft.SqlServer.Management.Smo.Server" $conn
$db = $srv.Databases["master"]
With that done, let’s create a SQL login we’ll call “TroyPSTestDbUser”:
$login = New-Object -TypeName Microsoft.SqlServer.Management.Smo.Login -ArgumentList $srv, "TroyPSTestDbLogin"
$login.LoginType = "SqlLogin"
$login.PasswordPolicyEnforced = $false
$login.PasswordExpirationEnabled = $false
$login.Create("S0m3thingR3@llyR@nd0mTh@tI$ntThi$")
Next up we’ll create a user in the DB against that login:
$db = $srv.Databases["TroyPSTestDb"]
$dbUser = New-Object -TypeName Microsoft.SqlServer.Management.Smo.User -ArgumentList $db, "TroyPSTestDbUser"
$dbUser.Login = "TroyPSTestDbLogin"
$dbUser.Create()
And that’s it – job done! Of course you’ll still need to put this user in a role within your DB after you deploy it to Azure and give it the appropriate rights, but now it’s all sitting there waiting for you. Do take note of how the password is defined and set, that’s not a particularly manageable (or secure) way if you’re going to be orchestrating this en masse, but I’ll come back to this a little later on with the mega script, there’s just one more thing I want to do first…
Adding the connection string to the website
Ok, last trick in the config: I want to make sure the website is pre-configured with the connection string of the database. We already know all the connection details, it’s now just a matter of building up the string and invoking the appropriate PowerShell commands. Here’s all the bits:
$connStr = "Server=tcp:snyb5o1pxk.database.windows.net,1433;Database=TroyPSTestDb;User ID=TroyPSTestDbLogin@snyb5o1pxk;Password=S0m3thingR3@llyR@nd0mTh@tI$ntThi$;Trusted_Connection=False;Encrypt=True;Connection Timeout=30;"
$connStrInfo = New-Object Microsoft.WindowsAzure.Commands.Utilities.Websites.Services.WebEntities.ConnStringInfo
$connStrInfo.Name=TroyPSTestDb
$connStrInfo.ConnectionString=$connStr
$connStrInfo.Type="SQLAzure"
$connStrSettings = (Get-AzureWebsite TroyPSTest -Slot "production").ConnectionStrings
$connStrSettings.Add($connStrInfo)
Set-AzureWebsite -Name TroyPSTest -Slot "production" -ConnectionStrings $connStrSettings
Now there’s one thing here I want to draw particular attention to and that’s the slot parameter on the Get-AzureWebsite and Set-AzureWebsite commands. Miss this and you will spend a long time beating your head against the wall wondering why you’re getting exceptions about null objects when the website name is clearly correct. You see, when a website has multiple slots such as what the one above does courtesy of the “Stage” one we added, not explicitly specifying the slot will leave you high and dry as it will return a collection describing the slots. If you’ve only got the one default slot then the commands will implicitly apply to that one and you’ll get a website entity back so when you see all those “how tos” out there which look so damn easy but simply don’t work for you, that may well be why! Did I mention it can be frustrating that exactly the same command with the same parameters can return completely different types based on the state of the resource?
Moving on and back in the portal, we now have this:

That connection string name will need to line up with the one in your web.config so it may mean changing it after deploying the website so that it’s automatically applied to the website.
Pro tips
Stuff will go wrong and you’ll get errors. The errors may not tell you why, for example, when adding a tag to the database:
Set-AzureResource : : An error occurred while processing this request.
At line:1 char:1
+ Set-AzureResource -Name $dbName -ResourceGroupName $dbResourceGroup -ParentResou ...
+ ~~~~~~~~~~~~~~~~~~~~~~~~~~~~~~~~~~~~~~~~~~~~~~~~~~~~~~~~~~~~~~~~~~~~~~~~~~~~~~~~
    + CategoryInfo          : CloseError: (:) [Set-AzureResource], CloudException
    + FullyQualifiedErrorId : Microsoft.Azure.Commands.Resources.SetAzureResourceCommand
Oh, “An error has occurred”! When unexplained stuff goes wrong, crank up the verbosity:
$DebugPreference = "Continue"
If you don’t want the extra noise once stuff is sorted, quieten it back down again:
$DebugPreference = "SilentlyContinue"
Another thing you want to think about is conventions. If you’re going to be applying this process to a heap of sites then you want to think about your naming. I went with the following conventions:
- Website name = $projectName
- Database name = $projectName + “Db”
- Database login = $databaseName + “Login”
- Database username = $databaseName + “User”
- Tag name = $projectName
One final thing – and you’re not gonna like this – do not underestimate the significance of the fine print:
![[This topic is pre-release documentation and is subject to change in future releases. Blank topics are included as placeholders.]](https://storage.ghost.io/c/fb/33/fb3391dc-723d-4e74-b95a-d641b5feb38e/content/images/2016/02/50945093image3.png)
I’m a big proponent of Azure but I’ll be honest and say that I had to get the kids to leave the room before expressing how I felt about the consistency of PowerShell commands that actually work. I know I mentioned this earlier on as well and it was a real pain so just keep in mind that when stuff isn’t working, it’s not always your fault, it may have been someone’s else’s otherwise good advice that worked for them then but may not be relevant now.
Scripting it all out
Firstly, beware – dragons ahead! We’re going to automatically script the whole thing which means a single click creates a bunch of stuff that will hit your bottom line. As cheap as Azure services are, you create enough of ‘em fast enough and you may be in for a nasty surprise.
A quick caveat first – this script is nothing more than the commands above in a logical sequence and using some environment variables to persist a bunch of the hard-coded stings from above. It’s not an elegant PowerShell script so if you want a good reference point for that, check out this example for creating a bunch of Azure resources.
Here’s the whole thing:
Seem pretty easy? It is, and destroying it all is just as easy so here’s a script to nuke everything you just created so that you can play with it then remove everything before it hits your bottom line:
And that’s it – easy right?!
Other considerations and wrap-up
I’ve taken some shortcuts here that you may want to give more thought to if you’re going to follow this process. Lack of error resiliency in the script above is one example. If, for example, the resource name you’re trying to create already exists or the connection drops, it’s all going to fail halfway through. Not having a dedicated database for the staging environment is another example, but of course you’ve now got the scripts there to create an additional one if you please. Same deal again with lack of a connection string for the stage environment.
The main thing I’m trying to get across here though is that all of this is scriptable, automatable and perhaps most importantly, repeatable. Long gone are the days when acquiring infrastructure meant lengthy forms, long term commitments and lengthy wait times, these days it’s just a PowerShell script. That is rather awesome.