Edit (6 Oct 2020): It looks like the WCSA website has disappeared since originally writing this article and the domain is now parked on a porn site. The Google Code archive still exists so the blog post is still relevant, just be conscious that this project has obviously gone unloved for some time now and make take you to unexpected places.
Ah, automation. Any time I find myself doing the same thing more than once, I get the inclination to bundle it all up into something that can begin happening with a single click. Or even better, with no clicks.
I’ve been writing a lot on continuous integration lately, primarily using TeamCity to execute tasks on the change of source code, on a nightly basis and on demand. I’ve automated deployment of websites with web deploy, deployment of databases with RedGate, code quality with NDepend, code statistics with StatSVN and application security with Netsparker.
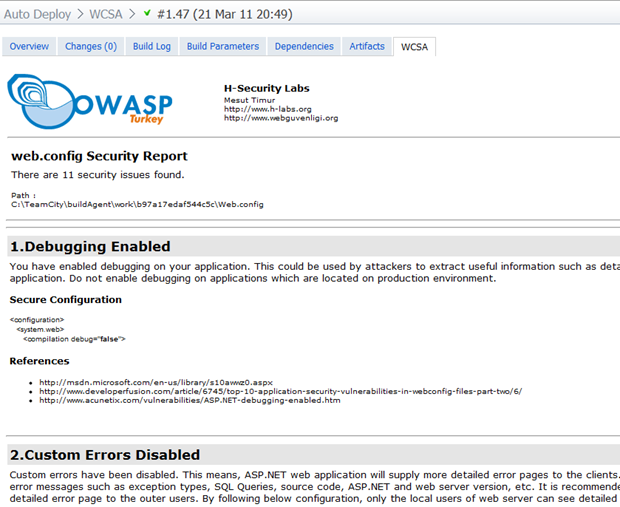
Recently I’ve begun using WCSA or in non-acronym terms, the Web.Config Security Analyser. This little beauty let’s you feed in a Web.config then it comes back and tells you everything you’ve done wrong in the world of security configuration. I talked a little about Web.config security in OWASP Top 10 for .NET developers part 6: Security Misconfiguration but there’s a lot more to it than just the old custom errors, debugging and tracing.
Since the Web.config tends to change a bit over time and poses a potentially serious security risk if it’s implemented poorly, inspecting it is ripe for automation.
What are we actually scanning for?
A whole lot, as it turns out:
- ASP.NET Debugging Enabled
- Clear-Text Credentials
- Custom Errors Disabled
- Cookieless Authentication Enabled
- Unencrypted Communication with Auth. Cookies
- Non-Unique Authentication Cookie Used
- Sliding Expiration Used
- Liberal Path Defined
- URL Redirection is possible
- Your form tickets are not both encrypted-validated
- Your form tickets are not validated
- Your form tickets are not encrypted
- Web cookies are not HttpOnly
- Web cookies doesn't require SSL
- Viewstate for CSRF
- No integrity check on ViewState
- ViewState is not encrypted
- ViewState may not be encrypted
- Page Validation is not being used
- roleManager cookies doesn't Require SSL
- roleManager Cookie Sliding Expiration Used
- roleManager cookies are not both encrypted - validated
- roleManager cookie are not validated
- roleManager cookie are not encrypted
- roleManager cookie path is Liberal
- Cookieless Session State Enabled
- Your web application's trust level is higher than Minimal
- Hardcoded Credentials Used
Many of these – in fact I’d say most of these – are frequently overlooked. You’ll probably be surprised at the number of findings the tool picks up in your typical Web.config file. The good news is they’re (usually) very easy to remediate without resorting to code.
Scanning the correct Web.config
Back in my You’re deploying it wrong series I automated the deployment of a web app to a remote IIS server. Part of this process involved employing config transforms so that the Web.config was changed to suit the appropriate target environment depending on the build configuration that was used.
When it comes to Web.config security, we may want to be a bit loose in a development or integration environment. For example, we might keep those custom errors turned off and allow tracing to assist in the development process. However, that’s definitely not what we want in the testing and production environments as we want these guys to be both consistent and secure.
The bottom line is that we need to scan the Web.config after it has been transformed in a fashion consistent with the live environment. In order to do this we can’t just scan the Web.config as it exists in source control, rather we need to inspect the packaged version which is to be deployed.
Back in part 2 of the aforementioned blog series I looked at how the Web.config is transformed and placed in a package ready for deployment. This is the guy we want as it’s consistent with what’s going to eventually end up on the server.
Configuring the build
Firstly, this build is going to be dependent on the one I configured back in part 5 of the series I keep referring to. I called that build “Package and deploy” and what it did as part of the whole process was to save the deployable package as a build artifact. This means quite a bit of the hard work has been done for us already as the transformed Web.config is just sitting there waiting for analysis.
But before I get into actually setting up TeamCity, we need to have the WCSA console app on the server. This is available over on the downloads page for WCSA and should not be confused with the GUI version. Remember, this has to be able to run unattended. I’ve grabbed the RAR file and just extracted it into the Program Files directory.
Getting down to business, here’s what the general build settings look like:

The artifacts are important as this is going to be the actual report which is generated by the process. Note that there’s both an .html file which is the actual report and a “Reporting” folder which contains some dependencies of the report. There’s not much to talk about in terms of VCS settings, just refer back to the previous posts and they’re all exactly the same deal.
Getting on to the important bit – the build step – here’s what’s going to actually do the hard work:
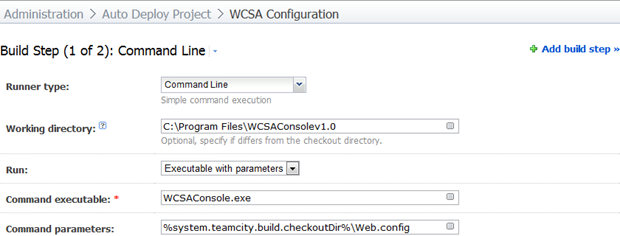
Most of the above is pretty straight forward, we’ll come back to how the Web.config gets into the build checkout directory shortly. All we need to know for the moment is that it will exist in the root of the checkout directory.
Now, you might be thinking “Gee, that was a very simple command, where’s the report going to be generated?” and you’d be right – it is simple. The usage info for WCSAConsole.exe only shows one parameter (the source Web.config) and a quick browse through WCSA.dll with Reflector shows there’s definitely only one argument being used which means we need to get a bit creative.
What actually happens is that the WCSA console only ever creates reports in the “OutputReports” folder of the app and then names the target HTML file uniquely, for example “Report-web.config-129450894350422843.html”. There’s also a “Reporting” folder within there which the individual report has some dependencies on (logo and a couple of HTML files). Fortunately it’s very easy to pick these up with a bit of command line magic wrapped into a batch file:
FOR /F %%I IN ('DIR *.html /B /O:-D') DO COPY %%I %1\WCSA.html & XCOPY Reporting %1\Reporting /I /Y & EXIT /B
What this is doing is enumerating through all the files in the directory with an .html extension and doing so in reverse chronological order. It then copies the first file to the path specified in the first argument passed to the command and names the target “WCSA.html”. This is followed up with copy of the “Reporting” folder and then before the enumeration moves to the next file, the program exits. Easy :)
Actually, the two resources referenced in that script are important because we referred to them earlier when we set up the artifacts. It’s the script above which ensures these exist in the correct location when all the build steps finish and TeamCity goes searching for artifacts.
We’re now going to call this from TeamCity in a second build step and pass it the build directory as the parameter. After it executes we’ll have everything nice and handy for TeamCity to pick up as artifacts and attach to the build for review.
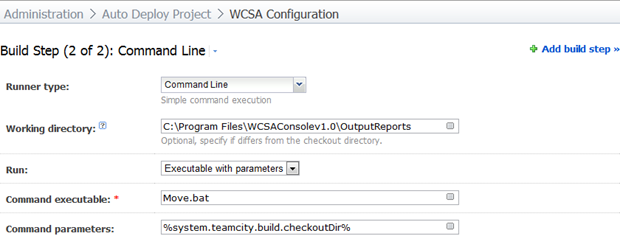
The command parameter in the screen above is important as the batch file will use this to place the artifacts in the correct location.
Next up we need to decide how to run the build. Because it’s very fast (only a few seconds) and produces small artifacts, I’m going to trigger it off each successful “Package and deploy” build:
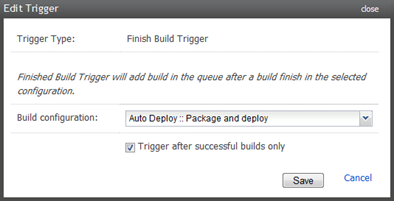
What this now means is that every single deployment into the server environment has a record of how securely our Web.config was configured after the config transforms were applied. Nice.
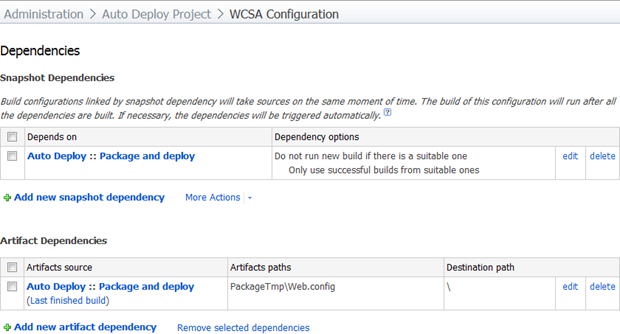
Now we need to establish some dependencies, both a snapshot dependency on the previous build (we want to ensure this one runs against the same VCS revision), and an artifact dependency so we can pull the transformed Web.config from somewhere. Remember, this is the Web.config after the config transforms have been applied:
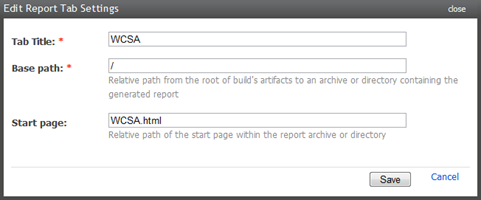
Finally, I want to give the build that professional touch so let’s add a report tab by heading on over to Administration –> Server Configuration –> Reports tab and asking it to look for the WCSA.html file:
That’s it, nothing more to do other than run the build and bask in the glory of a very nice little Web.config report:
Summary
This is a pretty simple little build, and that’s a good thing. What I really like about it is that it helps surface aspects of the Web.config which are often not understood or not implemented. In fact for many people, they’ll be a little obscure.
HTTP only cookies, for example, are a great defence against cross site scripting attacks which attempt to steal data persisted in the browser as they’re precluded from being accessed by client side JavaScript. All it takes is a simple <httpCookies> entry. Or request validation, which is on by default but often turned off during the development process (a practice I’ve bemoaned in the past), is an excellent defence against untrusted data containing a malicious payload.
Although basic, these settings often slip through and make their way into production environments. This build raises their visibility and is a really easy one to just template and drop in behind the deployment builds. Security checks don’t get any easier than that!
Update (4 April 11): I glossed over (or rather completely neglected), to refer to the fact that ideally, the WCSA app should have been stored in VCS rather than being installed on the server hence creating a configuration dependency on the build machine. Doug Rathbone articulates this very well in his response titled Third party tools live in your source control and we have some good banter as a result. Although I believe there are valid exceptions, WCSA is not one of those and could have easily been packaged in with the app. So do everything I’ve outlined above, just put the WCSA app into a VCS folder with the app and call it from there. Or feel free to argue to the contrary :)