| << Part 3: Publishing with Web Deploy | Part 5: Web Deploy with TeamCity >> |
Over the last three posts in this series, we got to the point where all the Microsoft bits are working really nicely together. Config transforms, packaging and Web Deploy are great stable mates in the world of web application deployment.
The bit that’s missing though is automation. Actually there are several bits missing but automation is the common solution. Deployment by developers directly from Visual Studio or command line with MSDeploy works fine most of the time but has a few flaws we’re simply not going to be able to overcome without a build and deployment server. In all likelihood, your existing release process looks something like this:
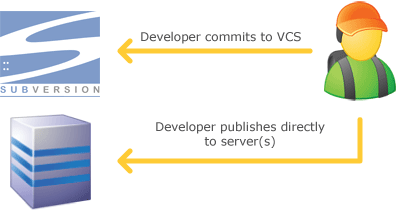
The problems with this are numerous:
- Access rights – you’re giving the developer too much if they can directly invoke Web Deploy either with their own credentials or other credentials they know. They will bend to temptation and circumvent release procedures, even though it’s normally well intentioned (just had to turn off custom errors for a moment…).
- Auditability – well, you’ve got none. You have no way of automatically capturing when, what and who. You could have a dozen releases in a day and be none the wiser because if it’s not automated, the information is inevitably not recorded or done so poorly.
- Rollback – you know how rollback is most commonly done? Copy the target folder and rename it “old_MyWebApp”, publish the new app then if it breaks, copy the old files back over. I’d bet my bottom dollar that in lieu of a build and deploy environment, this is your rollback strategy. Either that or pulling a previous revision from VCS and repeating a manual deploy which can be both time consuming and error prone.
- Version control – if you’re not deploying directly from your VCS, what confidence do you have that released source code is retrievable or reproducible? You’re (hopefully) not publishing all your source code to the target environment so short of some emergency reverse engineering, a developer could easily release code you’re never going to be able to reproduce.
I’m sure there are other good reasons but that’s a good kick-off for the moment.
Continuous integration concepts
Welcome to the realm of continuous integration or “CI”. Actually, the Wikipedia info the CI link points to is very good introduction to the concept so it’s one you’re not familiar with, go there and read that before continuing because I’m going to be a lot more succinct than they are.
The CI objective is to continuously and frequently incorporate changes to the codebase into a centralised build process which may include the automated running of tests, analysis of the code and deployment to target environment(s). Pivotal to this is the version control system as this should be the source of truth for the code base. As a result, effective CI is only achieved through effective use of VCS.
In theory, the continuous build process should look something like this:
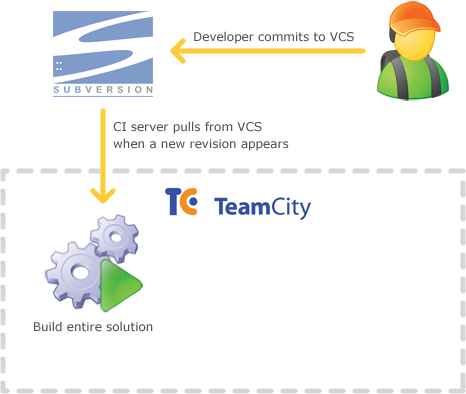
In order for this to work successfully, developers need to apply the good development practices they’re probably already aware of but may not have previously had the impetus to adhere to. Committing source code regularly, taking updates from team members as frequently as possible and only putting working code which doesn’t fail tests into VCS are all just common sense and good practice. The difference being that if they don’t do this in the CI world, lots of flashing red lights go off and other people get inconvenienced. Let’s just say they should be a lot more motivated now!
Impact on development practices
Forcing developers to only release code – even to a development or test server – via a continuous integration and deployment process can be a fundamental change of working for some people. It means moving away from casual VCS and release practices and having to take a much more structured approach to work.
This is a good thing, and if someone tells you otherwise it’s probably because they’re following less than ideal practices to begin with. This really forces you to modularise work into smaller, more atomic units than you might have done in the past. If you don’t commit code atomically, for example by submitting the code behind but not the ASPX with controls it references, your build breaks and now nobody can push it through to the development server until it’s fixed.
 Likewise if you go long periods without committing to source control you start to dramatically increase the risk of conflicts with others. Plus you also increase the duration between releases to a server environment which consequently increases your risk of features not working outside your own PC. Everyone’s familiar with this, I assume –>
So in summary, release early and release often. Yes, even if you’re not practicing CI!
Choosing a build server
This concept is equally applicable to a whole range of build server products that support the principals of CI. Within the .NET space the products most commonly seen include (but are not limited to) CruiseControl.NET (CC.NET), Microsoft’s own Team Foundation Server and the topic of today’s discussion, TeamCity from JetBrains (the good folks who bring us ReSharper).
Much discussion about the various merits of each is available on the web but there are a few key factors which drove me to TeamCity. Firstly, the Professional Edition is free and more than capable of providing sufficient features to get very intimate with how it runs before needing the scale of the Enterprise Edition which even then, is only a couple of thousand dollars.
To be honest, Microsoft licensing confuses the hell out of me but as best I can tell, you’re looking at shelling out dollars on a per client access license basis (or higher versions of Visual Studio) which starts to get expensive for large teams. Actually, I think TFS is a very impressive product. What it’s done with the whole application lifecycle management and particularly the testing and lab environment is mighty impressive. But the other thing which closed the door on TFS for me (at least for now), is that I want a build server that leverages Subversion for the VCS as I want to use this in an environment with a very rich, well established SVN ecosystem.
Secondly, the configuration is quite simple. One of the common criticisms of CC.NET is the clunky build configuration (lots of mentions of XML files) which doesn’t sound particularly appetising. Most of the comparisons I found on the web by people who actually understand both products (unlike me) favoured TeamCity and when you start to see such a common trend across so many independent reviews, it’s hard to ignore.
Finally, I just like JetBrains! ReSharper is a raging success (over 110,000 licenses sold) and every interaction I’ve had with them both professionally and via medium like Twitter has been profoundly positive. They give me a high degree of confidence that they understand the development process and the tools software developers need to be successful.
So moving forward, all the examples in this blog series are done against TeamCity Professional 5.1.5. At the time of writing, RC2 of 6.0 had just been released so JetBrains is getting very close to a new major version. The link above has plenty of references to what’s new.
Creating a TeamCity project
 I’ll skip over all the TeamCity installation how-to because quite simply, it’s a piece of cake. Go to the download page, run the installer then keep clicking “Next” or “Ok” or any other positive words until the thing works. There’s really not much to it. The only twist for my installation is that because it’s running on a machine that’s already consuming port 80 for IIS, I needed to pick another number so it’s all port 81 from here on in. I’ll also create an account with the username “troy” (no Active Directory integration in the free version).
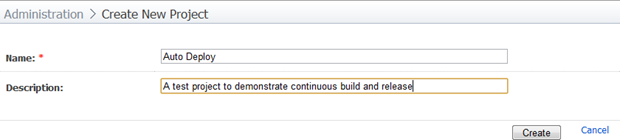
Onto the good bits. Let’s kick off by creating a brand new project:
Now we’ll get a few tabs across the page and the ability to create a new VCS root:

Fire this up and we’ll get quite a number of form fields of which only the first five really matter that much. Here’s how I’ve configured it:
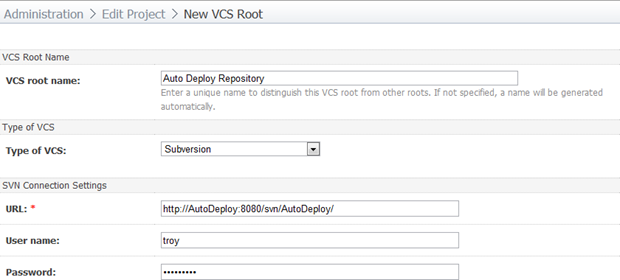
I’m running VisualSVN Server on the same machine hence the familiar URL but as with TeamCity, it has to run on a different port so it’s 8080 this time around. I’ve created a user in VisualSVN called “troy” which is totally autonomous to the “troy” user account in TeamCity. Most of the other info on the page is pretty obvious with one exception; the URL. My project sits in a “trunk” folder beneath this URL (pretty normal VCS practice) but we’re configuring a VCS root here, not a project root. This is so that is we want to leverage VCS labelling to automatically tag every release in SVN, we can easily refer to the “tags” folder beneath the root. We won’t do that in this series but there’s a great post about Build and Deployment automation, VCS Root and Labeling in TeamCity which is well worth a read if you want to know what it’s all about.
Just before saving the VCS root configuration, I always make sure the “Test connection” button returns something positive. An inaccessible VCS is going to put the brakes on things pretty quickly. Once it’s done it will look something like this:
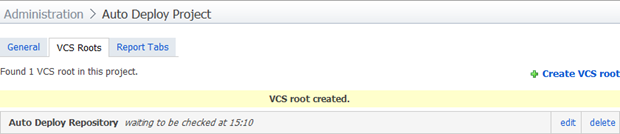
That’s it for the project, it’s now attached to the local Subversion instance and ready for some builds. I’ll click back on the “General” tab in the image above before progressing to the next section.
Creating a continuous build
Now we get into the really cool bit and what’s at the heart of this entire series; building the solution. The objective here is to ensure that every time code is committed to VCS the entire solution can actually build without error. Note that this doesn’t just mean the web application project and its dependencies, I want to ensure that everything in the solution builds. If I have a business logic project and someone makes changes to it which break another project outside the scope of the web app, I want to put the brakes on things in this build.
I’m now back on the project configuration home page:
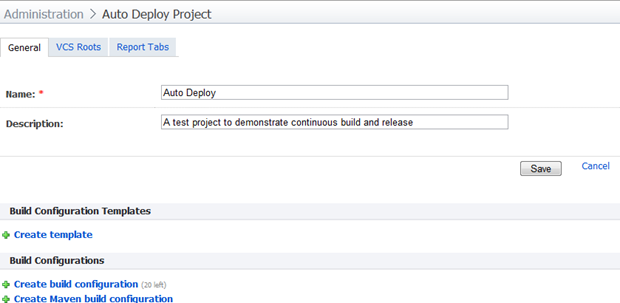
I’m going to go ahead and “Create build configuration” and give it a logical name and description. Here’s how the first four fields now look (I haven’t touched the remaining fields):
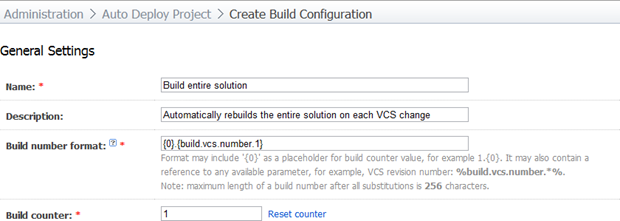
I’ve made one important change from the default here which makes life a lot easier later on; I’ve appended a format string to the build number. By default, every build will get a unique, auto-incrementing number so it can be uniquely identified. However, as you can see from the description under the field, we have a little bit of control as to how that build number is formatted. By appending the VCS revision number we’re going to be able to really easily tell at a glance which version of the code was used in the build. As you’ll see later on, this can be very handy.
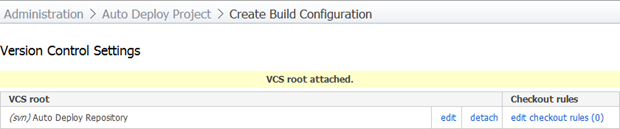
Proceeding to the next screen, we now get to attach a VCS root which should be the one created when the project was set up. After selecting this, there’ll be a confirmation screen and the VCS root will appear in a table:
There’s one more change we need to make though. Earlier on we specified the VCS root as the very root of the repository but when it comes to building the solution, we really just want to get the contents of the “trunk” folder. To do this, I’m going to create a checkout rule:
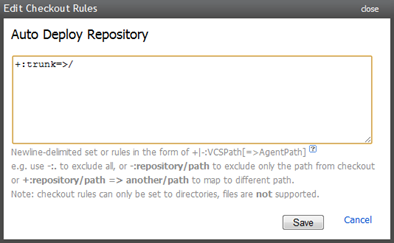
What this rule is going to do is ensure we only get code from the trunk. Without this, we’d get the trunk, the tags (which could be very numerous) the branches and anything else in the repository. I recently made the mistake of doing just this on a large project for a build intended to find duplicates in the code. It took me a couple of days to realise why a 37 second build had suddenly blown out to an hour and 30 minutes!
Once this is saved we can progress to choosing a build runner. This is what’s actually going to do the hard work. You’ll find TeamCity has a number of build runners that not only build the project but do things like find duplicate code or run FxCop rules. We’re just going to do the simplest possible thing and choose “Visual Studio (sln)” then fill out the form like so:
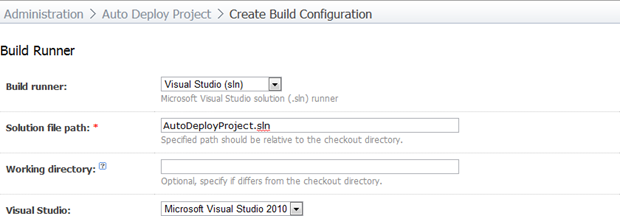
This should all be immediately self-explanatory so there’s no point delving into it. Everything else on the page has been left in its default state including the target which is “Rebuild” and the configuration which is “Release”.
Although I’ve cropped it off in the above image, if the project were to have unit tests, it’s here in the build runner configuration we’d set those up. The success of the build would then be dependent on the successful passing of the unit tests.
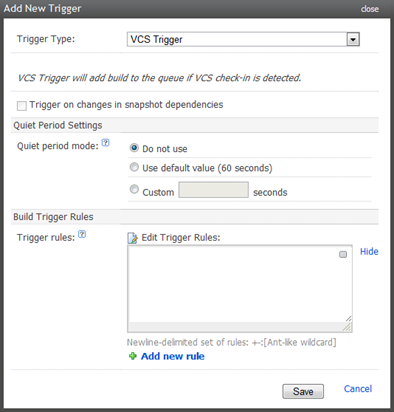
 Once this is saved we’ll see the “Configuration Steps” menu to the right of the screen for the first time. This will become quite familiar if you regularly tweak or reconfigure build settings. Obviously we’ve already gone through the first three steps and while we could leave it right there, there’s one more thing we need to do first and that’s create a trigger for the build.
You can trigger builds based on a number of variety of different events such as on a schedule (i.e. nightly) or on the success of another build. What we want to do in this scenario is trigger the build every single time there’s a VCS change. This is fine for demonstration purposes but for real projects with a potentially large number of developers making frequent commits, it could be a bit aggressive.
Here’s how I’ve configured the trigger, basically everything is in its default configuration but the screen grab gives you a good idea of the extensibility:
Hitting the right target
There’s one more thing we need to get right before we can successfully build the solution and that’s to get the Web Application targets assembly onto the build server. If we just try and run the build immediately, we’ll get an error like this:
The imported project "C:\Program Files\MSBuild\Microsoft\VisualStudio\v10.0\WebApplications\Microsoft.WebApplication.targets" was not found. Confirm that the path in the <Import> declaration is correct, and that the file exists on disk.
The reference to this target is included in the project file of any web application and if it doesn’t exist, our build isn’t going to go very far. The general consensus is that the easiest way to resolve this is to simply copy the targets file from a machine with Visual Studio 2010 installed over to the build server. While we’re there, we’ll also copy over the contents of the “Web” folder (exists in the same location as the WebApplications folder) because we’ll need that in the next part of the series when we start targeting “Package” in the build.
Depending on what you read, the build server may theoretically require Visual Studio to be installed and an appropriate license to be procured. Just to build a web application project. C’mon, seriously? For the sake of a few files? Anyway…
Making the magic happen
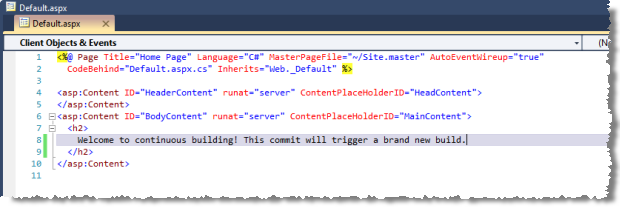
Now there’s only one thing left to do – let’s trigger the build! I’ll jump back to Visual Studio, make a change then commit it to Subversion. I’m just going to create a little welcome message on the default page so we’ve got something friendly to look at later on:
What I didn’t show you in the earlier screen grab when I set up the VCS root for the project was that by default, TeamCity will poll Subversion every 60 seconds looking for new changes. That’s just fine for our purposes.
Voila! Here we have a successful build:
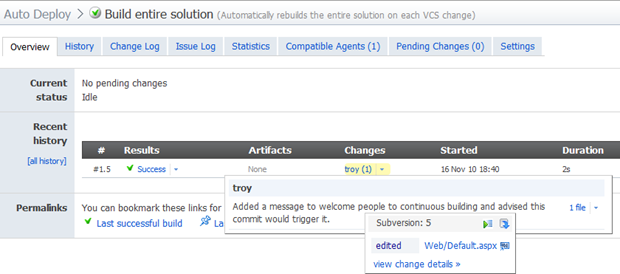
There’s a lot going on in the screen above. Firstly, we have the build number which indicates it was the first time this build ran and it was against the fifth revision in the VCS repository. Then we see the build was successful but there were no artifacts (more on these in the final part of the series when we start creating packages). The changes column explains there was one change in this build (strictly speaking, its one VCS revision which could include multiple changes), committed by me which I’ve then expanded to show the commit message in Subversion and expanded again to show the change set. We could drill this down even further to get a diff of the change. Very cool.
Breaking the build
The only other thing worth showing while we’re automating the build process is what happens when it all goes wrong. Let’s add a brand new project to the solution in Visual Studio and call it “BusinessLogic”. I’ll add an “Order” class with a “CancelOrder” method which has a dependency on “RefundPayment” in a “PaymentGateway” class. Except I won’t create the “RefundPayment” method and the build should fail. Here’s what happens:

There are various means of being notified of a failed build; email, Windows system tray notifier, Visual Studio plugin and obviously by just looking at the website. There’s plenty of info out there on these methods so I won’t dwell on them here. Let’s drill down into the failed build and see what’s going on:
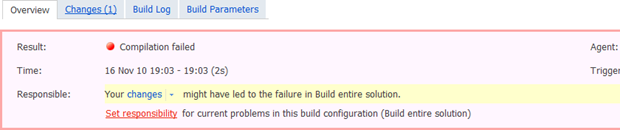
The overview tab is pretty self-explanatory and it’s making it clear I’ve screwed something up. That’s all pretty obvious in this test scenario but in a larger team with multiple people regularly committing code, it starts to become pretty valuable information. Let’s take a look at the build log tab:
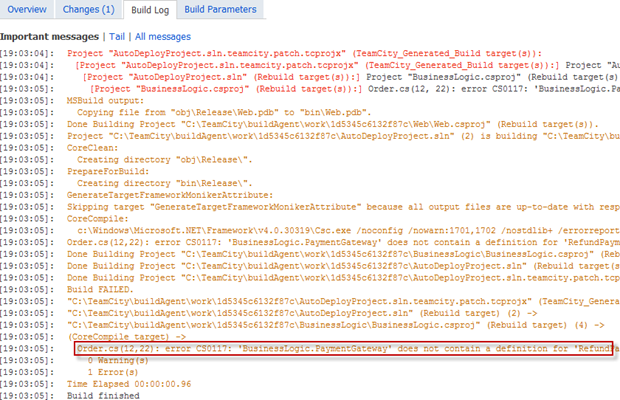
I’ve cropped the image a little tight but you can clearly see where the error was. Again, once you consider this in the context of a larger team it becomes a pretty neat way of pointing the finger at someone supporting the author in working through a resolution.
Coming next…
The last thing we need to do in this whole series is tie together everything we’ve done so far to get the app deployed out to a server.
| << Part 3: Publishing with Web Deploy | Part 5: Web Deploy with TeamCity >> |