| << Part 4: Continuous builds with TeamCity |
In the first four parts of this series we got config transforms playing nice, command line builds and packaging ticking along, Web Deploy happily receiving our application and TeamCity continuously building the entire solution on every commit. The last thing to do is to harmonise everything so that we can actually automate the deployment.
Breaking down the build and deploy processes
First up, we’re now only focussed on the web application. If there are other projects in the solution on which the web app is not dependent, they’re not going to play a role in this post. It’s now all about building, packaging and deploying the UI layer and anything it’s dependent on.
However, we only want to do this if the build in the last part of the series has passed. If another part of the solution contains errors – even though it might be independent of the web app – I don’t want to push this through to a live server. As I mentioned when we set up the build runner for the solution, that build may also contain unit tests and we definitely want those guys to pass before publishing the app.
There are also times when we’re going to want to package and deploy without necessarily repeating something we’ve already done before. If we know the entire solution in a particular VCS revision has built successfully before and all the tests have passed, we don’t necessarily want to repeat those activities even though we may want to run the deployment process again. For example, when we’re deploying to a different server or rolling back to an earlier build after finding problems in the target environment with a newer one.
What this means is breaking the process down into two discrete but definitely related parts:
- Ensuring the entire application builds and if they exist, unit tests pass.
- Creating a package of the web app and publishing it to IIS via Web Deploy.
If the second item above is to happen in one TeamCity build configuration, we need to ensure we can execute a single command to perform both the package and deploy activities. The final thing we want to get out of this process is to ensure we can go back and retrieve the exact package that was deployed in the future. From an auditability perspective, this is a very good thing indeed.
Encapsulating the package and deploy processes
The next step is to encompass both the package and deploy processes into a single command. We need to do this because when we configure a new build runner in TeamCity, we’ll be asking it to execute one specific task. We could break the process down into a package build task and then a separate deploy build task but the whole thing starts to get a bit verbose. I’m sure there are valid use cases for it but I’m finding the single process works pretty well for me.
We can tackle this several different ways:
- Add a deployment target to the csproj and include this in the MSBuild command which creates the package. This is easy enough to do, but it starts to play havoc with TeamCity naming conventions when MSBuild is run directly against the csproj.
- Create a custom build file with separate targets to package and then deploy. This approach encompasses all the build logic for this process into a single file and is also advantageous for larger, more complex projects with multiple build steps or more than one web app project (separate admin and public interfaces, web service layer, etc.).
- Use an MSBuild command with a DeployOnBuild parameter. This is a neat way of very easily packaging and deploying via MSBuild and it means no changes whatsoever to the solution. This is what we did back in part 3 and is a really neat, low friction approach.
Setting the TeamCity build agent service account
As I mentioned earlier, we want to get the build and deployment process executing under an account with the rights to deploy to the target environment so that we can avoid basic authentication and nasty plain text credentials. We don’t want these anywhere; not in the build server and not in the VCS repository, just stay away from them! To do this, we need to change the account the TeamCity build agent service logs on with.
The build agent service is the one that does all the hard work. This is the process that actually compiles code and executes whatever it is you ask the build runner to do. TeamCity can be configured to distribute build agents out to multiple machines in order to spread the load and in a scenario like this, you’d want to set the log on account for the service running on each of those machines.
Ideally, you’d want to pick a service account from your network specifically for the task. For this example I’ll just run the agent service under the local administrator account and leave the TeamCity web server account as it is:
![]()
Configuring the new build runner
Now for the best bit – getting continuous deployment working. We’ll go back to the TeamCity web UI, open the project we created in part 4 and create a new build configuration. I’m to configure this mostly the same way as the build configuration in the previous post:
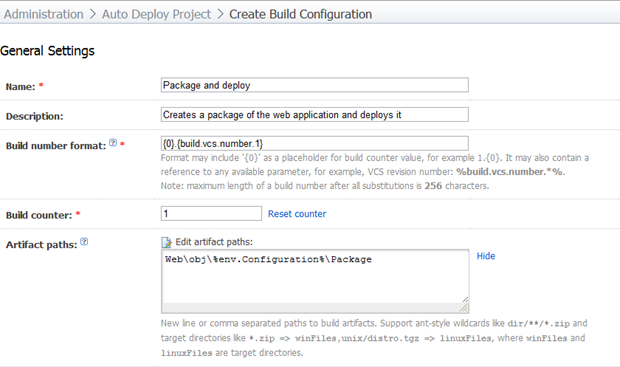
The big difference this time around is that we have an artifact path. The reason I’m doing this is so that after the build runs, the output (or artifact) is saved and can be referenced at a later date. In the case of this build, the artifact is the deployment package. Having this available for perpetuity means we can always go back and see exactly what was deployed to the server (thumbs up for auditability). It also means we could always download the package and redeploy it elsewhere, for example by a system administrator who won’t allow remote deployment. As we saw in part 3, we can always run the Web.deploy.cmd script to push a pre-package web app out via Web Deploy.
In the artifact path you’ll see a “%env.Configuration%” string. This is a variable we’ll come back to shortly.
On the next page, the VCS configuration will be identical to the previous build. Reuse the VCS root, edit the checkout rule to pull code from the trunk then continue on to the build runner page.
Onto the engine room of this build configuration; the build runner. Here’s how it looks:

The command line parameters are mostly reminiscent of the incredible all-in-one build, package and deploy command we configured in step 3. However, there are a couple of little differences. Let’s take a look at them all:
/P:Configuration=%env.Configuration%
/P:DeployOnBuild=True
/P:DeployTarget=MSDeployPublish
/P:MsDeployServiceUrl=https://%env.TargetServer%/MsDeploy.axd
/P:AllowUntrustedCertificate=True
/P:MSDeployPublishMethod=WMSvc
/P:CreatePackageOnPublish=True/P:UserName=AutoDeploy\Administrator
/P:Password=Passw0rd
We can see the same %env.Configuration% variable we saw in the artifact path earlier on. You’ll also see a %env.TargetServer% variable in the service URL parameter. I’ve kept the credentials plain text for the sake of demonstration but once again, don’t do this in a live environment where you can happily use NTML.
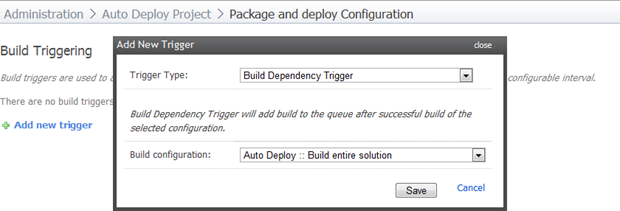
Next up, we’ll select the “Build Triggering” item from the newly visible “Configuration Steps” menu to the right of the screen. This time we’ll trigger the build based on the successful execution of the build we created in part 4:
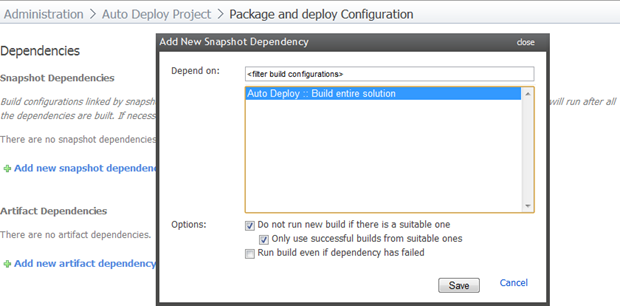
Continue down to the “Dependencies” menu item and add a new snapshot dependency on the previous build. What this is going to do is ensure that when the build runs, it does so against the same source as the first build. This may seem a bit redundant if it’s triggered by the previous build anyway, but consider this scenario: The first build is fired off by a VCS change and starts running. Before it finishes, someone commits a revision which breaks before the first build against the previous revision has completed running. Now, if the second build pulls the head of the VCS repository, it’s going to have problems. Adding a snapshot dependency ensures it pulls down the code from the build which ran successfully and triggered the second build. Easy :)
Now for the final step; configuring the build parameters. We’ll jump on down to the “Properties and Environment Variables” menu and add the two values we’ve already references in the previous settings as new environment variables:
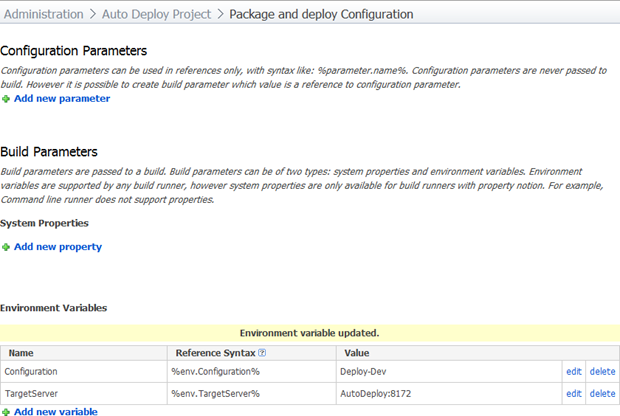
What the environment variables are going to do for us is allow us to configure them on demand later on. We’ll come back to that a little later.
So that’s it; when we next commit a change to Subversion the first build configuration will run and if it’s successful, it will trigger the second build configuration which should ultimately result in our application being deployed out to IIS.
Running the package and deploy build
Back in part 4 I committed a failing build to demonstrated how TeamCity reports on the error. I’m going to fix that code and commit it back to Subversion so it triggers the first build runner then take a look at what happens on the package and deploy build.
Success! Here’s the first build passing again:
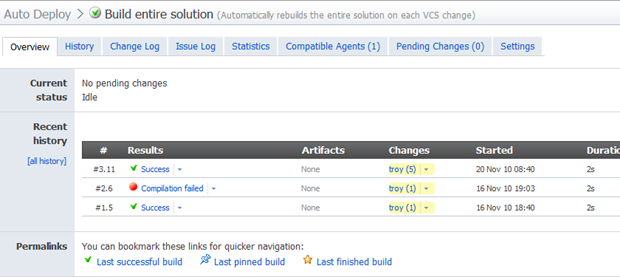
The build number is referring to revision 11 in VCS and the “Changes” column is showing 5 changes since the last build because I paused this build and played around with another project while I got the machine configured correctly. Let’s drill down into that build then take a look at the “Dependencies” tab:
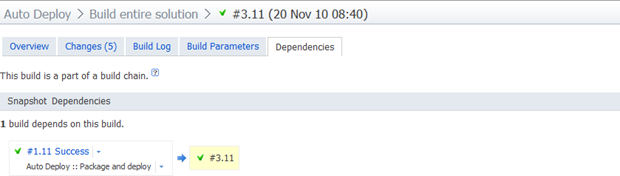
What this is telling us is that this build – #3.11 – has been used by another build which is the “Package and deploy” build in the “Auto Deploy” project, specifically, build number 1.11. You can also see this indicated by a little  icon on the build runner home page (I’ve cropped it out a couple of images back up). Let’s browse back over to the home page for the “Package and deploy” build:
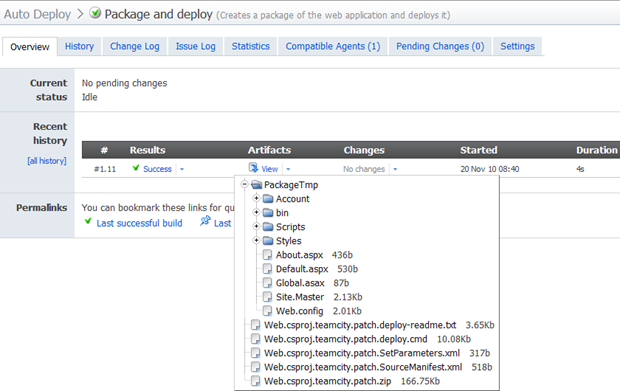
What we see here is not only a successful build but an “Artifact”. If we expand that out we can see the package we discussed way back in part 2. This is now retained against this build so we can go back and retrieve it at any time. Once again, great auditability!
But now for the pièce de résistance; let’s see if the site was published successfully.
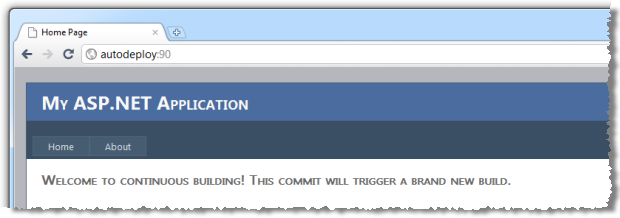
Success! The website we first published from Visual Studio back in part 3 has successfully been updated to the changes we committed to Subversion. Every single time we commit code to the repository the entire solution will now build and the web app will be deployed out to the website with the correct configuration settings and a record of the package will be retained on the build server.
One last word on continuous deployment triggered by a VCS change; think carefully before doing this. Automatic deployment to any environment can get intrusive. Imagine a team of 5 developers committing work once an hour; do you really want 40 deployments in a day? Not only does it leave the target environment in a state of flux, it means your build server is going to be very busy (build tasks are sequential), plus it’s going to fill up with a lot of artifacts that can chew space up pretty quickly.
A more likely scenario for deployment to a development environment is either a trigger on a nightly basis or even no trigger at all and the build configuration just gets called on demand via the “Run” button. Keep the first build which ensures the entire solution runs and allow it to be triggered by VCS change because it provides valuable immediate feedback and doesn’t produce any space-hungry artifacts (again, consider the load on the build agent(s)), just perhaps be a bit more selective about the deployment process.
Passing parameters to the build and deploying to other environments
There’s one last thing I want to look at that fills a bit of a gap in the whole application lifecycle management; deployment to other environments. When we configured this last build, we parameterised a couple of environment variables, namely the build configuration and the target server. What this means is that if we now browse back to this build and hit the ellipses (the dot-dot-dot), next to the “Run” button, we’ll see this screen:
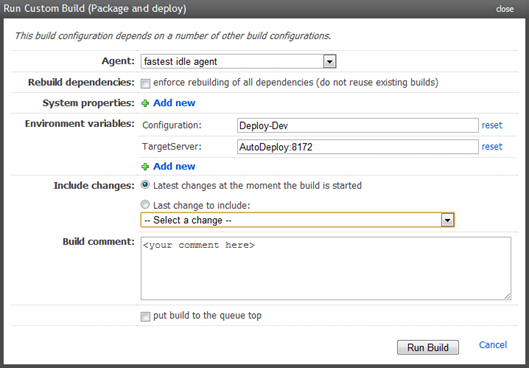
You’ll see both the configuration and the target server automatically populated with the values we entered when we created the environment variables, but we can now change those to whatever we like and run the build again. For example, we might create a “Deploy-Test” build configuration in Visual Studio with different config transforms then change the target server to our test server. Same logic again for production.
You’ll also see an option a bit further down for “Last change to include”:

This lets us pick an earlier revision from Subversion and push this out instead of just taking the head of the repository. It’s a great way of either pushing out an earlier, stable copy to a target environment or rolling back if a deployment goes wrong.
The complete picture
Picture being a thousand words and all, here’s what we’ve ended up with:
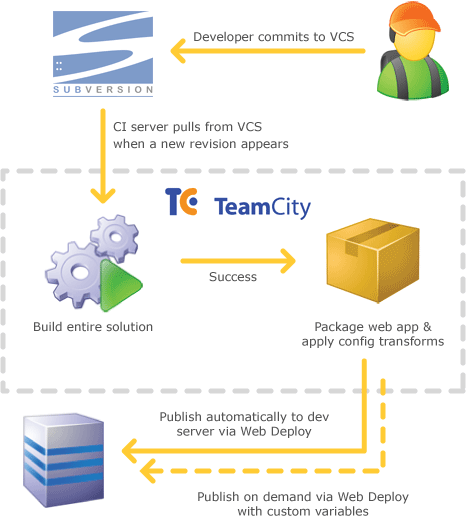
Beautiful!
Summary
I’m conscious there’s a lot of material over this blog series, but it wasn’t intended to be that way. What started out as an afternoon blog post somehow turned into a five part series with 12,000 words that just continued to grow every time I realised the process wasn’t quite perfect or the picture wasn’t exactly complete.
The thing is, if you only appreciate part of the process you simply can’t tie the whole thing together successfully. Or if you do, you’ll come to troubleshooting something later on but that little gap in knowledge – such as how the packages are structured – with cause a great deal of frustration. I should know, I pieced everything together very randomly and had enormous frustration along the way.
The thing is though, this is one of those things which is worth doing and worth doing right. Every time I switch back to a project with a manual mechanism for publishing, I approach it with renewed trepidation because it just feels so, well, flimsy. The confidence I now have to release into any environment at any time without fear of screwing it up – and the ability to rollback if I do – is a huge bonus to the way I work.
So here we are; no manual configuration on every release, no CTRL-C and CTRL-V or Xcopy, no trouble rolling back to an earlier build, just an entirely predictable, easily reproducible procedure that anyone with access to TeamCity can perform. And that folks, is just how deployment should work.
A very rocky journey
Getting to grips with all the concepts in this blog series and tying them together in a cohesive fashion was not an easy task. Many others have said it already, but the documentation around Web Deploy is not fantastic. It’s there in volumes, it’s just hard to piece it all together, particularly given the idiosyncrasies around IIS6 versus IIS7 and basic versus NTML auth. I ended up reading a huge amount of content (as you’ll see form the resources list below), and asking a lot of questions.
I’d like to mention the support Sayed Ibrahim gave me. Sayed works at Microsoft on the Visual Web Developer team and is the co-Author of Inside the Microsoft Build Engine. Sayed not only provided a lot of support through Twitter and Stack Overflow but on a couple of occasions blogged in detail about the questions I’d asked (Web Deploy: How to see the command executed in Visual Studio during publish and ASP.NET Web Application: Publish/Package Tokenizing Parameters). Many thanks indeed for your support Sayed.
Resources
Normally when I provide resources at the end of the post, it’s just a few links, maybe half a dozen at a push. The fact the list below is so long is more a reflection of how difficult it was to find the information in this blog series than it is an endorsement of thorough research!
- Web Deployment Made Awesome: If You're Using XCopy, You're Doing It Wrong (includes an excellent video from Scott Hanselman)
- Web Deploy Provider Settings
- Configure the Web Deployment Handler
- MS Deploy Basics
- How We Practice Continuous Integration And Deployment With MSDeploy
- Web Packaging: Installing Web Packages using Command Line
- Best Practices For Creating Reliable Builds
- Automating Deployment with Microsoft Web Deploy
- Continuous Integration and Better Unit Testing (great video from Rob Connery)
- Web Deployment Painkillers: Microsoft Visual Studio 2010 & MS Deploy (video from PDC09 with Vishal Joshi)
- Web Deployment Tool Installation (installer for Web Deploy)
- Automated deployments with TeamCity, Deployment projects & SVN
- Automatic Deployment from TeamCity using WebDeploy
- Build and Deployment automation, VCS Root and Labeling in TeamCity (nice info on tagging releases in Subversion)
- Web Deployment: Web.Config Transformation (config transforms 101)
- Walkthrough: Deploying a Web Application Project Using a Web Deployment Package (4 part walkthrough of everything you need to know about packaging)
- ASP.NET Web Application: Publish/Package Tokenizing Parameters (how tokenising works in config transforms)
| << Part 4: Continuous builds with TeamCity |