I'm increasingly of the view that both my time and my sanity are worth more and more as the years progress. Particularly in my independent life, it really can be that black and white - if I can't work, it costs me money. Plus, I want to be happy and few things make me less happy than computer bits going wrong:
Really disappointed with the @Linksys WRT1900AC wireless routers I bought a year ago, continually degrade speed and need a reset pic.twitter.com/TsEzdiHLMs
— Troy Hunt (@troyhunt) September 22, 2016
I bought 2 Linksys WRT1900AC wireless routers when I moved interstate into a big house just over a year ago. They were well-reviewed and I figured I'd put them at opposite ends of the place, throw in a couple of switches as well and we'd be all good. Now maybe if I was your everyday garden variety home user it would have been ok, but I'm not and if you're here on my blog reading this then you're probably not either.
The first thing that got me with these devices is that it felt like nothing had changed since the very first wireless access points I had over a decade ago. Same basic interface, same simple settings, same "just get it set up then never look at it again" paradigm. Also the same approach to updating the thing: you're not going to see many changes to the firmware. I had Billion devices before Linksys and I don't think I ever saw a firmware update over many years which worried me not just because I'm sure there was broken stuff in there, but because it was never evolving. It was like "here's your router, uh, good luck!"
And then the Linksys started misbehaving. I'd be working away on the laptop on wifi and the connection would just drop to almost nothing. Instead of 40Mbps down per the tweet above, it'd drop to less than 2. There's 95% of my connection speed gone for no apparent reason. Wired connections were fine and power-cycling the router would fix it, but every time a page was a bit slow I'd be wondering if it was cactus again. After venting on Twitter, I got a variety of responses including that I should install the open source dd-wrt firmware or that I should buy a power adaptor that can automatically cycle the power every night. No, no, a hundred times no to both - if I buy a product then I expect it to work as advertised and not need to implement hacks to keep it alive. There's also extensive evidence out there that this is just what many Linksys products do and the more I looked into it, the less convinced I was that it was ever going to be acceptable whilst I had Linksys devices in the house.
But I also got a resounding chorus of people telling me to just "do it properly" and go buy Ubiquiti bits. Admittedly, this bugged me because I didn't want to buy new stuff, I wanted the stuff I already had to work properly. But the more I thought about it and particularly as I looked into it, Ubiquiti made a lot more sense. Plus, I frankly just had to get over my sense of loss aversion - it is what it is with the Linksys devices, now what's the smartest thing to do? It was Ubiquiti. Let me share what I got, how it works and how it's finally solved my long-running wifi dramas.
Ubiquiti things
First and foremost, Ubiquiti doesn't fit the usual consumer-grade mould, for example, they make gear like this:

For when you absolutely, positively need to stream data at 450Mbps over a 30km range! It's full on gear and when you browse through their product page you get a sense of who they target. There's a lot of gear there you'll find in an office or commercial environment and it's bereft of pretty colours, gamer-style antennas and other warm, fuzzy, touchy-feely things. It's stuff that has purpose.
But here's the thing - it's all pretty single-purpose stuff too. The consumer gear crams everything into one box that tries to do everything which you then sit in a corner and it's "job done". For example, the Linksys I was replacing is The Homer:

Go down the Ubiquiti path and you're buying different bits for different purposes. Instead of being a single purpose Homer, it's multiple individual vehicles: one is a two seat Italian supercar, another is a people mover, then there's a track day special and yes that means more things but they each do what they do extremely well without the compromises of multi-purposing. Want DHCP? That's a device. Want wifi? That's a different device. Hard-wiring some bits? Another device.
All these devices take some planning so let's get onto how I put it all together.
Requirements and design
Because not having an all-in-one device was a bit foreign to me, I decided I needed to crowdsource some help on this one. I'd had a bunch of chats with people online about this but it was tricky in short Twitter discussions so I wrote the whole thing up in a Gist about building Troy's network which I'll embed here as it explains the background and design decisions really well:
Let me clarify a few important points here:
- The house is large - 500 square meters is 5,381 square feet - and it's spread out over 3 levels
- Going back to the first para of this post, I wasn't going to take any chances this time and I wanted to overcompensate
- I decided I didn't need 3 switches after all, I'd run the lounge devices (Apple TV, Xbox, etc) off wifi and save on the extra network hardware
Do have a read of the comments on that Gist too and while I'm here, a big thanks to Drew Davies and Nick Craver who were enormously helpful in sanity-checking what I was doing.
Ordering and what's in the box
With the design in the Gist above now pretty much solid, I ordered all the bits locally. I'm always pretty transparent in these posts so here's what they cost me (all Australian dollars so take off about 24% for USD, 31% for EUR or 38% for GBP):
- The 5 pack of wireless access points: $1,077
- The 2 switches: $762
- The Security Gateway: $197
- The Cloud Key: $139
Edit: For the fellow Aussies who have been asking, the local eBay sellers I bought from are cedge_computers and oz_atg and I had a perfect buying experience from both.
These were all via local sellers on eBay with strong histories I was confident I could get support from. I could have bought them cheaper from overseas or via less reputable sellers, but I didn't want to take chances. Yes, it's nearly $2.2k but I'll eBay the 2 Linksys wireless routers (the faulty one goes back to them, they sent me a brand new one that's still boxed) and the 2 Linksys switches I have and that'll be about a quarter of the Ubiquiti cost right there. The remainder is spent with pre-tax dollars and I'll get at least half a decade out of it so back of the napkin, it'll take less than 50c a day out of my pocket for something that's an absolutely critical part of what I do professionally, as well as personally. I could also have saved about half the cost by using a single switch (I could repurpose one of the Linksys switches) and only a couple of wireless access points. I was happy to pay to overdo it, but you get the point - you can do it a lot cheaper.
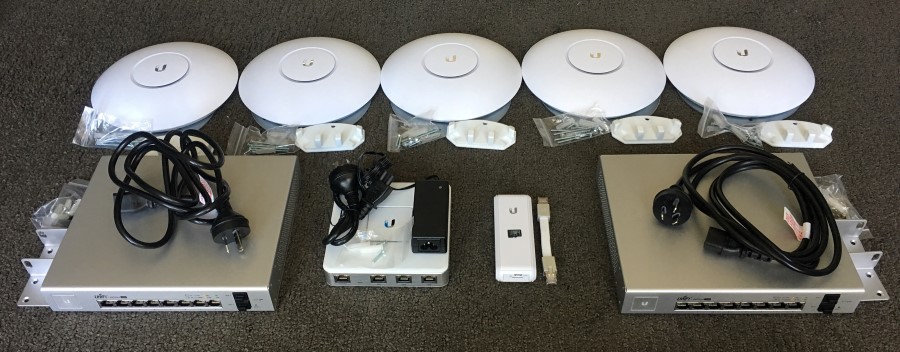
Anyway, I order all the gear whilst away on my mega-trip and collected it all when I got home. I captured the following Periscope video as I unboxed it all:
LIVE on #Periscope: Unboxing a whole bunch of shiny Ubiquiti network bits https://t.co/cKBtgy6PWx
— Troy Hunt (@troyhunt) October 24, 2016
And once arranged in a pretty, photogenic fashion:
All that is just the warm-up though, let's now make some stuff work!
Getting the basics working
I wanted to start with just the most fundamental bits working which in my mind, meant this:
Modem -> Security Gateway -> Switch -> Cloud Key
So I did just that: the modem was the only hangover from the old setup so that stayed and I plugged it directly into the Security Gateway. These were sitting next to each other in my lounge room (because that's where the cable for the web enters the house) so it was a no-brainer. I needed the Cloud Key in order to actually control everything though which meant I also needed a switch to plug it into. I went out from the Security Gateway, into a wired ethernet port in the lounge room, out through the patch board into the garage and then into the Ubiquiti switch. Plug the Cloud Key into that and it's job done.
I connected my laptop into the switch via ethernet and browsed over to the Cloud Key admin interface. Everything worked immediately and frankly, I chucked out the instructions after the first few minutes and just followed the on-screen prompts. I'm not even going to bother repeating the steps here because it's ridiculously easy - there's no story to be told in clicking the "next" button!
I patched the point which terminates in my study and dropped in another switch up there. This then gave all my study bits connectivity as well (desktop PC, NAS, printer).
Then I patched a bunch of points around the house for the wireless access points, each one ultimately terminating at the Ubiquiti switch in the garage which provides them power over ethernet. The only other step required now was to "adopt" each access point which literally meant a button click and now it was under control with all the other UniFi enabled devices.
Let me just qualify that term too - "UniFi": it's actually very simply explained on their UniFi page:
UniFi is the revolutionary Wi-Fi system that combines Enterprise performance, unlimited scalability, a central management controller and disruptive pricing
Right... In more simple terms, it unifies (get it?) all the management into the one portal run off the Cloud Key which makes for a neat management experience. All my bits are aligned with the UniFi product line (other Ubiquiti bits aren't) which makes for a nicely integrated experience.
All said and done, I ended up with this:

1 Security Gateway, 2 switches and 5 wireless access points. Beautiful! Let's set them up.
Configuring the wired bits
This was all a piece of cake and it literally consisted of me working through the menus and thinking "I wonder what this does..." For example, when I drill down into the switch I put in the garage at the patch board by clicking on the device in the image above, I found this:

Already you'll start to see a lot of info not exposed by your usual consumer-grade stuff. There's more again in the uplink section:

There's the Security Gateway sitting upstream of the switch and the activity it's both seen and is seeing. Here's everything downstream of the switch:

You can see that I have 4 wireless access points plugged directly into the switch as well as the other switch in the study. If I was to drill down on that one, I'd see another access point connected directly to it.
In the earlier image, you may have noticed the coloured indicators across the top of the properties window, let's take a closer look at those:

I love how much information is coming back here. For example, port 5 is only talking at 100/10Mbps, the slowest of the lot. That's because it's connected to the base station for my NetGear Arlo security cameras and inevitably it doesn't require quite the same throughput as the things on the other ports. Speaking of which, there are 5 ports using PoE which is the Cloud Key and 4 of the wireless access points. The 1Gbps port with no PoE links to the switch in the study and whilst all this may be more information than what I actually need, it doesn't get in the way of the essential stuff.
Moving on, I used the configuration section of the switches to name them logically and then did the same with the access points:

There's obviously there's a heap more configurability beneath there and I won't delve into all of it, but you're getting a pretty good idea of what goes on by now anyway.
Configuring the wireless bits
Onto the wifi and it's a case of dropping into the wireless networks section and just creating a new one:

You can go a whole lot deeper on things like rate and beacon control too if you want to get down to that level:
![]()
What I really like about Ubiquiti's approach is that whilst you can get down to this very fine level of control from within the UI, it never gets in the way of configuring the fundamentals. I don't have a need for rate and beacon control and I don't see it by default or even when drilling down into the advanced options (it's collapsed by default), but when I need it, it's easy to find.
Once the wifi is configured, it's pushed out to all the access points. Remember, this is all being set up on the Cloud Key and the config then needs to be applied as required, but that happens automatically when you save any settings. It's a seamless experience.
As with the switches, there's a heap of configuration options once you drill down into an access points:

Of particular "cool factor" is stuff like the spectrum analysis which allows you to run an RF scan on the network from any access point:

That's 5G from the living room drilled down on channel 100 usage, here's 2G as well:

This can be great for identifying where you might have interference on certain channels within the environment.
Then there's band steering:

Apparently, clients aren't always the best at connecting to 5G when it's supported and will often fall back to 2.4G. There's a good discussion on this in the Ubiquiti forum (in fact there are many good discussions on the forum with lots of support from Ubiquiti themselves) but in short, it should encourage your things to communicate via the faster 5G network. I actually only configured this while writing this blog a week after setting up the network and I found a lot of 5G capable devices were on 2.4G. Now having said that, I still see a lot of 5G capable devices on 2.4G which doesn't bother me for devices like the iPhone, but I need to look a bit further at why my laptop in particularly may not be jumping onto the faster network at every available opportunity.
So ultimately, I ended up with 5 wireless access points spread around the house with each supporting both 2.4G and 5G but "steering" clients towards the latter. Roaming around between them is seamless; I have absolutely no idea when, for example, my iPhone jumps between access points whilst on a Skype call. The device seamlessly roams between APs and it makes the whole experience as slick as I could imagine with no noticeable change in behaviour as I move around the house. However, I can always find out what the phone did by looking at the events:

I went out of range at 08:17 when I took my son to school, not returning home until 11:11 at which time I wandered around the house a bit until the time of writing at midday. What an excellent way to track the comings and going of your significant other! Or perhaps older kids ("I know how late you were out, the network told me!"). And in case you're wondering, yes, I named my network HTTP403 :)
But I'm getting ahead of myself, let's get everything reconnected.
Reconnecting everything
By far, this was the most painful bit of the entire install. Combine a strong WPA2 password with many devices and a bunch of them not being things you can easily enter anything into and you've got yourself an evening of tedium. For example, I have a WeMo switch for the coffee machine and if you change your router you have to restore the device to its original settings which means re configuring things like schedules too. I also ended up entirely reconfiguring the Sonos as well and the Withings scales were painful to connect again. But it's a one off - you do it and you're done - and that means you get a really shiny dashboard:

I love this. I love that I can see everything that's connected (I did have to name each device as I showed with the switch earlier on), I love seeing where it's connected to and I love seeing which devices are active. When I snapped this, I'd just fired up the W540 after being dormant for a long period and it was downloading updates. My wife was watching Netflix on the Apple TV in the lounge room and the Yoga 900 was downloading an update. For folks like me that love visibility into this sort of thing, it's like being a kid in a candy store.
There's just information everywhere. For example, here's what I'm seeing on my iPhone:

If I drill into the history, I can see what its been doing data wise recently:

I did an iOS update last night so it pulled down quite a bit, plus it did the usual iCloud backup thing so pushed up 163MB.
But here's the big question most people have in mind when implementing wifi: is it fast? Let's start with one easily quantifiable figure and that's the speed test embedded in the tweet at the start of this post. It's 40Mbps down and as for the up speed, well, we try not to talk about that in Australia (it's almost impossible to get more than 2Mbps up in the home unless you're on the National Broadband Network). That was on 5G with the Linksys gear, here it is on 5G with Ubiquiti:

That's healthy! In fact, it's as fast as my connection will go - I even saw a few Mbps less just now when I tried it on my desktop PC wired directly into the switch. Now of course there's lots of factors involved here as well, not least of which is the proximity to the AP and if there's any obstructions. In my case, it was about 6m away and separated by a concrete wall. But what I'm happy about is that this is my Lenovo P50 sitting on the kitchen bench where I so frequently use it and I'm now getting the maximum possible speed through to the internet which is what was most important for me.
This is by no means a comprehensive test, but it's the one that most mattered to me. If you want to get into more technical detail, check out the post titled Ubiquiti UniFi made me realize how terrible consumer Wi-Fi gear is on Ars. That pretty much sums it up for me too :)
Now all this is cool, but wait until you see the next bit...
Analysing the network
I wanted to leave this until now because it doesn't make a lot of sense until everything is plugged in and traffic is being captured, so here it is, in all its glory:

Need a quiet moment to yourself? Yeah, it's that good. Let's go through it bit by bit from top to bottom:
- The 44ms latency is what I'm getting on the outbound connection and I'm pulling down 49Mbps whilst pushing up 0.94
- I've got 1 WAN device which is the Security Gateway
- I've got 2 LAN devices being the switches
- There are 5 WLAN devices which are the access points
- Download throughput and latency are self-explanatory and show traffic patterns that align with waking hours
- The devices on the 2.4G and 5G channels are represented by little dots
- I've got 8 network devices serving 18 clients that have transferred 217GB of traffic since I set this up
That last stat is extra cool and it's enabled once you turn on deep packet inspection (DPI). Here the Security Gateway is inspecting the traffic so that it can give you reports like this:

DPI is actually still indicated as being in beta at the time of writing and there are a few rough edges but it's still very well presented. For example, there's a lot of Dropbox traffic in there, let's see who that's coming from:

Ok, that'd be mostly me then! Now just in case anyone asks, yes, Dropbox traffic is encrypted but a man in the middle can still observe the service the traffic is going to and which clients are sending it hence the ability to do visualisations like this.
Actually, the Dropbox graph is a good example of where it's still a little bit rough. We're seeing 87.2GB but it's not immediately clear what duration this is over (I assume since day 0). The clients beneath it are also a bit misleading - we're looking at current activity here as opposed to historical shares of the 87.2GB pie. But hey, it's beta and once the data exists they can always but more intuitive visualisations over it later on.
In fact, to the point about later updates, Ubiquiti is actively working on new features:
@troyhunt Thanks! I think you'll like this topology view when it's out later this year - particularly because you have the full UniFi kti! pic.twitter.com/wjVc8hCVrY
— Brandon Gilles (@UBNT_Brandon) October 25, 2016
This is one of the things I'm excited about and it's not just that software is being maintained, it's that they're actively adding features. I've never had a home access point that's done that and frankly, I've been lucky to ever see any updates of any kind on most of them!
Guest network
Just a quick one here - of course there's the ability to create a guest network:

What did surprise me though is the extent to which it can be customised which is, well, pretty full on:

This brings us back to the premise that this isn't a consumer product and that it's designed to support all sorts of use cases you're not going to see in the home. Changing the authentication to "Hotspot", for example, allows you to configure voucher and payment based authorisation.
Finally, on the guest side of things, there's easy access to filtering down the subnets available on that network which is pretty handy in terms of keeping guests isolated but also having the ability to give them access to certain devices if desired:

Other controls
There's more configurability than what I have time to cover, but let me give you just a sense of things.
I could decide that I want to limit the speed some users can achieve by setting upload and download limits in a new user group:

I can then create a new wireless network and apply the group to it:

And because this is for the kids, I've also restricted their hours so they're offline by 18:00 when it's a school day the next day, but they have until 20:30 when the following day is free.
Mobile clients
For me personally, these aren't particularity important as I'm always close to a PC which is going to be a much better experience if I'm configuring anything, but they've actually got pretty neat iOS clients:


Actually, the one surprising thing I found was that the mobile clients seem to be the only place where I can see which devices are on 2.4G versus 5G! Not sure entirely why that is (a possible answer is that I'm simply missing it on the portal), but here we are.
Other bits
A few other things that have come up as I've been researching, configuring and sharing progress online:
There's some contention about whether or not you should have a Security Gateway or an Edge Router, there's even a video dedicated to the discussion. The tl;dr is that the Security Gateways works with the UniFi ecosystem which gives it nice integration but lacks the power and configuration of the Edge Router. The latter has greater configurability around more complex network setups and also adds support for things like... DPI! But this is a 5-month-old video and since that time, things have moved on and obviously, DPI is a great example of something that's now in the Security Gateway too. You'll also notice that it's a very different looking portal in my screen grabs and clearly a lot of work has gone into the software since the video was recorded. I'm sure there's still not quite feature parity, but it's worth doing the research based on what's actually supported today and what's important to you personally.
One criticism I've seen is that the guts of the Ubiquiti gear is essentially just consumer grade chipsets. I'm not sure this is necessarily a detrimental attribute though - using chips from the one manufacturer across various other downstream hardware vendors is very common. It's also worth nothing that's a 2-year-old post and things may have moved on since then, but I'm just not sure that common components are really a story.
There's a bunch of other stuff I haven't touched on here because I haven't had the need to: VLANs, site to site VPNs, airtime fairness and so on and so forth. If you want more info on these, a combination of the Ubiquiti website and their forum should have you well and truly covered. Or just ask a question in the comments below and I'll do my best to answer it.
But do I trust the security of them?
I'm going to touch very briefly on this simply because people have asked the question and it deserves an answer. I have no less confidence in the security of Ubiquiti gear than I did with Linksys or any other provider for that matter. That's a very caveated statement because frankly, it's not something I've delved into. I don't want to delve into it either; I have so many devices, apps and all manner of other connected things that I simply don't have the time or inclination to delve into all of them.
One area where Ubiquiti does come up security wise though is when they featured in DDoS attacks last year. This was not their finest hour - vulnerabilities in their gear caused equipment to be enslaved in botnets which is not what you want to see happened with your network things. Unfortunately, this is what does tend to happen with network equipment on an alarmingly regular basis, just check out some of the examples involving CSRF on routers.
Where I do have more confidence in Ubiquiti than the other players I've dealt with before is in what I mentioned earlier, namely that they're maintaining their things. The product is being improved and the software regularly updated. They're used to shipping updates and that gives me a great degree of confidence that when they next need to fix a vulnerability (and there will be a next time - everyone is in this boat), they should be well-positioned to do it quickly.
Summary
Obviously, I like the gear :)
I've been running the setup described above for a week now and it's been rock solid. Great coverage, no drop outs like before and some very interesting insights about what my devices are doing which I never knew before. But you'd expect all that, especially as I over-compensated on APs!
What I didn't expect was how easy it would be. I was admittedly daunted when I first started investigating this setup what with the Security Gateway and the Cloud Key and other concepts I'd never had to consider in the home before. But I wouldn't do it any differently and if you're reading this and thinking "It's nice, but it's pricey", ditch one of the switches off my config and stick with 1 or maybe 2 APs depending on the size of your place and call it done.
Just do it - you'll never look at home networking the same again!
Update: This post was so well-received and led to so many other people implementing Ubiquiti that they sent me a box of goodies. I subsequently wrote about How I finally fixed the dodgy wifi on my jet ski with Ubiquiti's UniFi Mesh so check that post out too. I also later followed up with Wiring a home network from the ground-up with Ubiquiti which explains how I set my brother's new house up, including things I wish I'd been able to do in the post above.